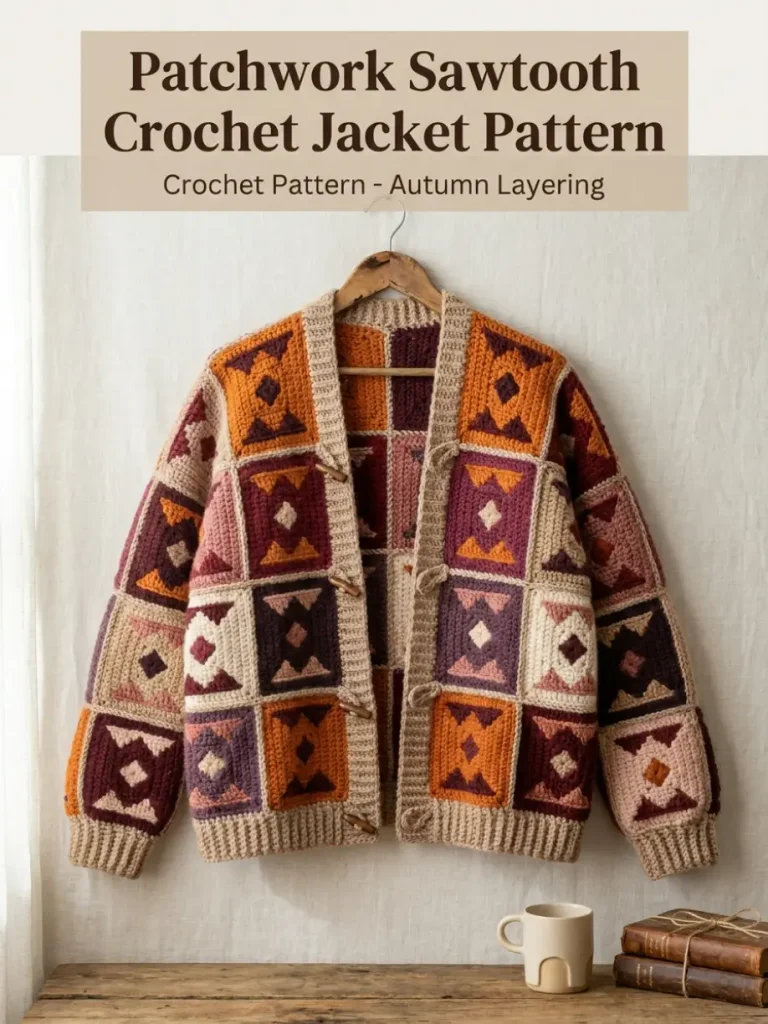
There is something especially cozy about a crochet jacket that looks as though it came straight from a handmade patchwork quilt. This colorful crochet jacket combines bold geometric motifs, warm woolly texture, and an intentionally relaxed shape that makes it perfect for layering.
The design uses individual crochet sawtooth-inspired blocks joined into larger panels, so you can work with one small section at a time instead of carrying a full garment around. It is also a wonderful stash-busting crochet project because every block can feature a different combination of warm autumn colors.
DESCRIPTION
This patchwork crochet jacket has an oversized, slightly boxy silhouette with dropped shoulders, long straight sleeves, an open front, and decorative toggle closures. Geometric crochet blocks create a heritage-quilt-inspired surface using deep berry, pumpkin, plum, dusty pink, burgundy, cream, and beige shades. Each block combines a solid background with contrasting stepped triangular details that create the recognizable sawtooth effect. The finished jacket is substantial enough to wear as crochet outerwear during cool spring mornings, autumn walks, and chilly evenings.
MATERIALS
- Worsted or light aran weight yarn
- Approximately 1,800–3,800 yd depending on size
- 5 mm crochet hook
- 4.5 mm crochet hook for edging
- 8 yarn colors for the patchwork effect
- Yarn needle
- Scissors
- Stitch markers
- Measuring tape
- 3 wooden toggle buttons
- Blocking mats and pins
Suggested palette:
- Pumpkin orange
- Oxblood
- Deep berry
- Plum
- Dusty rose
- Dark burgundy
- Warm beige
- Soft blush
A two-color version also works beautifully if you prefer a more minimal crochet jacket.
ABBREVIATIONS
- ch – chain
- sc – single crochet
- hdc – half double crochet
- dc – double crochet
- sl st – slip stitch
- st(s) – stitch(es)
- RS – right side
- WS – wrong side
- BLO – back loop only
- rep – repeat
PATTERN NOTES
This is an original crochet jacket pattern inspired by traditional geometric quilt motifs.
US crochet terminology is used throughout.
The jacket is constructed from individual rectangular crochet blocks. The blocks are joined into larger vertical strips, which are then assembled to create the back, two front panels, and sleeves.
The relaxed construction is intentionally oversized. Choose a finished chest measurement approximately 8–12 in / 20–30 cm larger than your actual bust or chest measurement.
Approximate finished chest circumference:
- Size 1: 40 in / 102 cm
- Size 2: 48 in / 122 cm
- Size 3: 56 in / 142 cm
- Size 4: 64 in / 163 cm
- Size 5: 72 in / 183 cm
Difficulty: Intermediate
The jacket can easily be adjusted because the construction is modular.
Gauge
14 hdc x 11 rows = approximately 4 in / 10 cm after blocking.
Exact gauge is less important than achieving consistent block measurements.
Each finished block should measure approximately 8 in wide x 8 in tall after blocking.
STEP-BY-STEP INSTRUCTIONS
BASIC CROCHET QUILT BLOCK
Each block begins as a square worked in half double crochet.
Using Color A:
Ch 29.
Row 1
Hdc in second ch from hook and in each ch across.
28 hdc.
Turn.
Rows 2–22
Ch 1.
Hdc in each st across.
Turn.
Fasten off after Row 22.
The block should measure approximately 8 x 8 in after blocking.
Make additional blocks in different background colors.
SAWTOOTH COLOR DETAIL
The stepped sawtooth sections are crocheted separately and sewn onto the background squares. This keeps the colorwork beginner-friendly and gives the jacket its bold quilted appearance.
Using Color B:
Ch 4.
Row 1
Hdc in second ch from hook and remaining 2 ch.
3 hdc.
Turn.
Row 2
Ch 1.
2 hdc in first st.
Hdc across.
4 hdc.
Turn.
Row 3
Ch 1.
Hdc across to final st.
2 hdc in final st.
5 hdc.
Turn.
Continue increasing one stitch every row until the triangle contains 10 hdc.
Fasten off.
Make four triangles for each full quilt block.
Arrange the triangles around the center of the square so their widest edges face outward and their points face toward the center.
Leave a small central diamond of the background color visible.
Using matching yarn and a yarn needle, carefully sew each triangle onto the square.
This creates the stepped geometric sawtooth appearance.
COLOR LAYOUT
For the rich patchwork appearance, alternate both the background and triangle colors.
Example combinations:
Block 1:
Pumpkin background with burgundy triangles.
Block 2:
Dusty pink background with plum triangles.
Block 3:
Berry background with beige triangles.
Block 4:
Cream background with dark cherry triangles.
Block 5:
Oxblood background with blush triangles.
Block 6:
Plum background with pumpkin triangles.
Avoid placing identical color combinations directly beside one another.
The irregular color placement is part of the handmade quilt-inspired look.
BACK PANEL
Arrange completed blocks into vertical columns.
For a shorter jacket, use 3 blocks vertically.
For a longer jacket, use 4 blocks vertically.
Approximate layouts:
Size 1:
5 blocks wide.
Size 2:
6 blocks wide.
Size 3:
7 blocks wide.
Size 4:
8 blocks wide.
Size 5:
9 blocks wide.
Lay the blocks on a flat surface before joining so you can balance the colors.
With RS facing, whip stitch or mattress stitch neighboring blocks together.
Join the vertical blocks first.
Then join the columns together.
Block the complete back panel before continuing.
FRONT PANELS
Each front is approximately half the width of the back, allowing space for the front opening and edging.
Make two mirrored panels.
Suggested widths:
Size 1:
2 blocks per front.
Size 2:
3 blocks per front.
Size 3:
3 blocks per front.
Size 4:
4 blocks per front.
Size 5:
4 blocks per front.
Use the same number of blocks vertically as the back.
Arrange the blocks so the two fronts are visually balanced without making them perfectly identical.
Join the blocks securely.
SHOULDERS
Place the front panels against the back panel with RS together.
Align the outside shoulder edges.
Beginning at each sleeve edge, seam approximately:
Size 1: 6 in
Size 2: 7 in
Size 3: 8 in
Size 4: 9 in
Size 5: 10 in
Leave the center back neck section open.
Turn the body RS out.
SLEEVES
The sleeves are also made from patchwork blocks.
For each sleeve, make enough blocks to create a long rectangular panel.
For a standard sleeve:
Arrange 2 blocks across and 3 blocks vertically.
For a wider sleeve, add approximately 1–2 in of plain hdc along each long side after the blocks have been joined.
Sleeve Extension
Join yarn at one long edge.
Row 1:
Ch 1.
Work hdc evenly along the edge.
Turn.
Continue working hdc rows until the desired sleeve width is reached.
Repeat on the opposite edge if needed.
Make the second sleeve to match.
JOINING THE SLEEVES
Lay the body flat with the WS facing upward.
Center the top edge of one sleeve along the shoulder seam.
Pin or mark the center point first.
Working outward from the shoulder, seam the sleeve securely to the body.
Repeat with the second sleeve.
SIDE AND SLEEVE SEAMS
Fold the jacket with RS together.
Beginning at the sleeve cuff, seam along the underside of the sleeve.
Continue directly down the side of the jacket.
Repeat on the opposite side.
Turn the jacket RS out.
CROCHET CUFFS
Using the smaller hook and a contrasting color, join yarn at the sleeve seam.
Round 1
Ch 1.
Work sc evenly around the cuff.
Join with sl st.
Round 2
Ch 1.
Sc BLO around.
Join with sl st.
Repeat Round 2 until the cuff measures approximately 1½–2 in.
Fasten off.
Repeat on the second sleeve.
BOTTOM BORDER
Using the smaller hook, join yarn at one lower front corner.
Row 1
Ch 1.
Work sc evenly across the entire lower edge.
Turn.
Row 2
Ch 1.
Sc BLO across.
Turn.
Repeat Row 2 until the border measures approximately 1–1½ in.
Fasten off.
FRONT AND NECK EDGING
Join yarn at the lower right front corner.
Ch 1.
Work sc evenly:
- Up the right front
- Around the back neckline
- Down the left front
Turn.
Row 2
Ch 1.
Sc BLO in every st across.
Turn.
Repeat for 3–5 rows depending on the border width you prefer.
Fasten off.
This simple ribbed crochet border gives the jacket a clean structured finish while keeping the handmade appearance.
TOGGLE LOOPS
Make three crochet loops along one front edge.
Join yarn where you want the first closure.
Ch 12–16 depending on the size of your toggle.
Sl st back into the same edge stitch.
Fasten off securely.
Repeat for the remaining two loops, spacing them evenly along the upper half of the jacket.
ATTACHING THE TOGGLES
Place the jacket flat with the fronts aligned.
Position one wooden toggle directly opposite each crochet loop.
Sew the toggles securely using strong matching yarn.
Check that the loops slide comfortably over the toggles without stretching excessively.
OPTIONAL CROCHET CORD TOGGLES
For an entirely crocheted finish, you can replace wooden toggles with short rolled crochet cords.
Ch 14.
Sl st into the second ch from the hook and every remaining ch.
Fasten off.
Fold the cord into a small bar shape and sew securely to the jacket.
FINISHING
Weave in every loose yarn end.
Check all motif joins and reinforce any loose corners.
Gently wet block the completed jacket.
Shape the back, fronts, sleeves, cuffs, and borders while damp.
Allow the jacket to dry completely before wearing.
Blocking is especially helpful for this design because it allows the geometric blocks to settle into clean squares and gives the finished garment a polished drape.
TIPS & VARIATIONS
Make It a Stash-Buster
This colorful crochet jacket is perfect for leftover worsted yarn. Keep the yarn weight and fiber content reasonably similar so the blocks maintain consistent dimensions.
Try a Two-Color Jacket
For a graphic modern version, use cream backgrounds with black, charcoal, rust, forest green, or burgundy sawtooth details.
Change the Length
Add another row of quilt blocks to create a long crochet coat.
For a cropped cardigan, use only two or three blocks vertically.
Make the Sleeves Wider
Add several rows of hdc to each side of the sleeve panel before assembling the jacket.
Adjust the Hook Size
If your crochet fabric feels stiff, move up to a 5.5 mm hook.
If your blocks are too loose, try a 4.5 mm hook.
The ideal fabric should feel warm and substantial without becoming rigid.
Yarn Choice
Wool and wool-blend yarns create the most traditional outerwear texture.
Acrylic or acrylic-wool blends are excellent alternatives when easy washing is important.
Avoid very slippery yarn because the geometric pieces are easier to assemble when the stitches have some grip.
Color Planning
Photograph your blocks before joining them.
Looking at the photograph often makes repeated colors or unbalanced areas easier to notice.
FAQ
Can a beginner make this crochet jacket?
A confident beginner who is comfortable with half double crochet, basic increases, seaming, and garment assembly can make it. Because the jacket is built from small pieces, it can also be a manageable first patchwork crochet garment.
Can I make the jacket without the sawtooth appliqués?
Yes. You can use solid crochet squares for a simpler patchwork cardigan, although the geometric triangles are what give this design its distinctive quilt-inspired character.
How can I make the jacket less oversized?
Choose a layout that gives approximately 4–6 in of positive ease instead of 8–12 in. You can also slightly reduce individual block width by using fewer starting chains while maintaining the same construction method.
CONCLUSION
This patchwork sawtooth crochet jacket is the kind of project that makes choosing colors almost as enjoyable as crocheting the garment itself. The combination of warm yarn, oversized geometric blocks, contrasting borders, and simple toggle closures creates a cozy handmade layer with plenty of personality. Make yours in rich autumn shades, use up a collection of favorite yarn scraps, or choose just two colors for a completely different look. Save this free crochet jacket pattern and experiment with a palette that feels entirely your own.



