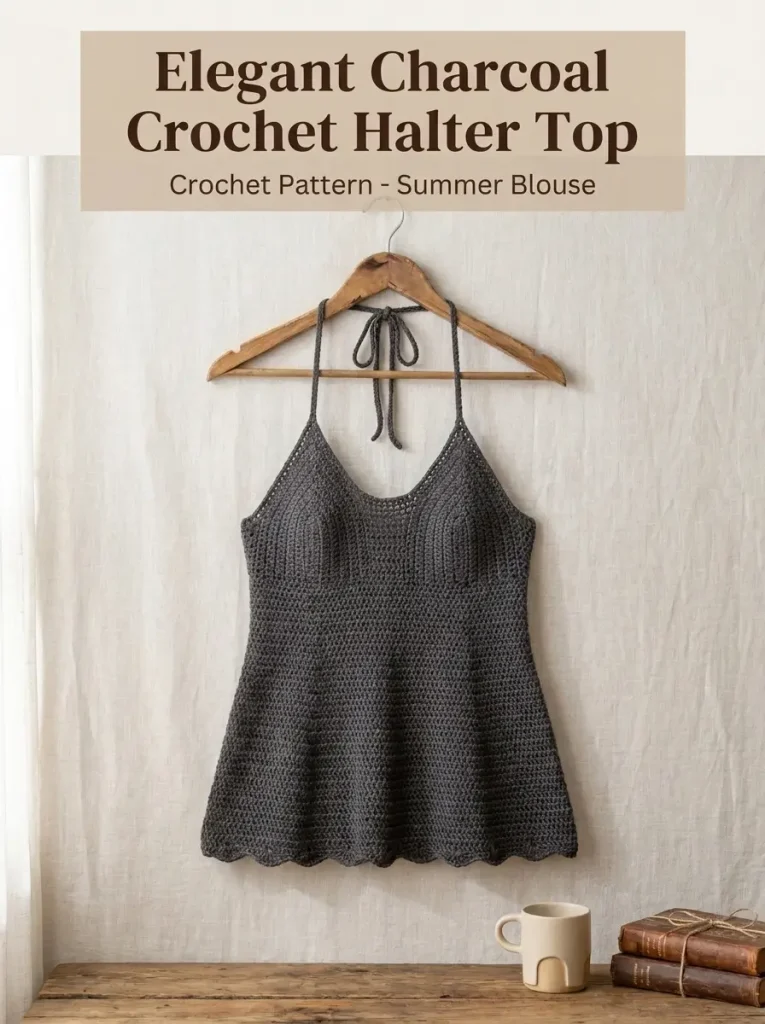
The Elderflower Crochet Halter Top is a lightweight summer blouse with a soft, fitted bust and an easy, flowing shape through the waist and hips. Its simple halterneck construction gives it a delicate, minimal look that works beautifully with skirts, linen trousers, shorts, or layered under a light cardigan.
This version is designed as an original made-to-measure crochet pattern inspired by the clean silhouette shown in the reference image. The slim straps, gently scooped neckline, fitted upper section, subtle under-bust shaping, and softly flared body keep the finished top feminine and comfortable without making the construction overly complicated.
Because the pattern is based on your own measurements, you can make it with fingering or sport weight yarn and adjust the length, ease, neckline depth, and flare to suit your preferred fit.
DESCRIPTION
The finished Elderflower Crochet Halter Top is a full-length summer crochet blouse with a fitted bust, narrow halter straps, a softly curved scoop neckline, and a slightly flared body that becomes wider toward the hem. The bust cups are shaped individually before being joined, creating a defined under-bust line while keeping the front smooth and minimal. The body has slight positive ease around the waist and hips for a relaxed drape, while the upper section remains fitted. A gently wavy lower edge and subtle rolled-look finishing complete the lightweight, understated design.
MATERIALS
- Fingering or sport weight yarn
- Approximately 350–650 yd depending on measurements and desired length
- 3 mm to 3.5 mm crochet hook, or size needed to achieve a soft fabric
- Stitch markers
- Measuring tape
- Yarn needle
- Scissors
- Blocking mats and pins
- Optional smaller crochet hook for firmer straps
For the best summer drape, choose a lightweight yarn with good flexibility.
Cotton, cotton-linen, bamboo blends, wool, or lightweight wool blends can all work well.
ABBREVIATIONS
- ch – chain
- sc – single crochet
- hdc – half double crochet
- dc – double crochet
- sl st – slip stitch
- st(s) – stitch(es)
- RS – right side
- WS – wrong side
- rep – repeat
PATTERN NOTES
This is a made-to-measure crochet top rather than a fixed-size pattern.
US crochet terminology is used.
The top is worked in several stages:
- Two shaped bust cups
- Joining and under-bust section
- Crocheted body
- Slightly flared lower section
- Wavy hem
- Halter straps
- Finishing
The upper bust should fit closely without pulling.
The waist and hip section should have approximately 1–3 in / 2.5–7.5 cm of positive ease, depending on how flowing you want the top to be.
Fingering or sport weight yarn is recommended because it creates a lightweight fabric suitable for warm weather.
Measurements You Will Need
Measure:
- Full bust
- Under-bust circumference
- Bust height
- Distance from center bust to center bust
- Desired neckline depth
- Under-bust to natural waist
- Under-bust to desired finished hem
- Hip circumference
- Desired strap length
Write these measurements down before beginning.
Gauge
Make a swatch at least 5 x 5 in / 13 x 13 cm using half double crochet.
Wash and block the swatch exactly as you intend to wash the finished garment.
Measure how many stitches and rows you have across 4 in / 10 cm.
Because this pattern is made to measure, your personal gauge will be used to determine stitch counts.
STEP-BY-STEP INSTRUCTIONS
BUST CUP FOUNDATION
The top begins with two individually shaped crochet cups.
Each cup should measure approximately half the width of the front bust area.
A useful starting point is to measure from the center of your breastbone to the outside edge of your bust.
This becomes the approximate finished width of one cup.
Begin with a foundation chain long enough to measure from the lower center of the bust to the desired top edge of the cup.
For many adults, this will be approximately 5–7 in / 13–18 cm.
Cup Row 1
Ch the required number of stitches.
Hdc in second ch from hook and in each ch until one ch remains.
Work 5 hdc in final ch.
Rotate the foundation chain.
Work hdc along the opposite side of the foundation chain.
Turn.
The group of 5 hdc creates the curved upper section of the cup.
Cup Row 2
Ch 1.
Hdc in each st until you reach the center stitch of the 5-stitch increase from the previous row.
Work 5 hdc into the center st.
Hdc in each remaining st.
Turn.
Following Rows
Repeat Row 2, always placing 5 hdc into the center stitch of the previous increase.
Continue until the cup:
- Covers the breast comfortably
- Reaches the desired width
- Reaches the desired neckline height
- Lies smoothly without pulling
Fasten off.
Make a second cup exactly the same size.
ADJUSTING THE CUP SHAPE
Before joining the cups, hold them against your body or pin them temporarily to a fitted shirt.
The inside upper edge should create a gentle scoop rather than a sharp V-neck.
If the cups feel too narrow, add another shaping row.
If they are too tall, stop earlier.
If additional side coverage is required, attach yarn along the outer edge and work one or more short rows of hdc.
Make both cups symmetrical.
JOINING THE BUST CUPS
Place both cups side by side with the lower edges aligned.
Position them so the center edges meet naturally without overlapping.
Join yarn to the lower inside corner of the first cup.
Work sc evenly along the lower edge of the first cup.
At the center:
Ch 1 if necessary to bridge a very small gap.
Continue working sc across the lower edge of the second cup.
Turn.
UNDER-BUST BAND
The under-bust section helps stabilize the top and creates the subtle horizontal line visible beneath the bust.
Row 1
Ch 1.
Hdc across.
Turn.
Row 2
Ch 1.
Hdc across.
Turn.
Continue until the band measures approximately 1–1½ in / 2.5–4 cm.
Try the piece against your body.
The width across the front should cover approximately half of your under-bust circumference.
BACK EXTENSIONS
The body can be worked in the round after creating short extensions from each side of the front.
Join yarn to one outer lower edge.
Work hdc rows until the extension reaches approximately one-quarter of your under-bust circumference.
Fasten off.
Repeat on the opposite side.
The total width of:
- Front section
- First extension
- Second extension
should approximately equal your under-bust measurement.
Allow a small amount of negative ease at the under-bust if your yarn stretches significantly.
JOINING THE BODY
With RS facing, join the two back edges with a sl st.
You will now work the body in joined rounds.
Place a stitch marker at the center back.
UPPER BODY
Round 1
Ch 1.
Hdc evenly around.
Join with sl st to first hdc.
Round 2
Ch 1.
Hdc in each st around.
Join with sl st.
Repeat Round 2 until the body reaches your natural waist.
Try the top on regularly.
The fabric should begin fitted beneath the bust and gradually relax toward the waist.
ADDING POSITIVE EASE
To create the slightly flowing silhouette, begin increasing slowly through the lower body.
A gentle increase rate works better than adding many stitches at once.
Increase Round
Ch 1.
Hdc around, placing approximately 4 evenly spaced increases.
To increase:
Work 2 hdc in the same stitch.
Join with sl st.
Plain Rounds
Work 2–4 plain rounds of hdc between increase rounds.
Continue alternating plain rounds and increase rounds until the circumference comfortably fits your hips with approximately 1–3 in / 2.5–7.5 cm positive ease.
LOWER BODY
Continue working even rounds of hdc until the top reaches approximately 1–2 in / 2.5–5 cm shorter than your desired finished length.
The finished top should fall smoothly from the fitted bust without clinging tightly around the stomach or hips.
WAVY BOTTOM EDGE
The lower edge features a gentle wave rather than a dramatic ruffle.
Hem Round 1
Ch 1.
Sc in each st around.
Join with sl st.
Hem Round 2
Ch 1.
Repeat:
Sc in next st.
Hdc in next st.
2 dc in next st.
Hdc in next st.
Sc in next st.
Repeat around.
Adjust the final repeat slightly if your stitch count does not divide evenly.
Join with sl st.
Hem Round 3
Sl st loosely in each st around.
Fasten off.
This creates a small soft wave while keeping the hem lightweight.
SUBTLE ROLLED-LOOK HEM
If you prefer a slightly more understated edge, replace the decorative wave with three rounds of sc.
The edge may naturally curl very slightly outward depending on your yarn and tension, creating the softly rolled appearance.
Do not aggressively block this curl flat if you want to preserve the effect.
NECKLINE EDGING
Join yarn at the outer upper edge of one cup.
Ch 1.
Work sc evenly:
- Along the outer cup
- Around the curved neckline
- Across the center
- Around the second cup
Keep your stitches relaxed so the neckline does not pull.
Fasten off.
For a firmer neckline, work one additional round of sl st.
HALTER STRAPS
The thin straps are crocheted directly from the upper outside corners of each cup.
Join yarn to the top corner of the first cup.
Strap
Ch until the strap reaches your required length.
For a delicate strap:
Sl st into second ch from hook and every remaining ch.
Fasten off securely.
Repeat for the second strap.
Tie the straps behind your neck.
THICKER CROCHET STRAPS
For slightly wider straps:
Ch 3.
Row 1
Sc in second ch from hook and next ch.
2 sc.
Turn.
Following Rows
Ch 1.
Sc in each st.
Turn.
Repeat until the strap reaches the desired length.
Fasten off.
Repeat for the second side.
OPTIONAL BACK TIES
If you want additional adjustment around the upper body, add ties to the back edge before joining the body permanently.
Crochet two cords using the same method as the halter straps.
This works especially well when using yarn with limited stretch.
FINISHING
Weave in all yarn ends carefully.
Pay extra attention to:
- Cup joins
- Strap attachments
- Under-bust joins
- Center back seam
These areas receive the most tension during wear.
Wet block the finished top gently.
Shape the cups with your hands while damp rather than stretching them completely flat.
Allow the lower body to dry with its natural flare.
Gently shape the wavy hem without flattening the texture.
TIPS & VARIATIONS
Use Fingering Yarn for Maximum Drape
Fingering weight yarn creates a delicate, lightweight fabric similar to a thin summer blouse.
Use a hook large enough that the fabric feels flexible rather than stiff.
Try Sport Weight Yarn
Sport weight yarn creates a slightly more substantial top and works especially well if you want additional coverage.
Adjust the Neckline
For a deeper scoop, position the cups slightly farther apart before joining.
For more coverage, position them closer together and add an extra edging row around the neckline.
Make It Cropped
Stop the body at the natural waist and work the wavy edging immediately.
This creates a simple crochet halter crop top.
Make It Longer
Continue the lower body until it reaches below the hips for a tunic-style version.
Keep adding occasional increase rounds so the fabric maintains its gentle flare.
Adjust the Flare
For a straighter silhouette, work fewer increase rounds.
For a more pronounced A-line shape, add increases more frequently through the lower half.
Choose Soft Yarn
Because this crochet top sits directly against the skin, softness is especially important.
Always make and wash a swatch before committing to your yarn.
Check Strap Strength
Halter straps carry some of the weight of the garment.
If your yarn stretches easily, use a smaller hook for the straps or reinforce them with an extra row of slip stitches.
FAQ
Is this crochet halter top beginner-friendly?
It is best for an adventurous beginner or intermediate crocheter. The stitches themselves are simple, but you will need to take measurements, adjust the cup size, and calculate the body circumference for your own fit.
Can I make the Elderflower top with cotton yarn?
Yes. Cotton, cotton blends, bamboo blends, lightweight wool, and other breathable fingering or sport weight yarns can all work well. Choose a yarn that creates a soft fabric with enough drape for the lower body.
How should the top fit?
The bust and under-bust should feel fitted and secure without being uncomfortable. The waist, stomach, and hips should have slight positive ease so the lower part falls softly away from the body.
CONCLUSION
The Elderflower Crochet Halter Top is a simple summer wardrobe piece that can be customized completely to your measurements. Its fitted crochet bust, delicate halter straps, gently flared body, and soft wavy hem create an understated silhouette that works beautifully in lightweight yarn. Make it full length like the original inspiration, shorten it into a crochet crop top, or experiment with your favorite summer yarn and neckline depth to create a version that fits exactly the way you want.



