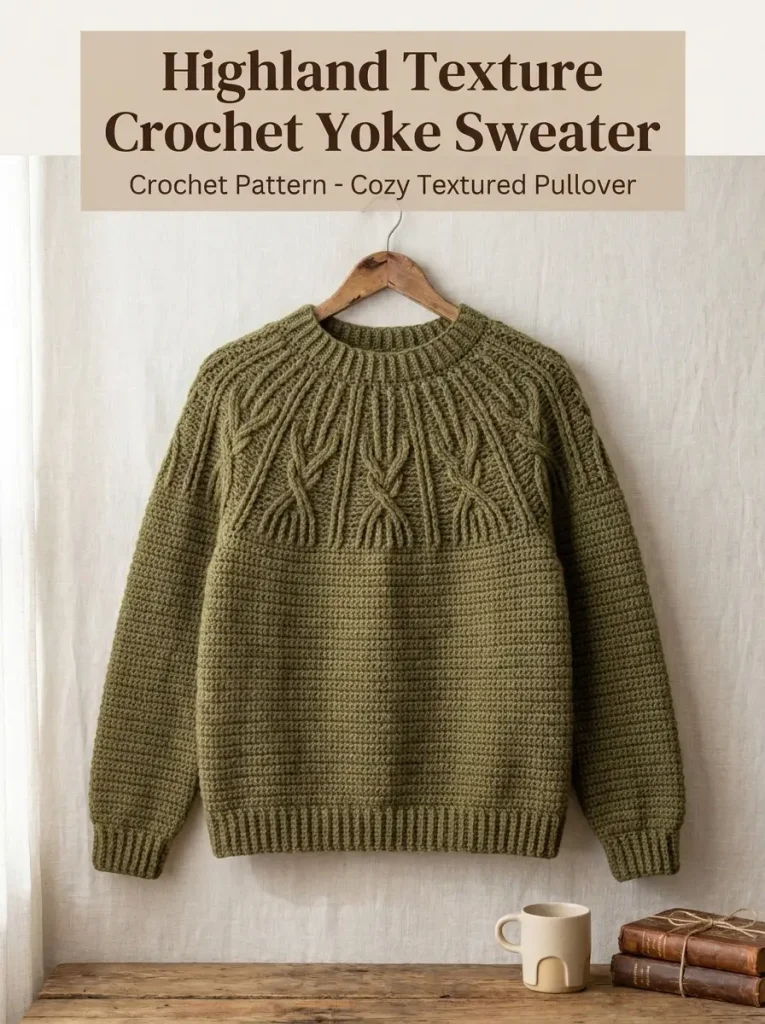
A beautifully textured yoke can turn a simple crochet sweater into something that feels truly special. This top-down crochet sweater combines a fitted ribbed neckline with decorative post stitches, crossed stitches, and subtle raised columns before flowing into a clean, understated body.
The sweater is worked seamlessly from the top down, making it easy to adjust the body and sleeve length as you crochet. The circular yoke creates a comfortable fit through the shoulders, while a small amount of shaping near the lower yoke gives the garment a neat, almost raglan-like transition into the body and sleeves.
DESCRIPTION
The Highland Texture Crochet Yoke Sweater is a classic long-sleeved pullover with a round neckline, circular textured yoke, straight body, and fitted ribbed cuffs and hem. The decorative upper section features alternating raised crochet columns, crossed stitches, and recessed texture that creates an intricate cable-inspired effect without requiring separate pieces. The body and sleeves are kept simple so the detailed yoke remains the focal point. Worked in an earthy olive green DK-weight yarn, the finished sweater has a cozy heritage look with a modern, wearable silhouette.
MATERIALS
- DK weight yarn
- Approximately 900–1,850 yd / 825–1,690 m depending on size and length
- 4 mm crochet hook, or size needed to meet gauge
- 3.5 mm crochet hook for ribbing
- Stitch markers
- Yarn needle
- Scissors
- Measuring tape
- Blocking mats and pins
Suggested yarn fibers:
- Wool
- Wool blends
- Merino
- BFL wool
- Wool and mohair blends
- Fingering yarn held double if gauge is achieved
ABBREVIATIONS
- ch – chain
- sc – single crochet
- hdc – half double crochet
- dc – double crochet
- fpdc – front post double crochet
- bpdc – back post double crochet
- sl st – slip stitch
- st(s) – stitch(es)
- sk – skip
- rep – repeat
- RS – right side
PATTERN NOTES
US crochet terminology is used throughout.
The sweater is worked from the top down.
The construction includes:
- Ribbed neckline
- Circular textured yoke
- Gradual yoke increases
- Lower yoke shaping
- Separation for body and sleeves
- Straight body
- Ribbed hem
- Long sleeves
- Ribbed cuffs
Difficulty: Intermediate.
The raised yoke texture uses front post stitches and crossed double crochet stitches.
Choose a size with approximately 2–6 in / 5–15 cm of positive ease.
Finished Chest Circumference
- Size 1: 34 in / 86 cm
- Size 2: 38 in / 96 cm
- Size 3: 42 in / 106 cm
- Size 4: 46 in / 117 cm
- Size 5: 50 in / 127 cm
- Size 6: 54 in / 137 cm
- Size 7: 58 in / 147 cm
- Size 8: 62 in / 157 cm
- Size 9: 66 in / 168 cm
- Size 10: 70 in / 178 cm
Gauge
18 hdc x 14 rows = 4 x 4 in / 10 x 10 cm after blocking.
For the textured section, exact row gauge is less important than maintaining the correct overall yoke depth.
Make and block a generous swatch before beginning.
STEP-BY-STEP INSTRUCTIONS
NECKLINE
Using the smaller hook, ch:
- Size 1: 81
- Size 2: 89
- Size 3: 97
- Size 4: 97
- Size 5: 105
- Size 6: 105
- Size 7: 113
- Size 8: 113
- Size 9: 121
- Size 10: 121
Being careful not to twist, join with sl st to first ch.
The stitch count should be divisible by 8 after completing the first round.
Neck Round 1
Ch 2.
Dc evenly around, adjusting by one stitch if necessary so your final count is divisible by 8.
Join with sl st.
Neck Round 2
Ch 2.
Fpdc around next 2 sts, bpdc around next 2 sts.
Repeat around.
Join with sl st.
Neck Rounds 3–5
Repeat Neck Round 2.
For a taller neckline, work 1–2 additional ribbing rounds.
Switch to the larger hook.
TEXTURED CIRCULAR YOKE
The yoke texture is formed from groups of raised stitches separated by recessed stitches.
Each decorative section develops outward as the yoke increases.
Yoke Round 1
Ch 2.
Fpdc around next 2 sts, bpdc around next 2 sts, fpdc around next 2 sts, bpdc around next 2 sts.
Repeat around.
Join with sl st.
Yoke Round 2
Ch 2.
Work stitches as they appear:
- fpdc around each raised stitch
- bpdc around each recessed stitch
Join with sl st.
Yoke Round 3 – Increase Round
Ch 2.
Fpdc around next 2 sts, bpdc around next st, 2 bpdc around next st, fpdc around next 2 sts, bpdc around next st, 2 bpdc around next st.
Repeat around.
Join.
This adds two stitches to each texture repeat.
Yoke Round 4
Work each stitch as it appears, using fpdc over fpdc and bpdc over bpdc.
CROSSED TEXTURE SECTION
Yoke Round 5
Ch 2.
Work bpdc across the recessed stitches.
For each pair of raised columns:
Skip the first raised st.
Fpdc around the next raised st.
Working in front of the stitch just made, fpdc around the skipped st.
This creates a small right-crossed cable effect.
Continue around.
Join.
Yoke Round 6
Work all stitches as established without crossing.
Yoke Round 7
Repeat the crossed-stitch placement from Round 5.
Yoke Round 8 – Increase Round
Work in established texture, adding 1 hdc into each recessed section between the raised columns.
Distribute the increases evenly around the entire yoke.
SECOND TEXTURE BAND
Yoke Round 9
Ch 2.
Fpdc around 2 raised sts, bpdc across recessed section.
Repeat around.
Join.
Yoke Round 10
Repeat Round 9.
Yoke Round 11
Cross each pair of fpdc stitches as described in Yoke Round 5.
Work bpdc across all recessed sections.
Yoke Round 12
Work stitches as established.
Yoke Round 13 – Increase Round
Work the established texture while adding one stitch to each recessed section.
Yoke Round 14
Work stitches as established.
Yoke Round 15
Cross the raised stitch pairs once more.
Yoke Round 16
Work stitches as established.
CONTINUING THE YOKE
Larger sizes will require additional yoke depth.
Continue alternating:
- 2 plain textured rounds
- 1 increase round
- 2 plain textured rounds
- 1 crossed-stitch round
Continue until the yoke reaches approximately:
- Sizes 1–2: 7–7½ in / 18–19 cm
- Sizes 3–4: 7½–8 in / 19–20.5 cm
- Sizes 5–6: 8–8½ in / 20.5–21.5 cm
- Sizes 7–8: 8½–9 in / 21.5–23 cm
- Sizes 9–10: 9–9½ in / 23–24 cm
The yoke should reach comfortably to the underarm.
LOWER YOKE TRANSITION
The lower section changes gradually from decorative post stitches to smoother crochet.
Transition Round 1
Ch 1.
Hdc in each st around.
Join.
Transition Round 2
Ch 1.
Hdc around, adding 4 evenly spaced increases.
Join.
Transition Round 3
Hdc in each st around.
Join.
Repeat Transition Rounds 2–3 if additional circumference is required before separating the sleeves.
SEPARATING BODY AND SLEEVES
Lay the yoke flat.
Place four stitch markers to divide the stitches approximately as follows:
- 30% front
- 20% first sleeve
- 30% back
- 20% second sleeve
Adjust the markers slightly if needed so the sleeve divisions sit directly beneath the arms.
Begin at the first marker.
Hdc across the front section.
At the first sleeve:
Ch 6–14 depending on size and desired underarm room.
Skip all sleeve stitches.
Hdc across the back.
Ch the same number of underarm stitches.
Skip the second sleeve.
Join to the first hdc.
Try the sweater on before proceeding.
The yoke should sit smoothly across the shoulders without pulling.
BODY
Body Round 1
Ch 1.
Hdc in each st and each underarm ch around.
Join with sl st.
Body Round 2
Ch 1.
Hdc in each st around.
Join.
Repeat Body Round 2 until the sweater reaches approximately 2–2½ in / 5–6 cm shorter than your desired finished length.
The body shown has a classic straight fit.
For a slightly shaped sweater, work subtle decreases near the waist and increase again toward the hips.
OPTIONAL WAIST SHAPING
Place markers at both side seams.
Every 5–6 rounds, work:
Hdc2tog before each side marker.
Hdc2tog after each side marker.
Repeat for 2–4 decrease rounds.
Work several rounds even.
If more hip room is required, reverse the shaping by working 2 hdc into stitches before and after each side marker.
LOWER RIBBED HEM
Switch to the smaller hook.
Hem Round 1
Ch 2.
Dc in each st around.
Join.
Hem Round 2
Ch 2.
Fpdc around next 2 sts, bpdc around next 2 sts.
Repeat around.
Adjust the final repeat slightly if necessary.
Join.
Hem Rounds 3–6
Repeat Hem Round 2.
For a deeper ribbed band, continue for additional rounds.
Fasten off.
SLEEVES
Join the larger hook and yarn at the center of the underarm.
Sleeve Round 1
Ch 1.
Hdc around the underarm chain and all held sleeve stitches.
Work one additional stitch into each corner where necessary to prevent gaps.
Join.
Mark the beginning of the round.
Sleeve Round 2
Hdc in each st around.
Join.
Sleeve Decrease Round
Ch 1.
Hdc2tog.
Hdc around until 2 sts remain.
Hdc2tog.
Join.
Work approximately 5–8 plain rounds between decrease rounds.
Repeat the decrease sequence gradually until the sleeve fits comfortably around the forearm.
Continue even until the sleeve reaches approximately 2 in / 5 cm shorter than the desired length.
Make the second sleeve to match.
CROCHET CUFFS
Switch to the smaller hook.
If necessary, decrease a few stitches evenly around the first cuff round.
Cuff Round 1
Ch 2.
Dc around.
Join.
Cuff Round 2
Ch 2.
Fpdc around next 2 sts, bpdc around next 2 sts.
Repeat around.
Join.
Cuff Rounds 3–6
Repeat Cuff Round 2.
Fasten off.
Repeat on the second sleeve.
FINISHING
Weave in all loose ends securely.
Check the underarms and close any tiny gaps with matching yarn.
Wet block the completed sweater.
Gently smooth the body and sleeves into shape.
Take extra care with the textured yoke.
Do not aggressively stretch the raised stitches because this can flatten the decorative pattern.
Allow the sweater to dry completely before wearing.
TIPS & VARIATIONS
Choose a Woolly DK Yarn
A slightly rustic wool yarn helps the raised crochet texture remain crisp and defined.
Very slippery yarns can make the crossed stitches less noticeable.
Make the Yoke Stand Out
Solid and lightly heathered colors show textured crochet exceptionally well.
Olive, moss, rust, oatmeal, charcoal, burgundy, navy, and chestnut are especially suited to this style.
Adjust the Neckline
For a closer crew neck, use the recommended starting circumference.
For a wider neckline, begin with one additional 8-stitch repeat.
Always make sure the finished neckline can comfortably pass over your head.
Make a Cropped Version
Stop the body at your natural waist and begin the ribbing.
The textured circular yoke also works beautifully on a cropped crochet sweater.
Make It Longer
Simply continue the body rounds before adding the hem.
For a tunic-style sweater, add occasional increases around the hips.
Add More Yoke Texture
For a deeper decorative yoke, repeat one of the crossed-stitch bands before beginning the smooth lower transition.
Keep the increases distributed evenly so the yoke remains flat.
Check Your Fit Frequently
One of the advantages of a top-down crochet sweater is that you can try it on while working.
Check:
- Neck opening
- Yoke depth
- Bust circumference
- Underarm comfort
- Sleeve width
- Body length
- Sleeve length
before moving to the next stage.
FAQ
Is this crochet yoke sweater suitable for beginners?
It is best for an intermediate crocheter or a confident beginner who already understands working in the round, post stitches, increases, decreases, and basic garment construction. The textured yoke looks complicated, but it is built from repeated combinations of familiar crochet stitches.
Can I use worsted weight yarn?
Yes, but you will need to make a gauge swatch and adjust the stitch counts. A heavier yarn will also create a thicker, more structured sweater than the DK-weight version.
Can I make the sweater without the crossed stitches?
Yes. Replace each crossed pair with two regular front post double crochet stitches. The sweater will retain its raised circular-yoke texture but have a simpler vertical design.
CONCLUSION
The Highland Texture Crochet Yoke Sweater combines the comfort of a seamless top-down pullover with a richly detailed crochet yoke that looks far more complicated than it is to make. The earthy color, raised stitch pattern, classic ribbed edges, and simple body create a timeless handmade sweater that works beautifully for autumn and winter. Choose your favorite woolly DK yarn, customize the body and sleeve lengths, and make this textured crochet sweater in a color you will want to wear year after year.



