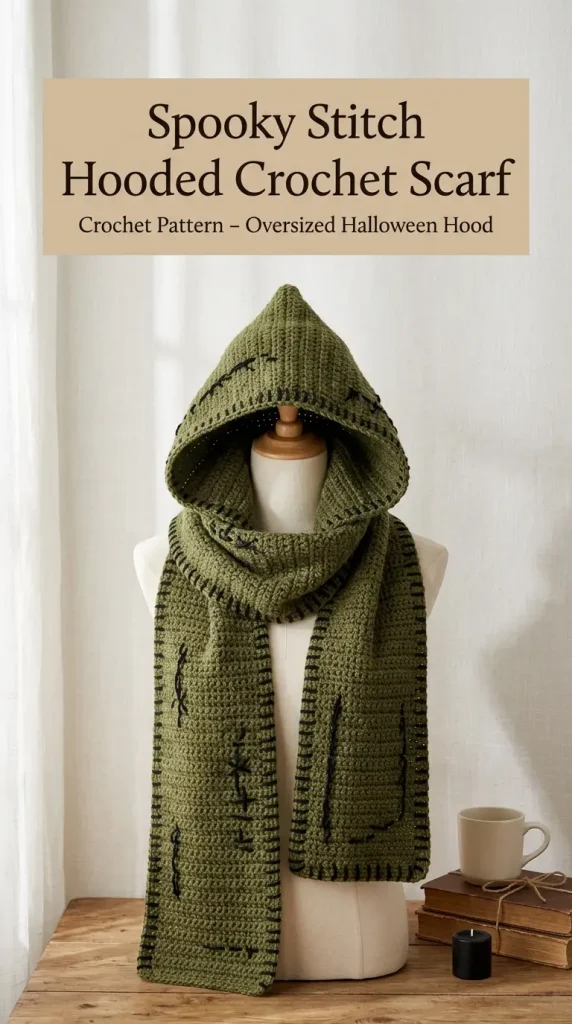
The Spooky Stitch Hooded Crochet Scarf is a cozy statement accessory with an oversized hood, long wrapped scarf, and dramatic contrast stitching around the edges. The soft moss-green yarn gives it an earthy handmade look, while the black surface stitches create a slightly eerie, stitched-together finish that makes it perfect for Halloween outfits, costume styling, and cold-weather wear.
This is an original crochet design inspired by the visible hooded-scarf silhouette in the reference image. The construction stays simple: crochet a long textured scarf, make a roomy hood, attach the hood to the center of the scarf, then finish the edges with bold black decorative stitches.
DESCRIPTION
The finished hooded scarf has a generously sized hood that drapes around the head and face, plus a wide scarf section that wraps comfortably around the neck. The main fabric is worked in textured moss-green crochet with a dense, slightly rustic appearance. Black contrast stitches run irregularly around the hood opening and scarf edges, creating a handmade patched effect. The hood is intentionally oversized and slightly pointed at the crown for a dramatic seasonal look.
MATERIALS
- Aran or worsted weight yarn in moss, olive, or sage green
- Approximately 750–950 yd / 685–870 m green yarn
- Approximately 80–120 yd / 73–110 m black yarn
- 4 mm crochet hook
- 3.5 mm crochet hook for decorative edging
- Stitch markers
- Measuring tape
- Yarn needle
- Scissors
- Blocking mats and pins
ABBREVIATIONS
- ch – chain
- sc – single crochet
- hdc – half double crochet
- dc – double crochet
- sl st – slip stitch
- st(s) – stitch(es)
- BLO – back loop only
- RS – right side
- WS – wrong side
- rep – repeat
PATTERN NOTES
US crochet terminology is used.
The project is made in three main stages:
- Long scarf
- Oversized hood
- Black decorative edging
Difficulty: Confident beginner to intermediate.
The hood should feel roomy rather than fitted.
Approximate finished dimensions:
- Scarf width: 10–12 in / 25–30 cm
- Full scarf length: 70–80 in / 178–203 cm
- Hood height: 15–17 in / 38–43 cm
- Hood depth: 12–14 in / 30–35 cm
Adjust the measurements freely for your preferred fit.
STEP-BY-STEP INSTRUCTIONS
SCARF
Using green yarn and the larger hook:
Ch enough stitches to measure approximately 10–12 in / 25–30 cm.
A typical starting chain will be approximately 38–44 chains depending on your gauge.
Row 1
Hdc in second ch from hook and in each ch across.
Turn.
Row 2
Ch 1.
Hdc BLO in each st across.
Turn.
Row 3
Ch 1.
Hdc in each st across.
Turn.
Repeat Rows 2–3 until the scarf measures approximately 70–80 in / 178–203 cm.
Fasten off.
This alternating texture gives the scarf a softly ridged handmade surface.
HOOD FOUNDATION
The hood is worked separately as a large rectangle.
Ch enough stitches to measure approximately 15–17 in / 38–43 cm.
Hood Row 1
Hdc in second ch from hook and across.
Turn.
Hood Row 2
Ch 1.
Hdc BLO across.
Turn.
Hood Row 3
Ch 1.
Hdc across.
Turn.
Repeat Rows 2–3 until the rectangle measures approximately 24–28 in / 61–71 cm long.
Do not make the hood too narrow. The oversized shape is an important part of the finished design.
SHAPING THE HOOD
Fold the rectangle in half so the short edges meet.
The fold becomes the top of the hood.
With RS together, seam approximately 8–10 in / 20–25 cm down the back edge.
Leave the front open.
Turn the hood RS out.
The top should form a soft point rather than a perfectly rounded crown.
For a sharper point, pinch the top-back corner and secure it with a few discreet stitches.
ATTACHING THE HOOD TO THE SCARF
Lay the scarf flat.
Find the exact center.
Mark approximately 10–12 in / 25–30 cm along the center section.
Align the bottom edge of the hood with this marked section.
Pin or clip in place.
Using green yarn and a yarn needle, whip stitch the hood securely to the scarf.
Keep the seam flexible.
The scarf ends should extend evenly on both sides of the hood.
HOOD FRONT EDGING
Join green yarn to one lower front corner of the hood.
Ch 1.
Work sc evenly:
- Up one side of the hood opening
- Around the top
- Down the opposite side
Turn.
Edging Row 2
Ch 1.
Sc BLO in each st across.
Fasten off.
This creates a slightly firmer frame around the face.
SCARF EDGE
Join green yarn at one corner.
Work sc evenly around the entire scarf.
Place 3 sc in each outer corner.
Fasten off.
This gives the black decorative stitches a stable foundation.
BLACK STITCHED BORDER
Switch to black yarn and the smaller hook.
The black edging should look irregular and hand-stitched rather than perfectly decorative.
Join yarn near the lower scarf edge.
Decorative Stitch
Ch 3.
Skip approximately 1–2 edge stitches.
Sl st into the next stitch.
Repeat loosely around the scarf edge.
Vary the spacing slightly.
Sometimes work:
- ch 2
- sometimes ch 3
- occasionally ch 4
This creates the uneven stitched-together appearance.
Do not make the loops too uniform.
HOOD CONTRAST STITCHES
Repeat the same black decorative edging around the entire hood opening.
For a stronger visual effect, use slightly longer loops around the upper hood.
You can also surface crochet several short black lines along the hood edge.
To surface crochet:
Insert the hook from front to back.
Catch the black yarn behind the fabric.
Pull up a loop.
Insert the hook approximately 0.5–1 in / 1–2.5 cm away.
Pull through again.
Continue for several stitches.
Fasten off.
Repeat in scattered locations around the hood and scarf.
OPTIONAL PATCHED STITCH DETAILS
For an even more handmade look, thread black yarn onto a yarn needle.
Create loose decorative stitches across selected areas.
Try:
- Long vertical stitches
- Short horizontal stitches
- Small X-shaped stitches
- Uneven whip stitches
Keep these details concentrated near the edges rather than covering the entire scarf.
OPTIONAL POINTED HOOD DETAIL
If you want the crown to look more dramatic:
With the hood turned inside out, pinch approximately 2–3 in / 5–7.5 cm at the top-back corner.
Sew diagonally across the pinch.
Turn RS out.
This creates a slightly exaggerated pointed crown.
OPTIONAL EXTRA-WIDE SCARF
For a more dramatic wrapped look, make the scarf approximately 13–14 in / 33–35.5 cm wide.
The wider scarf creates more volume around the neck and shoulders.
FINISHING
Weave in all green yarn ends first.
Then weave in the black yarn tails.
Keep the black decorative stitches relaxed.
Wet block the green crochet fabric gently.
Do not aggressively block the black loops flat.
Shape the hood by hand while damp.
Allow everything to dry completely.
TIPS & VARIATIONS
Choose a Rustic Yarn
A slightly woolly or textured acrylic gives the project more character than very smooth yarn.
Olive, sage, moss, khaki, and muted green shades all work beautifully.
Make It Black and Gray
For a darker version, use charcoal gray for the main scarf and black for the stitched edging.
Try Cream and Brown
Cream crochet with dark brown contrast stitching creates a softer woodland-inspired look.
Make the Hood Larger
Add another 2–3 in / 5–7.5 cm to both hood height and depth for a very oversized hood.
Make the Scarf Shorter
For a compact hooded cowl, reduce the scarf to approximately 50–55 in / 127–140 cm.
Keep the Decorative Stitches Irregular
Perfectly spaced loops can look too polished.
The charm of this design comes from slightly uneven, visible black stitching.
FAQ
Is this hooded scarf beginner-friendly?
Yes, if you are comfortable with half double crochet, back-loop stitches, basic seaming, and simple edging. The construction is mostly rectangles, making it approachable for a confident beginner.
Can I use chunky yarn?
Yes. Chunky yarn will create a warmer, heavier version. Use a larger hook and work to the finished measurements rather than relying on stitch counts.
Can I leave off the black edging?
Yes. Without the contrast stitches, the project becomes a simple oversized crochet hooded scarf.
CONCLUSION
The Spooky Stitch Hooded Crochet Scarf is a fun cold-weather project with plenty of personality. The oversized green hood, wide wrapped scarf, textured crochet fabric, and uneven black edging create a bold handmade accessory that works beautifully for Halloween styling or everyday winter wear. Make it in moss green and black for the dramatic version, or change the colors for a completely different look.



