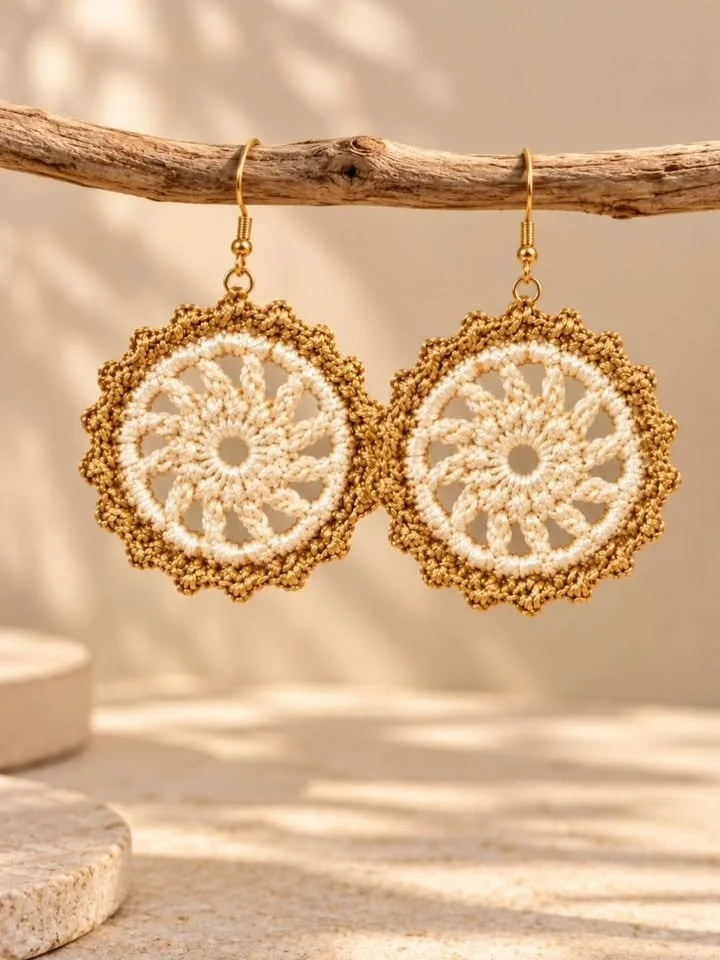
This delightful crochet earring pattern, entitled "Sun-kissed gold & warm cream," brings a touch of warmth and charm to your handmade jewelry collection. These earrings blend soft cream and golden hues, reminiscent of a sunlit meadow blanketed in daisies. Using simple crochet techniques, this project is not only visually appealing but also quite practical for adding a unique touch to your outfit or gifting to someone special.
Crocheted earrings can easily elevate any outfit, making them a fantastic choice for various occasions. Whether you’re heading out for coffee with friends, attending a casual event, or simply looking to add some flair to your everyday wear, these earrings are a perfect finishing touch.
In this guide, you’ll learn all about the construction of the earrings, the materials you’ll need, and detailed step-by-step instructions to create your very own pair. The simplicity of the pattern lends itself well to beginners and seasoned crocheters alike, making it a fun project for any skill level.
Pattern at a Glance
- Skill level: Easy
- Terminology: US crochet terms
- Construction: Worked in rounds with added embellishments
- Finished size: Approximately 2.5 inches in diameter
- Yarn weight: Light (weight 3)
- Hook: Size G (4.0 mm)
- Main stitch: Double crochet
- Gauge: 5 stitches = 1 inch, 6 rows = 1 inch
- Motifs: 1 main motif per earring
- Layout: Round
- Joining: No joining required
- Border: Optional scalloped edge suggested
- Seaming: None
Materials
For this project, you will need the following materials:
- Yarn:
- Light weight yarn in sun-kissed gold and warm cream
- Hook size:
- G/6 (4.0 mm)
- Notions:
- Scissors
- Yarn needle for weaving in ends
- Stitch markers to keep track of rounds
This basic list will allow you to create a beautiful pair of earrings. Make sure you are comfortable working with the chosen yarn and hook size, as they can affect the size and drape of your finished product.
Yarn and Color Notes
Choosing the right yarn is crucial for achieving the desired look of your earrings. A light yarn will keep the earrings lightweight and comfortable to wear. The sun-kissed gold provides a lovely shimmer, while the warm cream offers a soft contrast, allowing both colors to complement each other beautifully.
For a unique touch, consider experimenting with color combinations. You could use various shades or even add a pop of color through embellishments or beads that match your personal style.
Finished Measurements
The finished earrings measure approximately 2.5 inches in diameter. This size is ideal for making a statement without being overly heavy. Depending on your personal style, you can adjust the size slightly by altering your tension or using a different yarn weight, but aim to stay within the constructive boundaries for the most flattering results.
Gauge
Getting the right gauge is important for achieving uniformity in your earrings. The expected gauge for this pattern is:
- 5 stitches = 1 inch
- 6 rows = 1 inch
To gauge correctly, work a small swatch in double crochet stitches and measure to see if you’re meeting the specified dimensions. If your gauge is tighter than specified, consider switching to a larger hook, or if it’s looser, use a smaller hook. Proper gauge will ensure your earrings look as intended and fit comfortably.
Abbreviations
- Ch: Chain
- Dc: Double crochet
- Rnd: Round
- St: Stitch
- Sl st: Slip stitch
Important Pattern Notes
- Be mindful of turning chains; they do not count as a stitch unless stated otherwise.
- Work in continuous rounds to avoid visible seams.
- Adjust your stitch count gradually when working in larger hooks or thicker yarns to prevent distortion.
- Use stitch markers to keep track of your rounds.
- Color changes can be made between rounds for a unique twist on the design.
Special Stitches and Techniques
In this pattern, you will primarily use the double crochet stitch, which is the foundational technique for creating height in your earring construction. The finished texture will be light and airy, perfect for drops or studs.
Understanding the Construction
You will start with a foundation chain and work in rounds to create the main design. The structure is purposefully simple, allowing you to focus on the stitch and color transition without complex manipulation. There’s also the option to add a scalloped edge for a more decorated finish, which adds a lovely detail around the edge of the earring.
Full Pattern Instructions
Foundation
- Start with a Magic Ring. Hold the yarn to form a ring (or chain 4 and join to form a loop if you prefer).
- Rnd 1: Work 12 double crochets into the magic ring. Pull the yarn tail to close the ring. Join with a slip stitch to the first double crochet.
Rnd 2
- Ch 3 (counts as first dc). Work 2 double crochet in the same stitch. (Work 3 dc in each stitch around.)
- Join with a slip stitch to the top of beginning ch-3. (You should have 24 dc.)
Rnd 3
- Ch 3 (counts as first dc). Work 1 dc in the next stitch, then 2 dc in the following stitch. Repeat from * to * around.
- Join with a slip stitch to the top of the beginning ch-3. (You will have 36 dc.)
Rnd 4 – Scalloped Edge (Optional)
- Ch 3 (counts as first dc). Work 1 dc in the next 2 dc, then ch 1 and skip 1 dc. (Work 3 dc in the next dc, ch 1, skip 1 dc.)
- Repeat until the end of the round.
- Join with a slip stitch to the top of the beginning ch-3.
Your piece should now measure approximately 2.5 inches in diameter.
Assembly
Since this pattern is worked in the round and does not require additional pieces, assembly is straightforward.
- Finishing Touches: Weave in any ends with a yarn needle, making sure to secure all strands to ensure durability. If you added a scalloped edge, ensure it lays flat by gently blocking it, if necessary.
Finishing
- Trim excess yarn tails and weave in securely.
- Consider lightly blocking your earrings to shape them uniformly, especially if using natural fibers that tend to stretch or mold.
How to Resize
While this pattern is generally fixed to achieve the stated measurements, if you wish to make larger earrings, you can increase the number of double crochet stitches in each round while following the existing increase pattern.
For smaller earrings, reduce the number of stitches in the initial rounds similarly, but be cautious that it maintains structural integrity.
Useful Variations
For those wanting to explore further with this pattern, you might consider the following variations:
- One-Color Version: Use a single color to create a more understated effect.
- Multi-Color Version: Alternate colors in the rounds for a more colorful design.
- Beaded Version: Add beads in between the double crochet stitches for a sparkling embellishment.
- Longer Drops: Extend the length by adding more rounds, opting for length if desired.
Troubleshooting
Why Is My Edge Wavy?
Ensure that you’re maintaining consistent tension throughout your work. If tension varies, it might cause the edge to ripple or curl.
Why Don’t My Motifs Match?
Check to see if your stitch counts in each round are consistent. If one earring is growing faster than the other, track your rounds with stitch markers.
Why Is My Fabric Curling?
If your pieces are curling, this often indicates that your gauge is too tight. Consider using a larger hook or working more loosely when creating the earring.
Why Are My Color Changes Messy?
For clean color changes, make sure to switch colors at the end of each round before joining. This prevents the previous color from showing through.
Frequently Asked Questions
Can I use a different yarn weight?
Yes, you can use a different yarn weight, but remember that changing weights will affect the dimensions and overall look.
Can I make it larger?
Yes, you can adjust the stitch count as mentioned earlier to create larger earrings.
Can a beginner make this?
Absolutely! This is a great pattern for beginners to practice basic stitches and color changes.
How should I block it?
Lightly steam block your earrings, taking care not to saturate them with water. This will help retain their shape without causing any stretching.
Final Thoughts
Creating these sun-kissed gold and warm cream crochet earrings is a simple yet satisfying project that can add a personal touch to your accessory collection. Focus on mastering each step, enjoy the creative process, and soon you’ll have your charming pair of handcrafted earrings ready to wear or gift!



