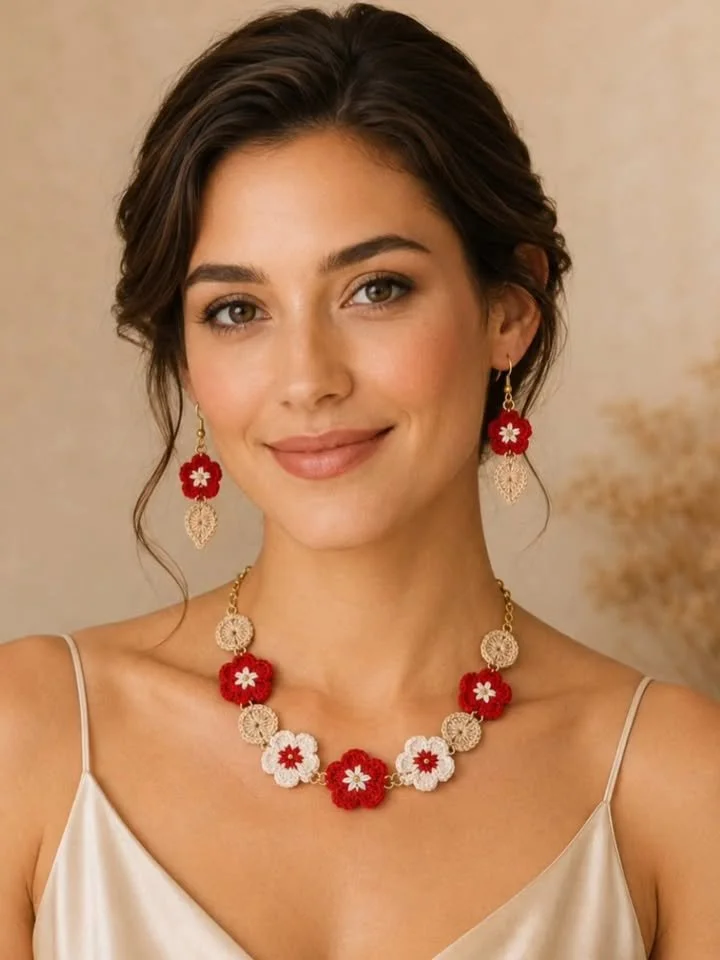
Creating delicate crochet flowers with a bold splash of red can be an exciting and rewarding experience. This project uses small stitches to create charming flower motifs that embody both elegance and boldness, making for a delightful addition to your handmade jewelry or accessories. Combining fine crochet techniques with vibrant colors showcases creativity and skills beautifully.
In this article, we’ll guide you through every step of creating these lovely flowers. You’ll learn about the materials you need, the importance of gauge, and how to master the stitches involved. Additionally, we’ll provide insights into resizing, variations, and troubleshooting tips to ensure your finished product turns out perfectly!
Pattern at a Glance
Skill level: Intermediate
Terminology: US Terminology
Construction: Motif-based with assembly
Finished size: Approximately 2-3 inches per flower (size may vary based on yarn and hook)
Yarn weight: Lightweight
Hook: Size D (3.25 mm)
Main stitch: Double crochet (dc), slip stitch (sl st)
Gauge: 5 stitches = 1 inch in double crochet
Motifs: Individual flowers to be assembled together
Layout: Flowers will be joined as needed based on the project
Joining: Slip stitch or whip stitch as specified
Border: Optional, based on preference
Materials
To get started, gather the following materials:
- Yarn: Lightweight cotton or acrylic yarn in two colors (one for the flower and one for the center). Approximately 50 yards (45 meters) of each color should be sufficient.
- Hook: A D (3.25 mm) crochet hook.
- Stitch markers: To mark the beginning of rounds or rows if needed.
- Scissors: For cutting yarn.
- Tapestry needle: For weaving in ends.
- Optional: Jewelry findings if using flowers for jewelry.
Each of these materials plays a crucial role in creating your flower motifs. The choice of yarn will affect the look and feel of your flowers, so select something that has a nice drape and stitch definition.
Yarn and Color Notes
When selecting yarn for this project, lightweight cotton or acrylics are recommended for their smooth finish and vibrant colors. Cotton is particularly suitable as it gives a clean and crisp stitch definition, which is perfect for delicate flowers.
Feel free to experiment with color combinations. Pairing a bold red with soft pastels can create a striking visual impact. Alternatively, stick to a monochromatic palette for a more classic look.
Finished Measurements
The approximate finished size of each flower motif will range from 2 to 3 inches in diameter. As your crochet tension may vary, keep this in mind when planning the overall size of your project. The final measurement can also be slightly influenced by the choice of yarn and hook.
Gauge
The gauge is very important for ensuring your motifs turn out as intended. For this pattern, you should achieve 5 stitches per 1 inch using double crochet stitches.
To check your gauge:
- Make a swatch of 20 stitches in double crochet.
- Measure across the swatch to see how many stitches fit within 1 inch.
- Keep in mind that if your gauge is larger than this (i.e., fewer stitches per inch), your flowers will be larger than intended, and if it’s smaller, they’ll be smaller than desired.
Abbreviations
- ch: chain
- dc: double crochet
- sl st: slip stitch
Important Pattern Notes
- Turning chains: When starting a new row, always begin with a specified number of chains that count as the first double crochet of that row.
- Right side / wrong side: Ensure you know which side you want as the right side (usually the side facing out), especially when assembling or stitching pieces together.
- Color changes: When changing yarn colors, work the last yarn over of the previous color with your new color before pulling through.
- Stitch markers: These are handy for marking the beginning of rounds or to keep track of increases.
Special Stitches and Techniques
Throughout this pattern, the primary stitch is the double crochet. However, here are some special notes on technique:
- Double crochet stitch: Yarn over, insert hook into the next stitch, yarn over again, draw through. You should have three loops on your hook. Yarn over once more, draw through two loops, then yarn over and draw through the remaining two loops.
Understanding the Construction
This project is constructed by creating individual flower motifs that will be assembled together after the petals are formed. Each flower will consist of a center section followed by petals that are layered to achieve the desired floral shape.
Full Pattern Instructions
Foundation
Start by making a magic ring or ch 4 and join with a slip stitch to form a ring.
Round 1
- Ch 3 (counts as the first dc), then work 11 dc into the ring.
- Join with a sl st to the top of the turning chains.
- Total stitches: 12 dc.
Round 2
- Ch 3 (counts as the first dc).
- Work 1 dc into the same stitch, then 2 dc into each remaining stitch around.
- Join with a sl st to the top of the turning chains.
- Total stitches: 24 dc.
Round 3
- Ch 1.
- Work 1 sl st into the next 2 stitches (to begin the petal).
- In the next stitch, work 5 dc, then ch 2 and sl st back into the same stitch to create a petal.
- Skip the next 2 stitches and repeat the petal creation around.
- Join with a sl st to complete the round.
- Total petals: 6.
Assembly
Once you have created the desired number of flower motifs, assemble them by:
- Placing the flowers close together and using a tapestry needle to whip stitch them together through the back of each piece.
- Ensure the joining is tight enough to hold the flowers but not so tight that it causes bunching.
Checkpoints for Assembly
- At the end of each assembly step, check that both sides of the flowers have an even alignment.
- Ensure that petals are arranged aesthetically before securing them.
Finishing
- Once the flowers are stitched together, weave in any loose ends using the tapestry needle.
- Gently block your pieces if necessary to enhance the shape of the flowers, ensuring they lay flat.
How to Resize
With this pattern, resizing can be achieved by:
- Adjusting the yarn weight: Using heavier yarn will create larger flowers, while a lighter weight will yield smaller flowers.
- Adding more rounds: If you wish to have larger petals, increase the number of rounds in the flower construction while maintaining the row count and stitch patterns.
- Altering the chain count: Modify the initial chain to suit specific size preferences for different project needs.
Useful Variations
Consider these fun variations:
- Create single-color flowers for a more modern aesthetic.
- Add a beaded center to each flower for a touch of sparkle.
- Use variegated yarn for a more dynamic flower appearance—this works especially well for petals.
Troubleshooting
Why Is My Project Getting Wider?
Check your starting chain; too many chains can cause the piece to widen unexpectedly. Additionally, ensure that you are following stitch counts accurately.
Why Is My Edge Wavy?
This could be due to too few stitches in the final round. Ensure that each round contains the specified amounts, particularly in terms of petal construction.
Why Don’t My Motifs Match?
If your motifs don’t look consistent in size, double-check your gauge before starting. A variation in tension can affect the overall size of your flowers.
Frequently Asked Questions
Can I use a different yarn weight?
Yes! Just remember that different weights can change the final size of your flowers.
Can a beginner make this?
While it’s an intermediate pattern, confident beginners can tackle it with careful attention to the stitch instructions.
How should I block it?
Gently wet the motifs and shape them; allow them to air dry to maintain the shape without distortion.
Final Thoughts
Creating these delicate flowers involves a straightforward yet engaging process of making motifs, combining vibrant colors, and learning essential crochet techniques. This project not only showcases beautiful craftsmanship but also serves as a canvas for personal expression through color and communication. Enjoy each stitch and embrace the creativity that comes with crafting unique crochet jewelry!



