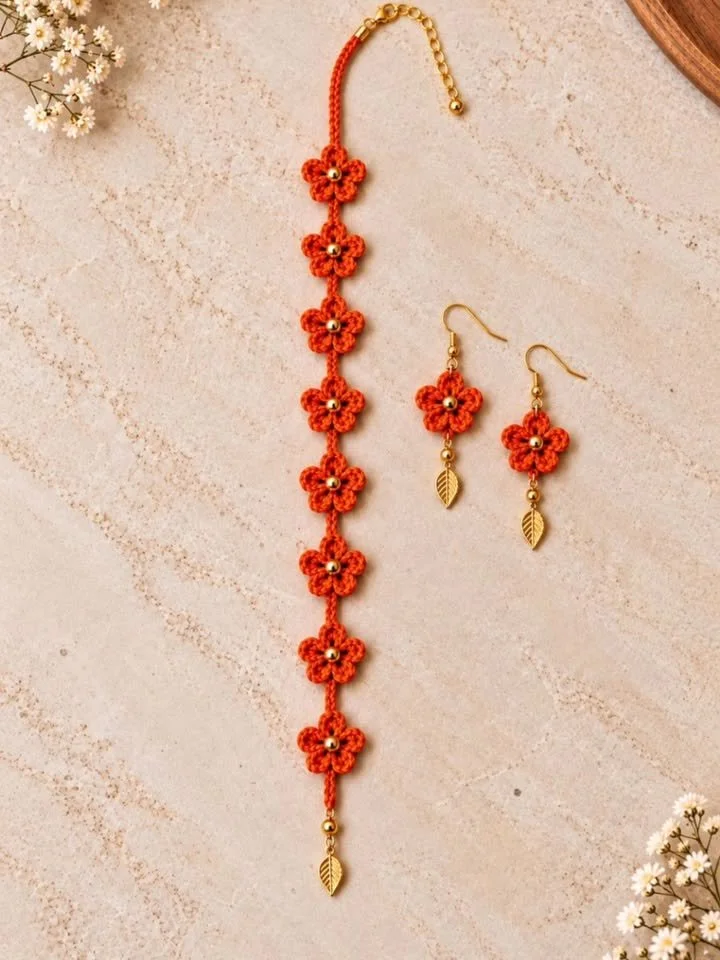
This cheerful crochet project embodies the lively spirit of sunny days, resulting in a delightful piece of handmade jewelry. The design is both vibrant and artistic, making it a perfect accessory to brighten your outfit. With a straightforward yet captivating structure, this crochet jewelry pattern offers an enjoyable crafting experience.
Through the use of basic crochet stitches and simple techniques, you’ll be able to create stunning pieces that reflect warmth and joy. This project can also serve as a thoughtful gift for friends and family or as a charming treat for yourself.
Pattern at a Glance
Skill level: Intermediate
Terminology: US crochet terms
Construction: Worked in rows
Finished size: Approximately the size of a bracelet (adjustable)
Yarn weight: Worsted weight (4)
Hook: 5.0 mm (H-8)
Main stitch: Double crochet
Gauge: 4 inches = 14 dc rows
Motifs: Simple chain and double crochet stitches
Layout: Linear chain structure
Joining: None required
Border: Not applicable
Seaming: Not required
Materials
For this project, you’ll need:
- Worsted weight yarn (approximately 50-100 yards) – Choose a bright color to embody the burst of sunshine.
- 5.0 mm (H-8) crochet hook – Ensure you have the correct size to achieve your gauge.
- Scissors – For cutting yarn when needed.
- Yarn needle – For weaving in ends and securing your project.
- Stitch markers (optional) – Useful for marking the beginning of rounds or rows, if necessary.
These materials will help you effectively create this cheerful jewelry piece.
Yarn and Color Notes
When selecting yarn, consider using a smooth fiber like cotton or acrylic. Cotton provides a subtly crisp texture, contributing to durability and a polished finish, whereas acrylic yarn can offer a variety of vibrant colors that are perfect for this sunny project.
For color combinations, consider using a gradient of yellows, oranges, or even mixing in some white for a fresh look. Variated yarn can also add an interesting dynamic to the finished piece.
Finished Measurements
The finished piece, when completed with the specified gauge, should approximately fit the wrist as a bracelet. Understand that the actual size may vary based on your tension and how tightly you crochet.
Gauge
To ensure your crochet jewelry piece has the right fit, it is crucial to check your gauge:
- Gauge: 4 inches = 14 double crochet rows
Why is gauge important? If your gauge is larger, your project may become looser and consequently larger than intended. Conversely, if your gauge is smaller, the piece will be tighter and may not fit properly. It’s best to make a small swatch before beginning your project to verify you’re working to the correct size.
Abbreviations
- ch – chain
- dc – double crochet
- st – stitch
Important Pattern Notes
- Turning Chains: When starting a new row, the chain counts as the first double crochet unless stated otherwise.
- Right Side/Wrong Side: As this project is worked in rows, the right side will always face outwards.
- Color Changes: If you wish to explore color changes, make sure to leave a sufficient length of yarn to secure and hide the ends.
- Repeats: Be cautious to maintain specified stitch counts throughout the pattern to achieve the correct dimensions.
Special Stitches and Techniques
This pattern relies on basic crochet stitches with a focus on double crochets. You may also choose to explore additional embellishments or variations in stitches to personalize the jewelry piece further.
Understanding the Construction
This jewelry piece is predominantly built using double crochet stitches worked in rows, creating a lovely texture that flows gracefully around the wrist. The piece does not require any elaborate joining or finishing, making it an easy and enjoyable craft.
Full Pattern Instructions
Foundation
Begin by making a slip knot and chaining a foundation that is appropriate for your desired length.
Row 1
Ch 12 (or desired length), then:
- 1 dc in the 4th ch from the hook.
- Continue to work 1 dc in each ch across the foundation chain.
At the end of the row, you should have a total of 10 dc.
Row 2
Ch 3 to turn (counts as 1 dc), then:
- Work 1 dc in each st across the row.
Repeat
Repeat Row 2 until you reach the desired length for your jewelry piece.
Finishing
Once your piece reaches the desired length, fasten off and weave in your ends securely using the yarn needle.
Checkpoints
- Your piece should measure approximately 1 to 2 inches wide, depending on your preference.
- Ensure you still have the correct stitch count after each row to maintain even tension throughout the project.
Assembly and Joining
There is no assembly required for this pattern, as the piece is worked continuously in rows. Ensure all ends are woven in securely to prevent unraveling.
Border / Finishing
As the pattern does not call for a border, your finishing steps mainly involve securing the end and ensuring your work is cleanly finished. Weave in all tails neatly, and consider a light blocking if necessary to shape the finished piece.
How to Resize
To resize the bracelet:
- Increase length by adding more chains to the foundation.
- Adjust by more rows for a looser fit.
Keep in mind to check your length as you crochet to ensure a perfect fit.
Useful Variations
- One-color version: Simplify the design using a single color for a minimalist look.
- Multi-color version: Employ multiple colors to create stripes or a gradient effect.
- Fabric choices: Experiment with different yarn textures, like novelty yarns, for a unique appearance.
Troubleshooting
Why Is My Project Getting Wider?
This might occur if extra stitches are added inadvertently. Ensure that you are consistently maintaining your stitch count across all rows.
Why Is My Edge Wavy?
A wavy edge often results from inconsistent tension. Ensure you’re pulling the yarn consistently, or consider adjusting your stitch technique for better accuracy.
Why Am I Not Getting the Right Length?
Check if you’re counting rows and stitches accurately. Adjust your foundation and make sure to repeat your row pattern without omitting any stitches.
Frequently Asked Questions
Can I use a different yarn weight?
While it is possible, using a different weight can affect the final structure and fit of your piece. Stick to worsted weight for optimal results.
Can a beginner make this?
Yes! The pattern utilizes simple stitches and offers an excellent introduction to crochet jewelry.
Do I need a special hook?
An H-size hook (5.0 mm) is recommended, but you can use any size that suits your gauge.
How should I block it?
Lightly blocking can help even out your stitches and shape the finished piece. Use a gentle steam method or damp cloth, avoiding direct contact with the iron.
Can I make it larger?
Absolutely! You can simply add more foundation chains or rows according to your preferences.
Final Thoughts
This project comes down to three main steps: creating a foundation chain, working double crochet rows, and finishing your piece with clean edges. Assembling all these elements ensures a delightful jewelry experience that you can wear with pride. Dive into your crochet skills with this sunny piece and enjoy the beautiful art of handmade jewelry!



