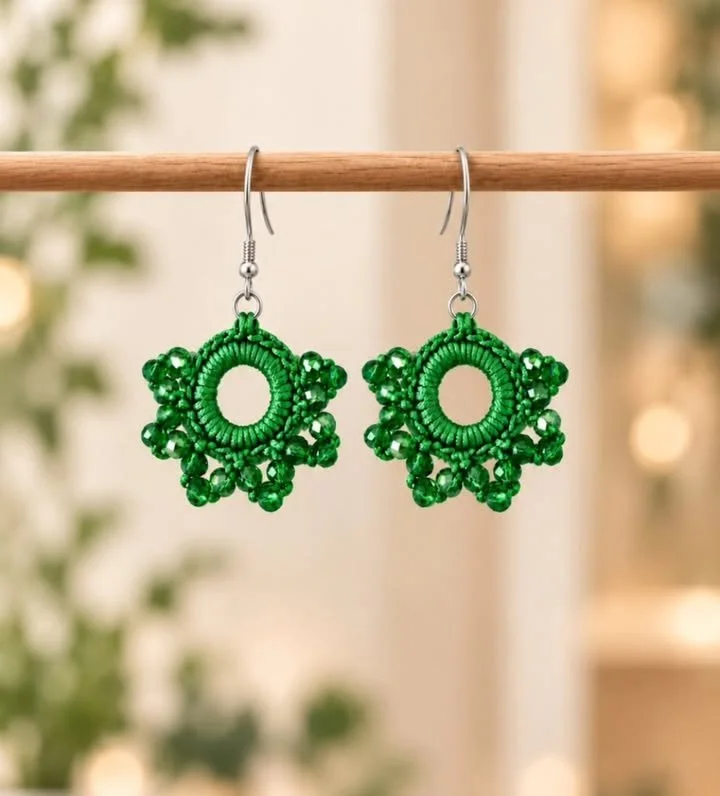
This stunning pair of earrings, lovingly dubbed "Elegant in Emerald," showcases a beautiful combination of crochet technique with an eye-catching design. With their bright green hue reminiscent of lush foliage, these earrings are perfect for adding a vibrant touch to any outfit. They are not only stylish but also lightweight, making them comfortable for all-day wear.
Crafted using basic crochet stitches and simple techniques, these earrings allow even novice crocheters to delve into jewelry making. The project employs a straightforward construction method that results in a beautiful finished product. With intricate detailing yet an approachable pattern, this is a wonderful stepping stone for anyone looking to advance their crochet skills, especially in accessories.
Pattern at a Glance
Skill level: Easy
Terminology: US Terminology
Construction: Made in rounds with simple increases and repetitive crochet stitches.
Finished size: Approximately 2.5 inches in diameter.
Yarn weight: Medium (Worsted)
Hook: Size H (5.0 mm)
Main stitch: Double crochet
Gauge: 4 inches = 14 dc stitches
Motifs: 1 main motif per earring
Layout: Round
Joining: Not applicable for individual earrings
Border: No specific border required
Materials
To create your "Elegant in Emerald" earrings, here is a comprehensive list of the materials you will need:
- Yarn:
- Medium weight yarn in emerald green (approximately 50 yards)
- Hook:
- Size H (5.0 mm) crochet hook
- Notions:
- Yarn needle for weaving in ends
- Scissors
- Earring hooks (two sets)
- Optional: Jump rings for attaching the hooks
These basic supplies will help you craft these stunning earrings, and they’re easily obtainable from your local craft store or online.
Yarn and Color Notes
When selecting yarn for this project, medium to worsted weight works best. This type of yarn provides a nice drape while still offering enough structure to hold its shape.
For color choices, consider varying shades of green, or even a contrasting pop of color for the inner motif. Whether you go for a solid emerald or explore variegated yarn, the final earrings will stand out beautifully, complementing different outfits and styles.
Finished Measurements
The finished earrings should measure approximately 2.5 inches in diameter. This measurement refers to the widest part of the earring motif, allowing it to be a striking addition without being overwhelming. If you find you’d like a larger or smaller size, consider adjusting the rounds made or yarn thickness accordingly.
Gauge
The gauge is a crucial aspect, especially when creating pieces that need to maintain their shape and size. For this project, your gauge should be:
- 4 inches = 14 double crochet stitches to ensure your earrings turn out the correct size.
Why Gauge Matters
Maintaining the correct gauge is essential for achieving the desired earrings size. If your gauge is larger, the earrings will turn out bigger than intended; conversely, a smaller gauge will make them significantly smaller. To test your gauge, crochet a small swatch in a double crochet stitch and measure to see if you maintain the specified count.
Abbreviations
Here are the abbreviations used in this pattern to ensure clarity:
- ch: chain
- dc: double crochet
- sl st: slip stitch
Important Pattern Notes
- Turning Chains: Be mindful that your turning chain does not count as a stitch unless specified.
- Right Side / Wrong Side: Always ensure you are working with the right side facing out before attaching earring hooks.
- Stitch Markers: Using stitch markers can help keep track of rounds if you’re unsure.
- Color Changes: If opting for an inner motif color, make sure to carry the yarn neatly to prevent tangling.
Special Stitches and Techniques
This pattern primarily uses basic double crochet stitches. If you’re unsure about how to perform these stitches, consider revisiting tutorials that guide you through double crochet stitch techniques. Here are few you might find useful:
- Double Crochet (dc): Yarn over, insert hook into designated stitch, yarn over again, pull through, yarn over again, and pull through two loops on your hook, yarn over and pull through the remaining two loops.
This straightforward approach keeps the pattern accessible and enjoyable for all skill levels.
Understanding the Construction
The entire earring is constructed as a round motif, with each round building upon the previous one. The pattern starts with a foundation chain, transitioning into rounds of double crochet that shape the earring. Once the motif is established, you will attach your earring hooks.
Completing one round serves as the base for the remainder, ensuring a consistent and beautiful finish.
Full Pattern Instructions
Foundation
Start by creating a magic ring to form the center of your earring.
- Magic Ring: Wrap the yarn around your fingers to create a loop, insert your hook through the ring, and pull up a loop.
Round 1
- Ch 3 (counts as your first dc), then work 11 dc into the magic ring. (Total: 12 dc including the turning chain). Pull the magic ring tight to close.
Round 2
- Sl st into the first dc to join. Ch 3 (counts as the first dc), work 2 dc in each stitch around. (Total: 24 dc).
Round 3
- Join with a sl st. Ch 1, work 1 dc in the first st, then 2 dc in the next st, and continue this pattern (1 dc in one st, 2 dc in the next) around. (Total: 36 dc).
Round 4
- Repeat as for Round 3. You should now have a total of 48 dc.
Checkpoints at this stage: Your piece should now lie flat, and you’ll notice the slight ruffle developing, indicating correct increases.
Assembly and Joining
Once you finish both earrings, it’s time to attach the hooks:
- Using your yarn needle, thread the yarn tail through to the back of the last round.
- Secure by weaving in the yarn and snipping excess.
- Individually attach the earring hook directly to the top of the motif using a jump ring if desired.
Checkpoints after assembly: Both earrings should be identical in size and shape, creating a beautiful set.
Finishing
The finishing stages include checking your yarn tails are woven securely and that your motifs have maintained their structure.
You might want to steam block your earrings gently to help them maintain their shape, especially if you’ve used a softer yarn.
How to Resize
If you’d like to create a larger or smaller version of your earrings, consider the following:
- To increase size: Add an extra round of increasing or use a thicker yarn.
- To decrease size: Remove a round or use a finer yarn.
Useful Variations
You can customize these beautiful earrings further by considering the following variations:
- Single-color version: Use one solid shade for a minimalist look.
- Intricate inner motif: Change up the center stitch to include a contrasting or textured yarn.
- Seasonal variations: Use different color schemes for holidays or seasonal events.
Troubleshooting
Why Is My Project Getting Wider?
Ensure you’re following the increase pattern precisely. Track your stitch count to maintain the intended structure.
Why Is My Fabric Curling?
Curling often occurs with missed stitches or rounds. Double-check each round’s count as you progress.
Why Are My Color Changes Messy?
When changing colors, ensure you’re pulling tight at the join and carry the previous color neatly to minimize excess yarn.
Frequently Asked Questions
Can I use a different yarn weight?
Yes, but ensure it maintains the correct gauge to fit the intended size.
Can I use cotton?
Cotton yarn works well for a more structured, non-stretchy earring.
Can a beginner make this?
Absolutely! This project is ideal for improving basic crochet skills.
What should I use for the hooks?
Standard earring hooks work perfectly; consider hypoallergenic options for sensitive skin.
How should I block it?
Lightly steam block to shape the motifs without losing the delicate crochet texture.
Final Thoughts
The "Elegant in Emerald" earrings come down to creating a simple yet beautiful round motif that showcases your crafting abilities. By using basic crochet stitches and straightforward construction techniques, you’ll have a beautiful accessory that celebrates both your skill and style. Embrace this project as an opportunity to express your creativity and enjoy a stunning piece of handmade jewelry!



