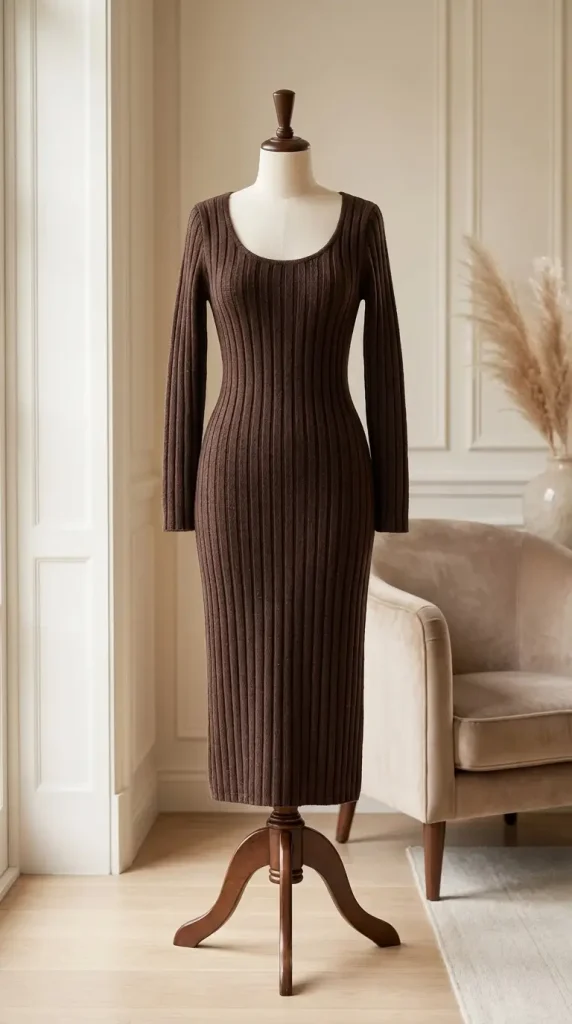
Elegant One-Piece Fall Knit with a Sculpted Ribbed Fit
The Espresso Ribbed Midi Dress is a timeless knitted wardrobe piece designed around one of the simplest and most effective textures in knitting: classic ribbing.
Worked in a rich espresso brown, the long vertical ribs create an elegant, streamlined silhouette while giving the fabric enough stretch to sit comfortably against the body. The scoop neckline, long fitted sleeves and midi length make this dress especially beautiful for autumn and winter styling.
This project is best suited to intermediate knitters who are comfortable knitting in the round, working ribbing, shaping armholes and necklines, and attaching sleeves.
Pattern note: This is a knitting pattern, not crochet. The original draft incorrectly referred to crochet terminology and a crochet hook. The instructions below have been corrected.
Pattern at a Glance
The dress uses US knitting terminology and is worked primarily in K2, P2 ribbing. The lower body is knitted seamlessly in the round before being divided at the armholes. The upper front and back are then completed flat, while the sleeves are worked separately and sewn into place.
The sample has an approximate finished bust of 34 in / 86 cm, hip circumference of 38 in / 97 cm, and shoulder-to-hem length of approximately 46 in / 117 cm.
Gauge is 24 stitches × 32 rows = 4 in / 10 cm in relaxed K2, P2 ribbing after blocking.
Materials
- Approximately 2,100–2,400 yards / 1,920–2,195 metres of DK-weight merino or merino/nylon yarn in deep espresso
- US 4 / 3.5 mm circular knitting needle
- US 5 / 3.75 mm circular knitting needle
- Stitch markers
- Waste yarn or stitch holders
- Tapestry needle
- Scissors
- Measuring tape
Choosing Your Yarn
The yarn choice is especially important for a fitted ribbed dress.
Look for a smooth DK-weight yarn with good elasticity and recovery. Merino wool works beautifully because it stretches comfortably while returning to shape after wear. A merino and nylon blend can provide even more durability and help the dress retain its fitted silhouette.
The deep espresso shade gives the design a sophisticated autumn feel, but the same pattern would also work beautifully in charcoal, black, burgundy, forest green, camel or cream.
Avoid yarns that are extremely heavy or have very little recovery, as the weight of a midi dress can cause the garment to stretch vertically.
Gauge
Work a generous ribbed swatch before starting the dress.
The target gauge is:
24 stitches × 32 rows = 4 in / 10 cm
worked in K2, P2 ribbing, measured after blocking.
Because ribbing stretches considerably, allow the swatch to relax before measuring it.
If you have more than 24 stitches across 4 inches, try a larger needle. If you have fewer stitches, try a smaller needle.
Gauge is particularly important for this project because the dress is intended to have gentle negative ease.
Understanding Negative Ease
The finished bust measurement is approximately 34 inches, but the ribbed fabric is designed to stretch comfortably to fit a slightly larger body measurement.
For example, someone with a 36-inch bust would have around 2 inches of negative ease.
A fitted dress should stretch gently rather than feel restrictive, so checking your blocked ribbing before beginning the full garment is essential.
Body
Using the 3.75 mm circular needle, cast on:
228 stitches
Join to work in the round, taking care not to twist the cast-on edge.
Place a stitch marker to indicate the beginning of the round.
Work continuously in:
K2, P2 ribbing
until the piece measures approximately:
20 in / 51 cm
from the cast-on edge.
The vertical ribs will naturally create the fitted column shape seen in the finished dress.
Waist Shaping
To create a more defined waist, decrease 8 stitches evenly around the round, while maintaining the ribbing pattern as neatly as possible.
Work another 8 rounds.
Decrease another 8 stitches evenly.
Repeat once more after another 8 rounds.
You will have decreased a total of:
24 stitches
The stitch count should now be:
204 stitches
Continue in ribbing until the entire body measures approximately:
36 in / 91 cm
from the cast-on edge.
Divide for the Armholes
Divide the 204 stitches evenly:
102 stitches for the front
and
102 stitches for the back
The remainder of the upper body will now be worked flat rather than in the round.
Back
Continue working the established ribbing pattern.
At each armhole edge, bind off:
4 stitches once
then:
2 stitches once
After shaping both sides, you should have:
90 stitches remaining
Continue working until the armhole measures approximately:
7 in / 18 cm
For the back neckline, bind off the centre:
40 stitches
This leaves:
25 stitches for each shoulder
Bind off each shoulder.
Front
Work the armhole shaping exactly as for the back.
After the armhole decreases, you should again have:
90 stitches
Continue until the front armhole measures approximately:
5 in / 13 cm
Now begin the scoop neckline.
Bind off the centre:
28 stitches
Work each side separately.
At each neckline edge, bind off:
3 stitches once
then:
2 stitches once
then:
1 stitch once
You should finish with:
25 stitches for each shoulder
Continue without further neckline shaping until the front reaches the same shoulder height as the back.
Bind off.
Important correction: The earlier version used a 34-stitch centre neckline bind-off while also specifying 25 stitches per shoulder. Those numbers did not balance mathematically. Using 28 centre stitches followed by decreases of 3, 2 and 1 stitch leaves the correct 25-stitch shoulder on each side.
Join the Shoulders
Place the front and back pieces together with the right sides facing.
Join the corresponding 25-stitch shoulder sections.
A neat mattress stitch or your preferred garment seaming technique can be used.
Take care not to pull the shoulder seams too tightly.
Sleeves
Using the larger needle, cast on:
52 stitches
Join carefully in the round.
Work in:
K2, P2 ribbing
Begin increasing gradually for the upper arm.
Increase a total of 2 stitches approximately every 10th round, maintaining the ribbing pattern as closely as possible.
Continue until you have:
72 stitches
Work straight until the sleeve measures approximately:
18 in / 46 cm
or your preferred sleeve length.
Bind off loosely.
Make the second sleeve in the same way.
Attach the Sleeves
Position each sleeve evenly inside its corresponding armhole.
Match the top centre of the sleeve with the shoulder seam first, then distribute the remaining fabric evenly around the opening.
Sew the sleeve into place using a tapestry needle.
Avoid pulling the seam too tightly, since the ribbed fabric needs to retain some stretch.
Scoop Neckline
Using the smaller 3.5 mm circular needle, pick up approximately:
116 stitches
evenly around the neckline.
The exact number may vary slightly depending on your tension, so concentrate on creating a neckline that lies smoothly without puckering.
Work:
K1, P1 ribbing
for 6 rounds.
Bind off using a stretchy bind-off technique.
A flexible bind-off is important here because an overly tight neckline can distort the scoop shape.
Finishing
Weave in all remaining yarn ends securely.
Check the shoulder seams, sleeve attachment and neckline.
Wash or wet-block the dress according to the care instructions for your chosen yarn.
Lay the dress flat and gently shape it to the desired measurements.
Do not aggressively stretch the ribs while blocking. You want to preserve their elasticity and deep vertical definition.
Allow the dress to dry completely before wearing.
Finished Measurements
The sample is designed to measure approximately:
Bust: 34 in / 86 cm
Hip: 38 in / 97 cm
Shoulder to hem: 46 in / 117 cm
Sleeve length: approximately 18 in / 46 cm
Because ribbing is highly elastic, the garment can comfortably stretch beyond its relaxed measurements.
For the best fit, compare the measurements of the blocked fabric with your own body measurements before beginning the armhole section.
How to Resize the Dress
The main K2, P2 rib repeat uses 4 stitches, so size adjustments are easiest when made in multiples of four.
At the stated gauge, 24 stitches equal 4 inches, which means approximately:
6 stitches = 1 inch / 2.5 cm
Because the body is worked as a complete circumference, adding 12 stitches would add approximately 2 inches / 5 cm to the relaxed circumference.
However, ribbed fabric behaves differently from flat stockinette. Always base major resizing decisions on a washed and blocked ribbing swatch.
For a longer or shorter dress, you can simply add or remove rounds before dividing for the armholes.
You can also adjust the skirt length without changing the upper-body proportions.
Styling Variations
This pattern can easily be adapted to create several different looks.
A knee-length version would require less yarn and feel more casual, while extending the skirt could create a dramatic full-length ribbed dress.
The sleeves could also be shortened for a transitional-season version.
For a minimalist look, knit the entire dress in one solid shade. For something more distinctive, you could use a contrasting colour at the neckline and cuffs.
A chocolate-brown dress paired with cream accessories creates a particularly elegant autumn palette.
Troubleshooting
My dress is much wider than expected
Recheck your gauge after blocking.
Ribbing can change considerably after washing, so an unblocked swatch may give misleading measurements.
The dress is becoming too long
Merino garments can grow under their own weight.
When making your gauge swatch, washing and hanging it briefly can help you understand how your chosen yarn behaves.
My neckline is wavy
You may have picked up too many stitches.
Try reducing the number slightly or using the smaller needle throughout the neckband.
My neckline feels tight
The problem is often the bind-off rather than the number of stitches.
Use a stretchy bind-off and avoid pulling the working yarn too tightly.
My ribs do not line up after the decreases
Because the waist shaping removes stitches, some rib columns need to transition.
Place decreases strategically near side areas where minor changes in the rib pattern will be less noticeable.
Frequently Asked Questions
Is this crochet or knitting?
This is a knitting pattern.
It uses knit and purl stitches, circular knitting needles and K2, P2 ribbing.
Can a beginner make this dress?
A confident beginner with garment experience may be able to complete it, but the fitted sizing, waist shaping, neckline and sleeve assembly make it better suited to an intermediate knitter.
Can I use cotton?
Yes, but choose carefully.



