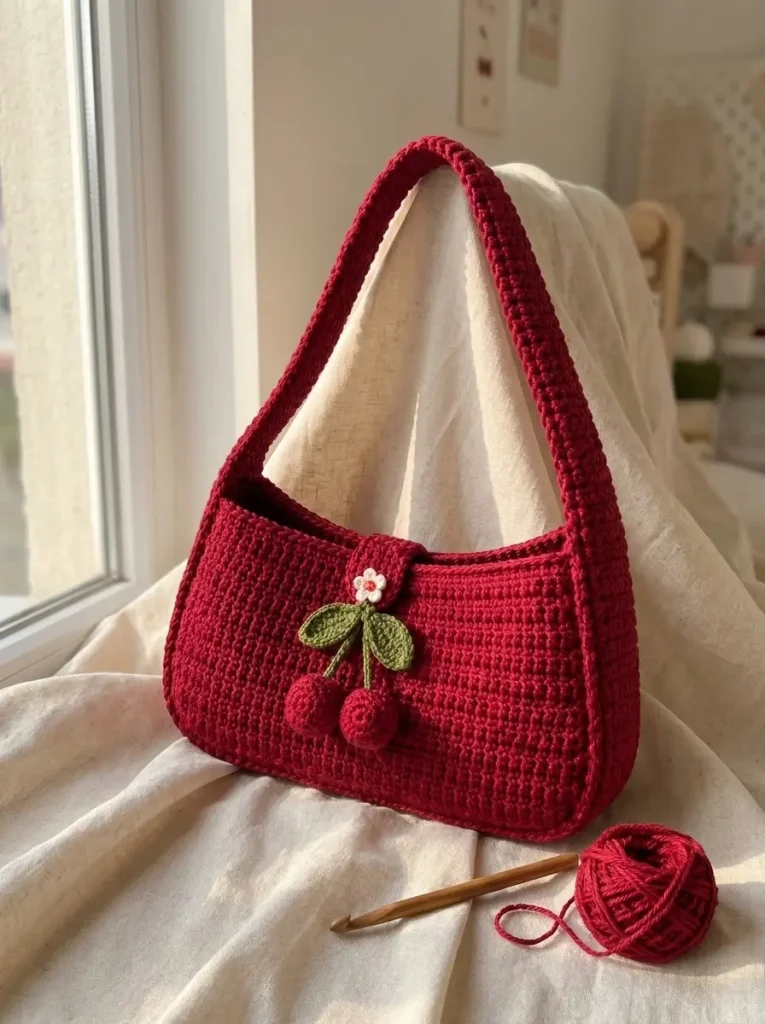
A Sweet Handmade Shoulder Bag You’ll Want to Make
There’s something special about a simple crochet bag with one playful detail—and for this project, it’s the cherries.
This Raspberry Crochet Cherry Bag combines a rich berry-red crochet body with two dimensional cherries, green leaves, and a tiny flower at the center. The wide crocheted shoulder strap keeps the design practical, while the cherry decoration gives it a cute handmade finish.
It’s the kind of project that looks detailed and impressive without needing lots of different decorative elements.
What You’ll Need
For a similar bag, gather:
- Raspberry or deep cherry-red yarn for the bag, strap, and cherries
- Olive or leaf-green yarn for the stems and leaves
- Small amount of white yarn for the flower
- Tiny amount of red yarn for the flower center
- Crochet hook appropriate for your chosen yarn
- Yarn needle
- Scissors
- Stitch markers
- Optional lining fabric for the inside
Because yarn thickness and tension can change the finished size considerably, choose your hook based on the yarn you’re using and aim for a firm, structured fabric rather than a loose crochet fabric.
1. Crochet the Bag Body
Begin with the raspberry-red yarn.
The main body has a softly rounded rectangular shape with a structured base. Crochet the fabric densely enough that the bag can hold its shape when standing.
Work the body evenly, keeping the stitch pattern consistent across the front and back.
As you build upward, regularly place the work flat to check that both sides remain symmetrical.
The finished body should have softly rounded lower corners rather than sharp, boxy edges.
2. Make the Wide Shoulder Strap
The wide crocheted strap is an important part of this design.
Using the same raspberry yarn, crochet a long, sturdy strap that is wide enough to sit comfortably on the shoulder.
Keep your tension consistent so the strap does not become narrower or wider as you work.
The strap should feel substantial enough to support the finished bag without stretching excessively.
Attach each end securely to the upper sides of the bag.
For extra strength, reinforce the attachment area with several passes of yarn using a yarn needle.
3. Add the Center Closure Tab
Crochet a small rectangular tab using the same raspberry yarn.
Position it at the center of the upper edge of the bag so that it folds naturally toward the front.
Keep this piece proportional to the bag. It should be a small detail rather than covering a large portion of the front.
Secure it firmly while keeping the crochet texture neat.
4. Crochet Two Cherries 🍒
Now for the feature that gives this bag its personality.
Using the raspberry-red yarn, crochet two small dimensional cherry shapes.
Rather than making them completely flat, give each cherry a softly rounded shape. Keep both cherries approximately the same size.
Once finished, gently shape them with your fingers.
Leave enough yarn for securely attaching the cherries to their stems.
5. Crochet the Green Leaves
Using olive-green yarn, make two leaves.
Each leaf should have an elongated oval shape with slightly pointed ends.
The leaves can be created around a central chain so the stitches naturally form both sides of the leaf.
Keep the stitches compact so the leaves hold their shape instead of becoming floppy.
Position the two finished leaves at slightly different angles for a natural cherry-branch appearance.
6. Make the Cherry Stems
Using the same green yarn, create two narrow stems extending down toward the cherries.
They should be long enough for the cherries to hang below the leaves without covering too much of the bag.
Attach one cherry securely to the bottom of each stem.
When the bag moves, the cherries should be able to move slightly while remaining firmly connected.
7. Crochet the Tiny Flower 🌼
The little flower is a small detail, but it helps finish the center decoration.
Use white yarn to crochet a tiny five-petal flower.
Add a small red center and position the flower above the green leaves, close to the center closure tab.
Keep the flower small so that the cherries remain the main feature.
8. Assemble the Cherry Decoration
Before sewing anything permanently, lay the bag flat and arrange all the decorative pieces.
Start with the stems, then position the two leaves. Place the cherries underneath and the little white flower above them.
Check the arrangement from a distance.
Once you’re happy with the placement, use a yarn needle to sew each component through the actual crochet stitches of the bag.
Secure the leaves and stems carefully while allowing the cherries to remain dimensional.
Avoid pulling the yarn too tightly because this can distort the front of the bag.
9. Finishing the Bag
Weave in every loose yarn end securely.
Check the strap attachment points and reinforce them if necessary.
Gently shape the lower corners and smooth the front and back panels with your hands.
If your chosen yarn benefits from blocking, lightly block the bag while preserving the dimensional shape of the cherries.
You can also add a fabric lining if you want the finished bag to have additional structure and prevent small belongings from catching on the crochet stitches.
The Finished Raspberry Cherry Bag 🍒
And that’s the finished look!
The deep raspberry color keeps the bag warm and rich, while the little cherries add just enough personality to make it stand out.
I especially love how the green leaves break up the red and draw attention to the center of the bag. The tiny white flower is the final touch that brings everything together.
This design would also be fun to customize. You could experiment with a different bag color while keeping the cherry decoration, or make the cherries in slightly different shades of red.
Crochet tip: If you’re making this as an everyday bag, prioritize tight, consistent stitches and reinforce the strap attachment points. Those areas will receive much more stress than the decorative sections.
🍒 Save this project for later, and happy crocheting!
Note: This is a recreation guide inspired by the pictured finished bag, not the original designer’s exact pattern. Exact stitch counts, gauge, yarn weight, hook size, and measurements can’t reliably be determined from the photograph alone.



