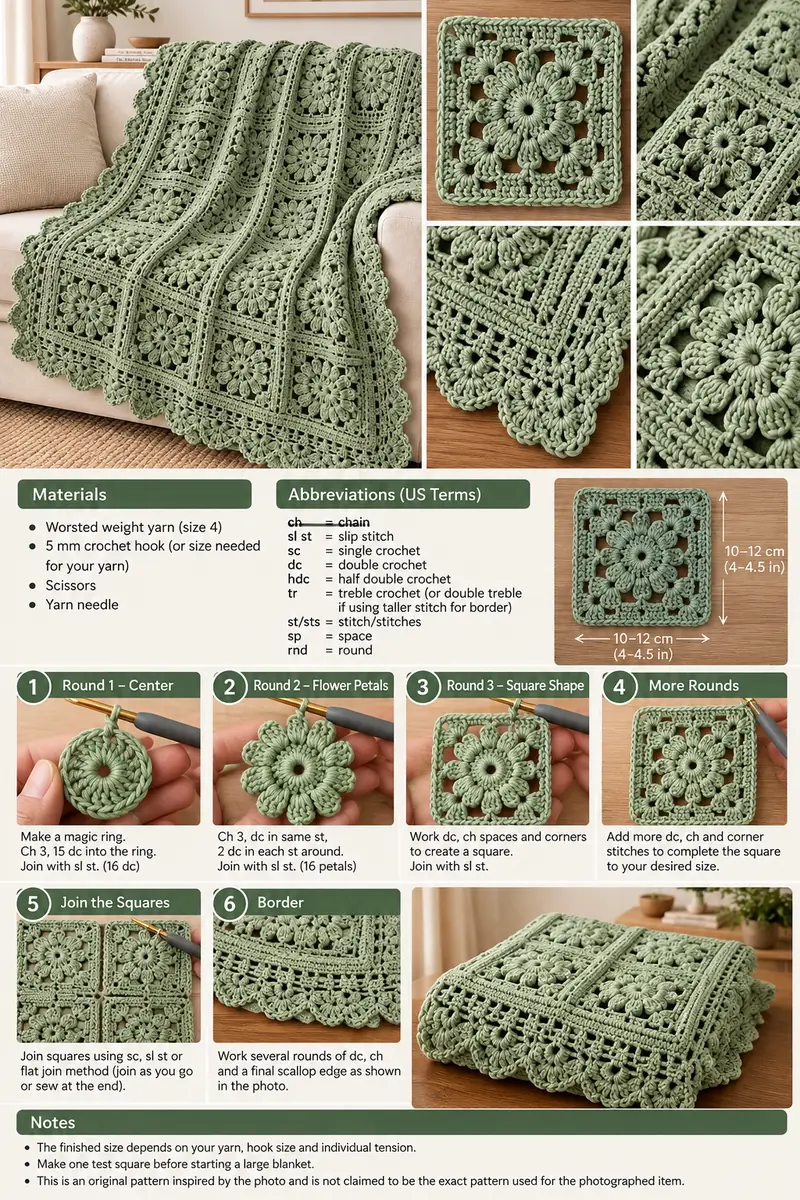
Sage Green Floral Crochet Blanket – Project & Construction Guide

This beautiful sage green crochet blanket combines dimensional flower motifs, openwork details and a decorative scalloped border.

Rather than being worked as one large piece, the blanket is built from individual crochet motifs that are arranged and joined together before the outer border is added.

This construction method makes a large blanket easier to manage because the individual motifs can be completed gradually.


IMPORTANT NOTE

This article is a construction guide inspired by the blanket shown in the reference image.

A finished photograph does not reveal every stitch, hidden join or round used by the original maker. For that reason, this article does not claim to provide the original designer’s exact stitch-by-stitch pattern.

Instead, it explains the visible construction and gives practical guidance for creating a similar floral-motif blanket using a floral square pattern of your choice.


MATERIALS

For a similar project, you will need:

• Crochet yarn in your preferred sage green shade
• A crochet hook appropriate for your yarn
• Yarn needle
• Scissors
• Stitch markers if needed
• Blocking mats and rust-resistant pins if you plan to block the motifs

The reference blanket has a substantial, textured appearance, so avoid choosing an extremely fine thread if you want a similar look.

Always use the yarn manufacturer's recommended hook range as your starting point.


CHOOSE YOUR FLORAL SQUARE FIRST

The most important part of this project is the floral square.

Choose a tested crochet square pattern featuring a dimensional flower in the center and a square outer structure.

Before buying yarn for an entire blanket, make one complete sample square.

Do not estimate the final square size from the photograph.

Your finished dimensions will depend on your yarn, hook and individual tension.


WHAT TO CHECK ON YOUR TEST SQUARE

Place the completed sample on a flat surface.

Check that:

• The center flower is approximately centered.
• The four sides are reasonably straight.
• The four corners are clearly defined.
• The square lies relatively flat.
• The outer stitches are suitable for joining.
• The raised petals are securely attached.
• The square does not cup significantly.
• The edges do not ripple excessively.

If the motif does not lie correctly, correct the problem before producing the rest of the squares.


BLOCK AND MEASURE THE SAMPLE

If your chosen yarn can be blocked safely, block the test motif before measuring it.

Shape it gently into a square without overstretching the stitches.

Allow it to dry completely.

Measure both the width and height.

This blocked measurement is the number you should use when planning your blanket.


PLANNING THE BLANKET SIZE

Decide approximately how wide and long you want your blanket to be.

Then arrange or calculate the number of blocked motifs required to approach those dimensions.

Remember that the joining method and final border will increase the finished dimensions.

For example, if your own blocked motif measures 15 cm, ten motifs placed across would cover approximately 150 cm before accounting for joining and the outer border.

This is only an example.

Use the actual measurement of your own motif rather than assuming that your squares will measure 15 cm.


MAKE THE FLORAL MOTIFS

Once you are happy with the sample, make the remaining squares using exactly the same pattern.

For consistency, keep the same:

• Yarn
• Hook size
• Stitch pattern
• Number of rounds
• Tension

Compare new motifs with your original sample regularly.

Minor differences are normal in handmade crochet, but large differences can make joining difficult.


WEAVE IN THE ENDS

Weave in the yarn ends securely as you work instead of leaving every end until the blanket is finished.

Use a yarn needle and weave the tail through several stitches.

Change direction where appropriate to help secure the yarn.

Trim the remaining tail only after it is securely woven in.


BLOCK THE MOTIFS

Blocking the motifs before joining can make assembly much easier.

Shape the squares to consistent dimensions.

Pay particular attention to the corners and outer edges.

Do not stretch one motif significantly larger simply to make it match another.

Large differences usually indicate a tension or stitch-count problem that should be corrected.


PLAN THE LAYOUT

Place all completed motifs on a clean floor, bed or large table.

Arrange them into the shape of the finished blanket.

Because this project uses one main colour, there is no complicated colour sequence to plan.

However, this is still a useful opportunity to distribute any small variations in the handmade motifs evenly.


CHOOSING A JOINING METHOD

The motifs need to be joined using a method compatible with the outer round of your chosen square pattern.

Common options include:

• Slip-stitch joining
• Single-crochet joining
• Mattress-style sewing
• Whip-stitch joining
• Join-as-you-go techniques when supported by the motif pattern

Each method creates a different appearance.

A sewn join can be relatively discreet, while a crochet join may become a visible decorative feature.

Do not change joining methods halfway through the blanket.


JOIN INTO ROWS

A practical approach is to join individual squares into complete rows first.

Check the alignment of the corners as you work.

Once the rows are complete, join the rows together.

Place the blanket flat periodically to check that the seams are not pulling the motifs out of shape.


CHECK THE COMPLETED BLANKET BODY

Before beginning the border, inspect the entire joined panel.

Look for:

• Missed joins
• Loose yarn ends
• Twisted motifs
• Uneven seams
• Areas that pull excessively
• Large differences between adjacent squares

Correct these problems before covering the outer edge with a border.


PREPARE FOR THE BORDER

The reference blanket has a substantial decorative border surrounding the joined floral motifs.

Before creating a decorative edge, establish an even foundation around the blanket.

The exact stitch count cannot be specified without knowing the stitch count of the floral square and the number of motifs used.

The important goal is even stitch distribution.


WORKING AROUND THE CORNERS

Corners require additional space so the border can turn without distorting the blanket.

Follow the corner construction required by your chosen border pattern.

After each border round, place part of the blanket on a flat surface and inspect it.

If the edge pulls inward strongly, the round may not contain enough stitches.

If it develops pronounced waves, it may contain too many stitches.


ADDING OPENWORK

The photographed blanket includes open decorative sections near the outer edge.

A similar effect can be achieved with a tested openwork border pattern using chain spaces combined with crochet stitches.

Choose a repeat that fits the stitch count around your finished blanket.

Do not force a repeat to fit by randomly adding or removing stitches.

If necessary, use a setup round to obtain a stitch count compatible with your chosen border pattern.


THE SCALLOPED FINISH

The final edge in the reference has a pronounced decorative scalloped appearance.

Choose a tested shell or scallop border pattern that is compatible with your foundation stitch count.

Work the repeat consistently along each side.

Follow the border pattern's specific corner instructions rather than treating the corners exactly like the straight sides.

This helps the finished border lie flat.


FINAL BLOCKING

After completing the border, weave in all remaining yarn ends.

If appropriate for your yarn, lightly block the finished blanket.

Do not aggressively stretch the raised flowers or decorative border.

Allow the blanket to dry completely while supported in its natural shape.


CARE

Follow the washing and drying instructions supplied by your yarn manufacturer.

Large crochet blankets can become very heavy when wet.

Support the blanket during washing and drying rather than allowing the full wet weight to hang from one edge.

This helps reduce unnecessary stretching.


HOW TO CUSTOMIZE THE PROJECT

The same construction concept can be used for many different blanket styles.

Try:

• Cream for a classic neutral blanket
• Dusty pink for a softer floral look
• Light blue for a fresh traditional style
• Several coordinated colours for individual flowers
• A contrasting border around a solid-colour center

You can also change the finished dimensions simply by changing the number of motifs.


BEFORE STARTING A LARGE BLANKET

Make one complete sample motif first.

Block it.

Measure it.

Check how much yarn it uses.

Make sure you enjoy making the motif repeatedly.

Only then should you estimate the quantity of yarn needed for the full blanket.

This small test can prevent expensive mistakes later in the project.


FINAL NOTE

This project guide is inspired by the visible construction of the sage green floral blanket in the reference photograph.

It is not the original designer's pattern, and the photograph alone is not sufficient to verify the exact hidden stitches, round counts or joining method used to make that specific blanket.

For the actual crochet work, pair this construction guide with a tested dimensional floral granny-square pattern and a tested scalloped border pattern.

That approach gives you reliable stitch-by-stitch instructions while still allowing you to create a blanket with the same beautiful floral style.
Get the PDF crochet pattern
Enter your email and the PDF download page will open instantly.