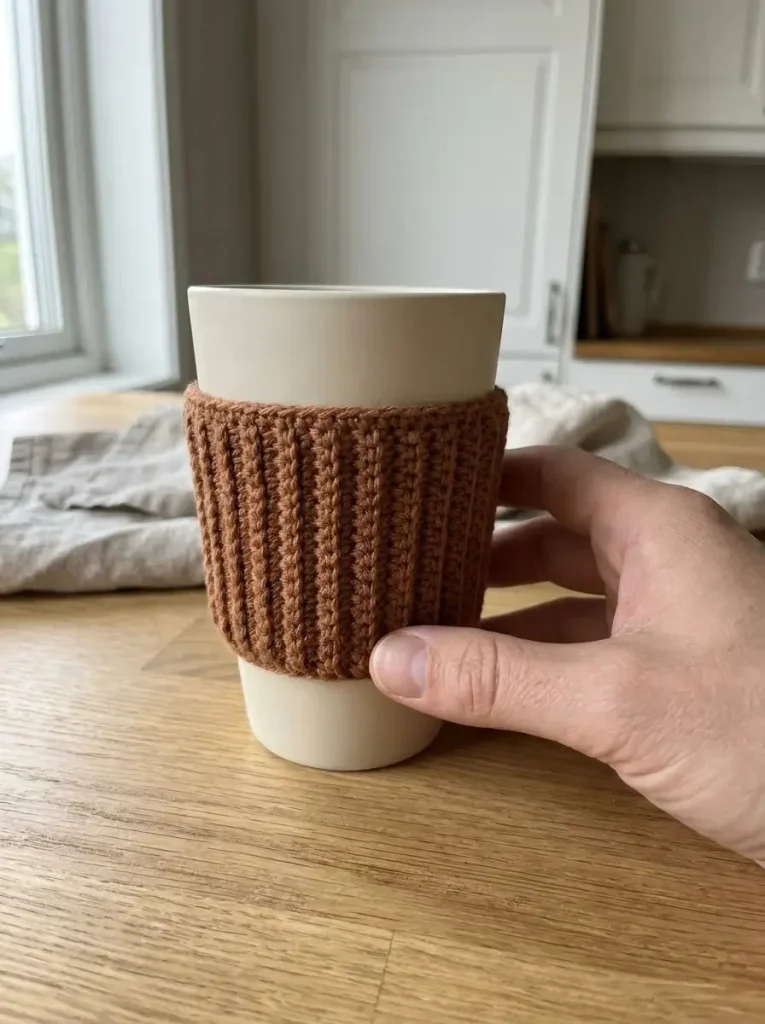
Creating a crochet cup sleeve is an innovative way to personalize your reusable cup while adding a touch of style. The Everyday Ribbed Cup Sleeve not only serves a practical function by providing a comfortable grip, but it also showcases beautiful texture and can be made in various colors to suit your taste. This sleeve is designed for straight-sided, handleless cups, making it a simple yet effective project for both beginners and seasoned crocheters alike.
This informative article will provide all the necessary details to create your own ribbed cup sleeve. You’ll learn about the materials to use, the gauge to achieve, and the step-by-step instructions for crocheting the sleeve. Finally, we will offer some valuable tips for customizing the design to your liking.
Pattern at a Glance
- Skill level: Beginner
- Terminology: US crochet terms
- Construction: Worked in rows, joined into a ring
- Finished size: Approximately 3 in (7.5 cm) tall, with the circumference fitted to your cup
- Yarn weight: Worsted cotton
- Hook: US G/6 (4 mm) or size needed for gauge
- Main stitch: Single crochet (sc)
- Gauge: 16 sc per 4 in (10 cm)
Materials
To create your Everyday Ribbed Cup Sleeve, gather the following materials:
- 25–40 g of worsted cotton yarn in cinnamon brown
- US G/6 (4 mm) crochet hook, or size needed for gauge
- Yarn needle for weaving in ends
- Scissors for trimming yarn
- Tape measure to measure your cup’s circumference
- A straight-sided handleless cup to fit your sleeve
This selection of materials is crucial for ensuring your sleeve has the right dimensions and fit.
Yarn and Color Notes
For optimal results, a smooth worsted cotton yarn in a solid color is recommended. Cotton yarn is beneficial due to its breathability, appealing texture, and ease of washing. A cinnamon brown hue adds warmth and complements various cups, but feel free to choose any color that matches your style. Consider using a contrasting color for subtle detailing or two-toned effects.
Finished Measurements
The finished cup sleeve will measure approximately 3 in (7.5 cm) in height. The circumference will depend on your specific cup, making it essential to measure accurately. This design is versatile enough to fit a variety of straight-sided cups, ensuring comfort while holding hot or cold beverages.
Gauge
Achieving the correct gauge is vital for ensuring a proper fit. The starting gauge for this project is 16 single crochet stitches per 4 inches (10 cm). To verify your gauge:
- Make a swatch using the yarn and hook you intend to use.
- Measure 4 inches (10 cm) across the swatch to determine the number of sc stitches within that measurement.
- If your gauge is larger (more stitches), switch to a larger hook; if smaller, switch to a smaller hook.
Maintaining gauge will help ensure that your sleeve fits snugly around your cup.
Abbreviations
The following abbreviations will be used throughout the pattern:
- ch: chain
- sc: single crochet
- BLO: back loop only
- st: stitch
Remember, the turning chain does not count as a stitch.
Important Pattern Notes
- The starting chain will dictate your sleeve’s width, so be precise in measuring your cup’s circumference.
- Ensure that each row is committed to back loop only (BLO) for texture.
- When joining the two ends to form a ring, keep the seam flexible for ease of sliding onto the cup.
Special Stitches and Techniques
The main technique utilized in this project is the single crochet worked in back loop only (BLO). This method creates a ribbed texture that is not only visually appealing but also provides a secure grip.
Understanding the Construction
The sleeve is a rectangular piece that will be crocheted in rows. After achieving the desired length, you will join the short ends to create a tube-like structure that fits snugly around your cup. This straightforward construction allows for easy adjustments in length based on your specific cup measurements.
Complete Pattern Instructions
Foundation
- With your cup empty and cool, measure its circumference where the sleeve will sit. Make sure to choose a straight-sided cup for this design.
- Ch 13 to start.
Row 1
- Work sc in the second ch from your hook and in each remaining ch. You should have 12 sc. This row forms the height of the sleeve.
Row 2
- Ch 1, turn your work, and work sc BLO in each st across, maintaining 12 sc. This row builds the ribbed texture of the sleeve.
Repeat
- Continue repeating Row 2 until the strip measures approximately 0.5 in (1.3 cm) shorter than your measured cup circumference.
Joining
-
Bring the short ends of your sleeve together to form a tube around the cup. Adjust the number of rows to ensure it fits snugly without forcing the ends together.
-
Fasten off the last row, leaving a 16 in (40 cm) tail. Match up the foundation edge to the last row without twisting, then whipstitch the corresponding stitches through both edges to form a ring. Be careful to keep this join flexible.
Finishing Up
- Weave in any ends securely in two directions to ensure no loose threads remain.
- Turn the seam inward. Slide the sleeve onto the empty cup to verify a secure fit. It should sit comfortably below the drinking rim and above the base of the cup.
Care Instructions
To maintain your cup sleeve, always remove it before washing the cup. Wash the sleeve according to the yarn’s care label and dry flat. It’s important to recheck the fit after washing as cotton can shrink.
Checkpoints
- Ensure you have 12 stitches at the end of each row.
- Your finished piece should fit comfortably around the cup, with the seam sitting below the drinking rim.
Resizing
To resize your cup sleeve, you can adjust the starting chain based on your cup’s size. For an increased circumference, add additional chains (in multiples of the stitch count), and for a reduced circumference, remove chains accordingly. Ensure the subsequent rows maintain the same pattern.
Variations
Consider trying out these variations to customize your cup sleeve further:
- Different Colors: Create a multicolored version by alternating rows of different yarn colors.
- Length Adjustments: For taller cups, simply add more rows to increase height.
- Textured Patterns: Experiment with different stitches such as double crochet or half-double crochet for a unique look.
Troubleshooting
Why Is My Project Getting Wider?
If your project is becoming wider, ensure that you’re not accidentally adding stitches or skipping chains while working your rows.
Why Is My Edge Wavy?
Wavy edges may arise from too-tight stitches; consider loosening your tension or using a larger hook.
Why Is My Sleeve Too Loose?
If the sleeve is too loose, you might need to add more rows or start with a smaller chain, depending on how it fits around the cup.
Frequently Asked Questions
Can I use a different yarn weight?
Yes, but using a different weight may affect the gauge and fit. Always check the gauge with a yarn substitution.
Can a beginner make this?
Absolutely! This project is beginner-friendly with simple stitches and clear instructions.
How should I block it?
Gently wash and lay the sleeve flat to shape it without stretching.
In summary, the Everyday Ribbed Cup Sleeve combines practicality and style, making it a delightful project to enhance your drinking experience. With clear instructions and customization options, you can create a sleeve that reflects your personal taste and sense of style. Enjoy crafting your cup sleeve and happy crocheting!



