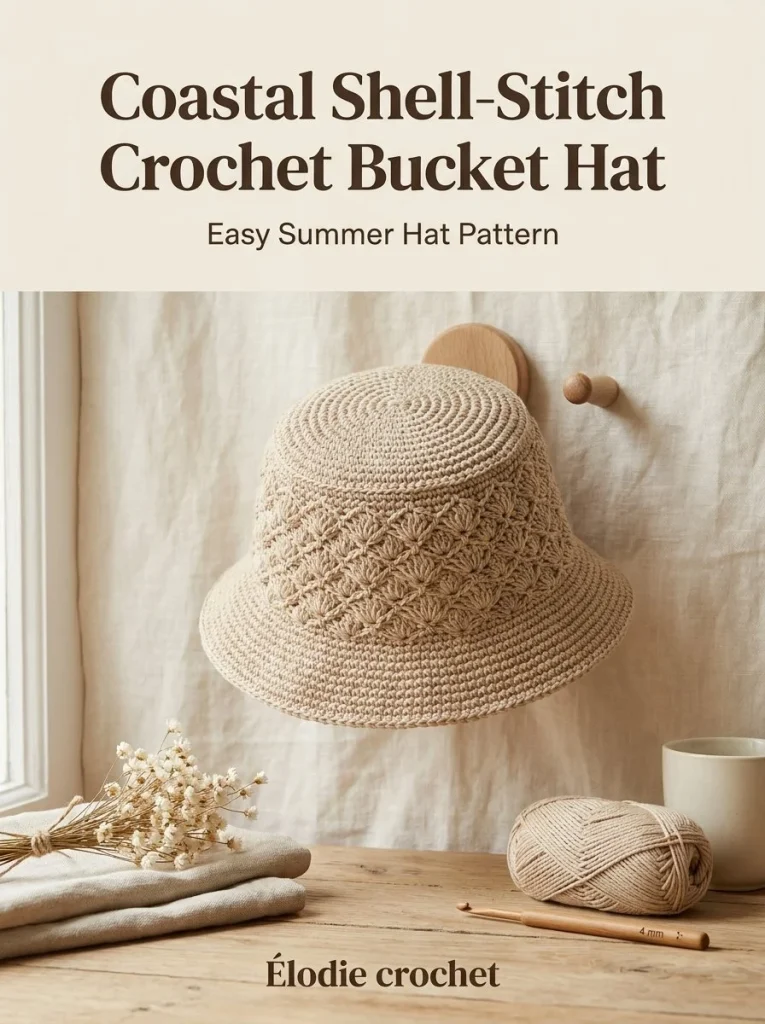
This delightful Coastal Shell-Stitch Bucket Hat is perfect for sunny days at the beach or casual outings in the park. Designed to bring together style and function, this hat features a lovely shell stitch pattern that adds texture and charm. The natural cotton yarn provides breathability and comfort, making this accessory essential for your summer wardrobe. Let’s dive into the details of this beautiful crochet project.
Skill Level
Confident Beginner
This pattern is suitable for confident beginners who have some familiarity with basic crochet stitches and working in the round. If you’ve mastered double crochet and are ready to learn a fun shell stitch, this project is a great way to enhance your skills.
Materials
- 180–200 m DK-weight cotton yarn (sand beige)
- 4.0 mm crochet hook
- Stitch marker
- Yarn needle
- Scissors
Abbreviations — US Terms
- ch – chain
- sl st – slip stitch
- sc – single crochet
- dc – double crochet
- st(s) – stitch(es)
- sp – space
Special Stitches
Shell Stitch
A shell stitch is worked by working multiple double crochet (dc) stitches into a single stitch or space, creating a fan-like shape.
Gauge
Gauge is not essential for this project; however, consistent tension will help achieve a uniform look.
Finished Size
The finished hat will fit an average adult head. The crown should measure approximately 17.5–18 cm across, with the sides measuring about 9–10 cm before the brim.
Pattern Notes
- The project is worked in the round.
- The crown is constructed first, followed by the side setup and shell rounds.
- Rounds are joined at the end of each round with a slip stitch.
- The last round of the side section uses single crochet for finishing.
- Keep your stitches tight to ensure a well-structured hat.
Crochet Instructions
Part 1 – Crown
Round 1
Start with a magic ring (MR). Chain 2 (ch 2), then work 12 double crochet (dc) into the ring. Join with a slip stitch (sl st) to the first stitch.
Total: 12 dc
Round 2
Ch 2, then work 2 dc in each stitch around. Join with a sl st to the top of the first ch 2.
Total: 24 dc
Round 3
Ch 2, dc in the next st, 2 dc in the next st; repeat from * to * around. Join with sl st.
Total: 36 dc
Round 4
Ch 2, dc in the next 2 sts, 2 dc in the next st; repeat from * to * around. Join with sl st.
Total: 48 dc
Round 5
Ch 2, dc in the next 3 sts, 2 dc in the next st; repeat from * to * around. Join with sl st.
Total: 60 dc
Round 6
Ch 2, dc in the next 4 sts, 2 dc in the next st; repeat from * to * around. Join with sl st.
Total: 72 dc
The crown should measure about 17.5–18 cm across.
Part 2 – Side Setup
Round 1
Work 2 rounds of dc without increases. For each round: ch 2, dc in each st around, then join with sl st.
Total after Round 2: 72 dc in each round.
Part 3 – Shell Round
Round 1
Ch 1, sc in the first st, skip 2 sts, work 5 dc in the next st, skip 2 sts, sc in the next st; repeat from * to * around. Join with sl st.
Total will vary based on initial rounds but will create shell spaces.
Part 4 – Next Round
Round 2
Ch 3 (counts as first dc), work 2 dc in the same st, sc in the center dc of the next shell, 5 dc in the next sc; repeat from * to * around. Finish with 2 dc in the first st and join with sl st.
Total will vary, but each shell will have 5 dc.
Repeat Steps 3 and 4 (Shell Round and Next Round) until the side measures 9–10 cm from the crown edge. Finish with 1 round of sc around the top edge.
Part 5 – Brim
Round 1
Sc in the next 5 sts, 2 sc in the next st; repeat from * to * around.
Total: 84 sc.
Round 2
Work 1 sc in each st around.
Total: 84 sc.
Round 3
Sc in the next 6 sts, 2 sc in the next st; repeat from * to * around.
Total: 96 sc.
Work 3–4 more sc rounds without increases. Each round should consist of working 1 sc in each st around.
Part 6 – Edging
Work one firm round of sl st around the brim to finish. Fasten off, weave in ends, damp-block over a rounded bowl to shape the brim flat.
Tips for the Best Result
- Use a stitch marker to keep track of your rounds, especially when the pattern has a lot of repeat stitches.
- Ensure that tension is consistent throughout, as varying tension can alter the fit.
- Double-check the count at the end of each round to avoid mistakes that can alter the shape.
Common Mistakes
Uneven Stitches
This can occur if you are varying your tension too much. Make sure to maintain an even pull on the yarn.
Skipping Stitches
Be mindful of where you are skipping stitches, especially during the shell rounds. It can be helpful to count as you go.
Miscounting Shells
Count the number of shells mid-pattern to ensure they are evenly distributed.
Finishing
Fasten off your yarn, weave in all ends carefully using a yarn needle. Take the time to damp-block the hat over a rounded bowl, which helps give the brim a flatter and more polished appearance.
Care
Hand wash in cool water with mild detergent to keep the cotton yarn fresh. Reshape and lay flat to dry. Keep in mind the yarn label for specific washing instructions.
Conclusion
The Coastal Shell-Stitch Bucket Hat is a fantastic addition to your summer wardrobe, offering both style and sun protection. Enjoy the process of creating your very own custom accessory, and don’t hesitate to explore different yarn colors to make it your own! Happy crocheting!



