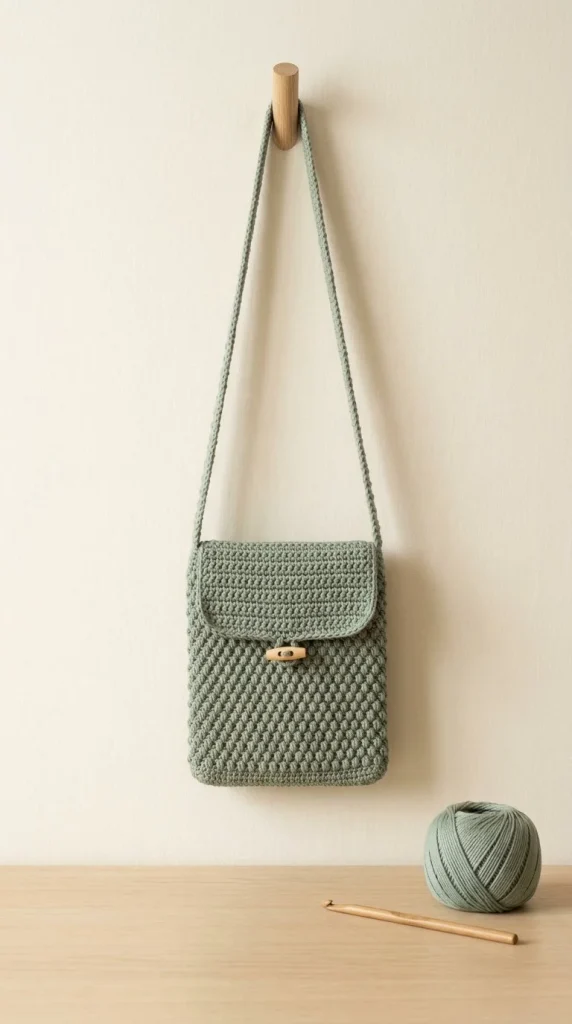
Create a stylish and functional accessory with the Sage Pebble-Stitch Crossbody Bag. This versatile bag, worked in a muted sage green mercerized cotton, is perfect for carrying your essentials while adding a touch of elegance to your outfit. Let’s dive into the details of how to create this lovely bag step by step, from the foundation to the finishing touches.
Skill Level
Confident Beginner
This pattern is suitable for a confident beginner due to the basic stitching involved alongside the more intricate pebble stitch technique. It incorporates straightforward construction methods, making it accessible for those familiar with crochet basics but ready to try something a little more challenging.
Materials
- 380 m worsted-weight mercerized cotton in a muted sage green
- 4.0 mm crochet hook
- 25 mm wooden toggle
- Yarn needle
- Stitch markers
- Scissors
Abbreviations — US Terms
- ch – chain
- sl st – slip stitch
- sc – single crochet
- dc – double crochet
- st(s) – stitch(es)
Special Stitches
Pebble Stitch
The pebble stitch creates a textured, raised effect. To make a pebble stitch, work 1 single crochet (sc) in the next stitch, and then in the same stitch, work 1 double crochet (dc). Repeat this to create a bumpy texture.
Gauge
Gauge is not provided for this project, but consistent tension is essential for achieving the correct dimensions for your bag.
Finished Size
The finished bag should measure approximately 20 cm in height from the base to the flap. Adjust the strap length according to your preference for a comfortable crossbody fit.
Pattern Notes
- The bag is worked in rounds after establishing the base with rows.
- The pebble stitch is used for the flap to create a unique texture.
- Use stitch markers to keep track of your work, especially when changing stitches or working in rounds.
- Make sure to join all rounds carefully to maintain the shape of your bag.
Crochet Instructions
Part 1 – Base
Foundation Chain:
- Ch 38.
Row 1
- Starting in the 2nd ch from your hook, work 1 sc in each ch across. This will give you a total of 37 sc.
- Ch 1 and turn your work.
Rows 2–9
- Work 1 sc in each st across.
- At the end of each row, ch 1 and turn your work.
- You will have a total of 37 sc at the end of Row 9.
Part 2 – Body Setup
- After completing the base, continue by working around it.
- Work 37 sc along each long side and 9 sc along each short side, for a total of 92 sts.
- Join with a sl st to the first sc.
Round 2
- Ch 1, then sc in each stitch around, joining with a sl st to the first sc.
Round 3
- Ch 1, then sc in the next st, dc in the next st. Repeat from * to * around and join with a sl st to the first sc.
Round 4
- Ch 1, then dc in the next sc, sc in the next dc. Repeat from * to * around and join with a sl st to the first sc.
Continuing the Body
- Repeat Rounds 3 and 4 until the body measures approximately 20 cm from the base.
- Ensure you maintain even tension for a neat finish.
Part 3 – Flap
- Mark the 37 centered back stitches on the last round of the body for your flap placement.
Row 1
- Continuing in pebble stitch, work across the marked 37 sts.
- After completing the row, ch 1 and turn your work.
- Work 9 additional rows in pebble stitch, maintaining the texture.
Flap Shaping
- For the next 5 rows, skip the first st and sl st into the second st.
- Continue working in pattern (pebble stitch) to the last 2 sts, then leave them unworked.
- Fasten off when complete.
Part 4 – Toggle Loop
- Join your yarn at the center of the flap.
- Ch 12, then sl st back into the same point where you joined. This forms the toggle loop.
- Sew the wooden toggle securely to the front panel using your yarn needle.
Part 5 – Strap
- Ch 186 for your strap.
Row 1
- Starting in the 2nd ch from your hook, work 1 sc in each ch across.
Rows 2–3
-
For each row, work in BLO (back loop only) across.
-
Adjust the length of the strap to your desired crossbody fit before fastening off.
-
Sew the strap ends to the side walls of the bag securely using several passes of yarn.
Part 6 – Finishing
- Consider adding an optional cotton lining for a more finished look.
- Weave in all loose ends using your yarn needle.
- Lightly steam-block your bag to shape it and neaten the stitches.
Color Variations
Consider using a complementary color for the flap or strap for added flair. Bright accents paired with sage green can create an eye-catching contrast.
Yarn and Hook Tips
Using mercerized cotton gives this bag a sturdy structure, perfect for everyday use. Make sure your yarn is smooth to avoid friction and snagging as you work through the stitches.
Tips for the Best Result
- Pay attention to your tension to ensure your body and flap remain even.
- Keep track of your stitch counts after each round or row to avoid discrepancies.
- Utilize stitch markers to help maintain your pattern effectively, especially when shifting stitches.
Common Mistakes
Uneven Tension
This can lead to ruffles or puckers in your bag. Maintain a consistent tension throughout your work.
Mistaking Rounds for Rows
Remember that once you join rounds, you do not turn your work. Ensure you’re working into the correct stitches.
Finishing
Fasten off all yarn and securely weave in the ends to prevent unraveling. If you’ve opted for a lining, sew it in along the edges where the strap attaches for a clean finish.
With these detailed instructions, you are now equipped to create your own chic crossbody bag. Enjoy the process, and don’t hesitate to experiment with colors and textures that reflect your personal style!



