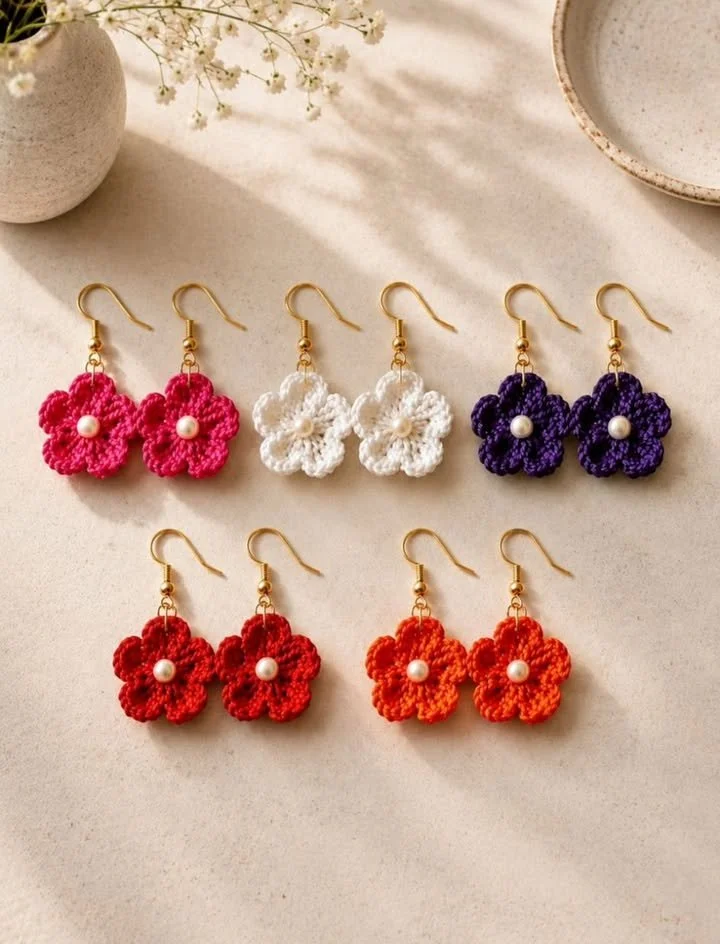
Creating beautiful crochet earrings from flowers can be a delightful project that showcases your crochet skills while adding a personal touch to your accessory collection. These earrings not only radiate charm but also allow for creativity in choosing colors and designs. The primary technique here involves mastering flower motifs, which can be adapted for various uses, making this project not only about creating earrings but also an exploration into crochet artistry.
The construction involves starting with a simple flower motif, which will be attached to earring hooks, resulting in a light and vibrant accessory suitable for any occasion. Whether you’re looking to make a statement or just enhance your outfit with a pop of color, these earrings provide a fun and engaging way to express your style.
Pattern at a Glance
- Skill Level: Beginner to Intermediate
- Terminology: US crochet terms
- Construction: Flower shapes attached to earring hooks
- Finished Size: Approximately 2-3 inches in diameter
- Yarn Weight: Any light-weight yarn (suggested: DK or Sport-weight)
- Hook: E (3.5 mm) or G (4 mm) hook
- Main Stitch: Slip stitch, chain stitch, single crochet, and double crochet
- Gauge: Not critical for this project
- Motifs: 1 flower per earring, with patterns repeated for a matching pair
- Joining: Attach flowers to earring hooks using yarn
- Assembly: Simple assembly with no sewing required
Materials
Gather the following materials before beginning your project:
- Yarn: Choose a light-weight yarn in your desired color. You may opt for one or multiple colors for a more vibrant design.
- Crochet Hook: A size E (3.5 mm) or G (4 mm) hook is recommended, depending on your yarn choice.
- Scissors: For cutting the yarn at the end of your project.
- Earring Hooks: These will serve as the base for your earrings; feel free to choose metal or plastic based on your preference.
- Yarn Needle: To weave in any loose ends and to assist in attaching the flowers to the hooks.
Yarn and Color Notes
When selecting your yarn, consider not just the color but also the texture. A smooth yarn will create a more polished look, while textured yarn may give a whimsical feel. Variegated yarn can add depth to your flowers, while solid colors tend to highlight your stitches.
For a cohesive look, coordinate your flower colors with your outfit or create a contrasting color palette to make the earrings pop.
Finished Measurements
While the exact finished size can vary depending on personal tension and yarn choice, aim for approximately 2-3 inches in diameter for each flower. This size is ideal for lightweight, easy-to-wear earrings that still make a statement.
Gauge
Gauge isn’t strictly critical for this project due to the nature of flower motifs. However, if you wish to maintain a consistent appearance, aim for your stitches to be neat and uniform. Allow about 5 double crochets to equal roughly 2 inches in width when worked in a relaxed tension.
Abbreviations
- ch: chain
- sc: single crochet
- dc: double crochet
- sl st: slip stitch
- rnd: round
Important Pattern Notes
- Turning Chains: When starting new rounds, if your pattern calls for it, the chain may count as your first stitch.
- Right Side / Wrong Side: Make sure to keep track of the right side of your work, especially if your flower shape has a distinct pattern.
- Color Changes: If you wish to have multi-colored flowers, remember to plan your color transitions before starting.
Special Stitches and Techniques
This pattern primarily uses basic stitches such as slip stitches, chains, single crochet, and double crochet, making it an excellent project for beginners to familiarize themselves with these techniques.
Understanding the Construction
The earrings are constructed using a flower motif that consists of a series of crochet stitches shaped to form petals. Once the petals are created and secured, they are easily attached to earring hooks using additional yarn, creating a beautiful and lightweight accessory.
Full Pattern Instructions
Foundation
- Start by creating a slip knot with your yarn and chain a length of 4. Join with a slip stitch to form a ring.
Round 1
- Ch 3 (counts as first dc) and work 11 dc into the ring.
- Join with a sl st to the top of the starting chain. You should have a total of 12 stitches.
Round 2
- Ch 1, then work 2 sc in each dc around (24 sc total).
- Join with a sl st to the first sc.
Rounds 3-4
- Ch 1, sc in the first 12 sc for one side of the flower, and then work 2 dc in each sc across for the remaining 12 stitches.
- Repeat the hydrogen with the appropriate slip stitches to finish. Ensure you maintain proper stitch counts and keep the project flat.
Finishing the Flower
- After completing the rounds, fasten off. Leave a long tail for sewing, ensuring it’s easy to attach to the earring hook.
- Use the yarn needle to weave in any loose ends.
Attaching to Earring Hooks
- Position the completed flower on top of the earring hook.
- Use the yarn tail, or additional yarn if necessary, to secure the flower to the hook. Make sure it’s tight and secure without rushing the process to avoid breakage.
Repeat
- Repeat all steps to create a second flower, thus forming a matching pair of earrings.
Checkpoints
- After Round 1, ensure you have 12 dc.
- Your flower should measure approximately 2-3 inches when complete, with each petal clearly defined.
Assembly
Since this project primarily consists of attaching flowers to earring hooks, assembly is straightforward:
- Ensure the flowers are positioned on the hooks in a way that they hang evenly.
- If needed, adjust the tension of the yarn to allow for a smooth hanging effect.
Finishing
After attaching flowers to earring hooks, take a moment to gently shape the petals, and ensure no loose ends are visible. A gentle blocking can help the flowers hold their shape, but be cautious not to stretch them out.
How to Resize
This pattern is simple to resize by altering the size of the initial ring or by adding extra rounds to the flower as desired. For larger earrings, consider adding another round of petals or increasing the yarn weight.
Useful Variations
- One-color version: Opt for all flowers in the same color to create a classic look.
- Two-color version: Combine two complementary colors to create interest.
- Scrap-yarn version: Use leftover yarn from previous projects to create a fun, eclectic feel.
Troubleshooting
Why Is My Fabric Curling?
Curling can occur if stitches are too tight; be sure to maintain a relaxed tension.
Why Are My Flowers Uneven?
Ensure you’re using the same stitch counts and maintain consistent tension across both earrings for symmetry.
Frequently Asked Questions
Can I use a different yarn weight?
Yes, but be aware that a different weight may change the sizing of your finished earrings.
Can I use cotton?
Absolutely! Cotton yarn can provide a sturdier fabric, perfect for flower motifs.
Is the pattern reversible?
No, due to the style and open design, these earrings aren’t reversible; focus on creating the front side as visually appealing as possible.
Final Thoughts
To summarize, making these crochet flower earrings is a fulfilling experience that combines technique with creativity. The process involves creating charming flower motifs, attaching them securely to earring hooks, and finishing them off to create a beautiful accessory. With endless possibilities for colors and variations, you can personalize these earrings to reflect your unique style. Enjoy your crafting, and let your creativity bloom!



