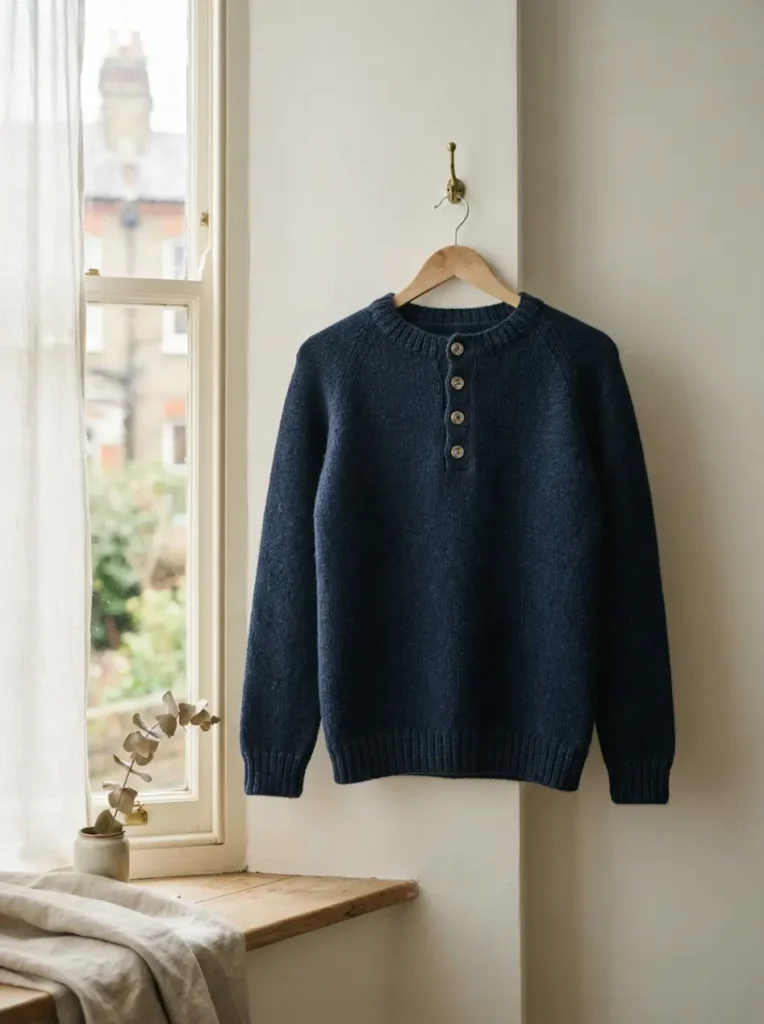
A Classic Everyday Sweater with a Polished Henley Finish
There is something timeless about a navy knitted sweater, and this Navy Merino Henley Sweater combines that classic look with a relaxed handmade finish.
Worked mainly in simple stockinette stitch, the sweater features comfortable ribbed edges, long sleeves and a traditional four-button Henley neckline. The deep navy merino wool gives the finished piece a soft, warm texture while keeping the design easy to wear with jeans, trousers or layered over a shirt.
This project is best suited to intermediate knitters or confident beginners who are comfortable working ribbing, stockinette stitch, simple shaping and garment assembly.
If you enjoy classic knitted garments, you may also like our Short Sleeve Mock Neck Sweater Knitting Pattern.
Pattern at a Glance
- Skill level: Intermediate
- Terminology: US knitting terminology
- Construction: Worked flat in separate pieces and seamed
- Finished chest: Approximately 44 in / 112 cm
- Finished length: Approximately 23 in / 58 cm
- Yarn weight: Worsted weight
- Main needle: US 7 / 4.5 mm
- Ribbing needle: US 6 / 4 mm
- Main stitch: Stockinette stitch
- Gauge: 20 sts × 28 rows = 4 in / 10 cm
- Closure: Four-button Henley placket
- Finishing: Ribbed neckline, cuffs and hem
Materials
For this sweater you will need:
- Approximately 1,450 yards / 1,325 metres of worsted-weight merino wool
- US 6 / 4 mm knitting needles
- US 7 / 4.5 mm knitting needles
- 4 natural, wooden or shell-style buttons
- Stitch markers
- Tapestry needle
- Scissors
- Measuring tape
Choose a soft worsted-weight yarn with enough structure to hold the shape of the neckline and ribbing.
Choosing the Yarn
Merino wool works beautifully for this design because it is warm, breathable and soft enough for an everyday sweater.
The navy colour gives the Henley a traditional look, but the pattern can easily be adapted to other shades.
Charcoal grey, oatmeal, forest green, burgundy or cream would all work particularly well.
A slightly heathered wool can also make the simple stockinette texture look more interesting without changing the pattern itself.
Gauge
Before beginning the sweater, knit and block a gauge swatch.
Your finished gauge should measure:
20 stitches × 28 rows = 4 in / 10 cm in stockinette stitch
Gauge is especially important when knitting garments.
If you have too many stitches within 4 inches, try using a larger needle.
If you have too few stitches, switch to a smaller needle.
Always measure your gauge after washing or blocking the swatch, particularly when working with wool.
Abbreviations
K – Knit
P – Purl
RS – Right side
WS – Wrong side
St / Sts – Stitch / stitches
K2tog – Knit two together
BO – Bind off
CO – Cast on
Back Panel
Using the smaller 4 mm needles, cast on:
110 stitches
Work in:
K2, P2 ribbing
for 12 rows.
Change to the larger 4.5 mm needles.
Continue in stockinette stitch:
- Knit all stitches on RS rows.
- Purl all stitches on WS rows.
Continue until the piece measures approximately:
23 in / 58 cm
from the cast-on edge.
For the neckline, bind off the centre:
34 stitches
Then bind off the remaining:
38 stitches for each shoulder
Keep your bind-off relaxed so the shoulder edges do not become too tight.
Front Panel
Using the smaller needles, cast on:
110 stitches
Work 12 rows in K2, P2 ribbing.
Change to the larger needles and continue in stockinette stitch.
Work until the front measures:
14.5 in / 37 cm
from the cast-on edge.
Creating the Henley Opening
On the next RS row:
- Work 51 stitches.
- Bind off the next 8 stitches.
- Work the final 51 stitches.
You will now work the two sides of the front separately.
Continue in stockinette stitch until the piece measures approximately:
18.5 in / 47 cm
Front Neck Shaping
Beginning at the neckline edge, shape each side separately.
Bind off:
- 8 stitches once
- 4 stitches once
- 2 stitches once
Then decrease:
1 stitch at the neckline edge three times
You should eventually have:
34 stitches remaining for each shoulder
Continue without further shaping until the front measures the same length as the back.
Bind off the shoulder stitches.
Repeat the neckline shaping on the opposite side, reversing the shaping where necessary.
Sleeves
Using the smaller needles, cast on:
46 stitches
Work:
12 rows in K2, P2 ribbing
Change to the larger needles.
Continue in stockinette stitch.
To shape the sleeve, increase:
1 stitch at each end every 7th row
Repeat these increases 15 times.
You should now have:
76 stitches
Continue working straight until the sleeve measures approximately:
18 in / 46 cm
or your preferred sleeve length.
Bind off loosely.
Make a second sleeve in exactly the same way.
Assembly
Block the individual sweater pieces gently before seaming if desired. This can make the final assembly easier and help the edges lie flat.
Join the front and back together at the shoulders.
Position the centre of each sleeve against the shoulder seam and sew the sleeves into the armholes.
Next, sew the sleeve and side seams.
Use mattress stitch for a clean, nearly invisible finish.
Henley Button Bands
Using the smaller needles, pick up approximately:
40 stitches along each side of the Henley opening
Work in:
K1, P1 ribbing
for approximately 8 rows.
On the buttonhole band, create four evenly spaced buttonholes.
Position them carefully before knitting the first buttonhole so the spacing looks balanced.
The lowest button should sit comfortably above the bottom of the opening rather than directly at the base.
Overlap the two bands neatly at the bottom of the Henley opening and secure them in place.
Neckband
Using the smaller needles, pick up approximately:
100 stitches around the remaining neckline
The exact number may vary slightly depending on your tension.
Work:
K1, P1 ribbing
for 7 rows.
Bind off loosely in pattern.
Avoid binding off too tightly, as this can make the neckline uncomfortable to wear.
Adding the Buttons
Sew four buttons onto the opposite Henley band, aligning each button carefully with its corresponding buttonhole.
Natural wooden, shell or matte cream buttons contrast beautifully against navy wool.
Secure each button firmly while leaving enough space for the knitted band to sit naturally underneath it.
Finishing
Weave in all loose ends.
Check your seams and button placement.
Then lightly wet-block or steam-block the finished sweater according to the care instructions for your chosen yarn.
Shape the sweater to its finished measurements and allow it to dry completely.
Blocking helps even out the stitches and gives the garment a much more professional finish.
Finished Measurements
The sample sweater measures approximately:
Chest circumference: 44 in / 112 cm
Finished length: 23 in / 58 cm
Sleeve length: approximately 18 in / 46 cm before assembly
The 44-inch chest measurement gives a relaxed everyday fit, although the final fit will depend on the wearer’s body measurements and preferred amount of ease.
How to Resize the Sweater
The pattern gauge is:
5 stitches per inch
because 20 stitches measure 4 inches.
This means approximately:
- 5 stitches = 1 inch / 2.5 cm
- 10 stitches = 2 inches / 5 cm of knitted width
Because the front and back panels both contribute to the total chest circumference, calculate any size adjustments carefully before casting on.
For example, adding 5 stitches to both the front and back increases the finished chest circumference by approximately 2 inches / 5 cm.
When changing the cast-on number, remember to keep the stitch count compatible with the ribbing pattern.
Optional Variations
Once you understand the basic construction, there are many ways to personalise this sweater.
You could use contrasting yarn for the neckline, cuffs and hem, replace the natural buttons with darker wooden buttons, or knit the body slightly longer for a more relaxed fit.
For a more modern look, try a warm oatmeal body with dark brown buttons.
You could also make the Henley opening slightly shorter or longer depending on your preferred style.
Troubleshooting
Why is my neckline too tight?
The most common cause is picking up too few stitches or binding off too tightly.
Try picking up stitches more evenly around the neckline and use a stretchy bind-off.
Why is my ribbing flaring?
The ribbing needle may be too large or the stitches may have been picked up too loosely.
Using a slightly smaller needle usually helps the ribbing pull inward neatly.
Why is my sweater wider than expected?
Check your gauge.
Even a small difference in the number of stitches per inch can make a noticeable difference across an entire sweater.
Why does one sleeve look longer?
Count your rows or measure frequently while knitting the second sleeve.
Making both sleeves simultaneously on separate needles can also help keep them identical.
Frequently Asked Questions
Can I use a different yarn?
Yes, provided you can achieve the required gauge.
A worsted-weight yarn is the easiest substitution.
Is this suitable for beginners?
A confident beginner who already understands knit and purl stitches could attempt it, but the neckline shaping, button bands and assembly make this more suitable as an intermediate project.
Can I knit it in cotton?
You can, but cotton behaves differently from merino wool and has less elasticity.
A wool blend or cotton-wool blend may give a result closer to the original sweater.
Can I make the sweater longer?
Yes.
Simply continue knitting the body before beginning the upper shaping.
Make sure to calculate additional yarn requirements.
How should I wash a merino sweater?
Always follow the yarn manufacturer’s care instructions.
Many merino yarns benefit from gentle hand washing in cool water and drying flat.
A Classic Sweater Worth Making
The Navy Merino Henley Sweater is the kind of handmade piece that can stay in your wardrobe for years.
Its simple stockinette body keeps the knitting relaxing, while the ribbed finishing and four-button Henley neckline give the sweater enough detail to make it feel special.
Once you understand the construction, the pattern is also easy to customise with different colours, lengths and button styles.
Happy knitting! 🧶
SEO Settings
SEO Title:
Navy Merino Henley Sweater Knitting Pattern
Meta Description:
Knit a classic Navy Merino Henley Sweater with this step-by-step pattern featuring ribbed edges, long sleeves and a four-button neckline.
Focus Keyphrase:Navy Merino Henley Sweater Knitting Pattern
Suggested Slug:navy-merino-henley-sweater-knitting-pattern
Image Alt Text:Hand knitted navy merino Henley sweater with four buttons and ribbed cuffs
Pinterest Title:Navy Merino Henley Sweater Knitting Pattern – Classic Handmade Knit
Excerpt:
Create a timeless Navy Merino Henley Sweater with soft worsted-weight wool, classic ribbing and a four-button neckline. This intermediate knitting pattern includes complete instructions, measurements, finishing tips and resizing guidance.



