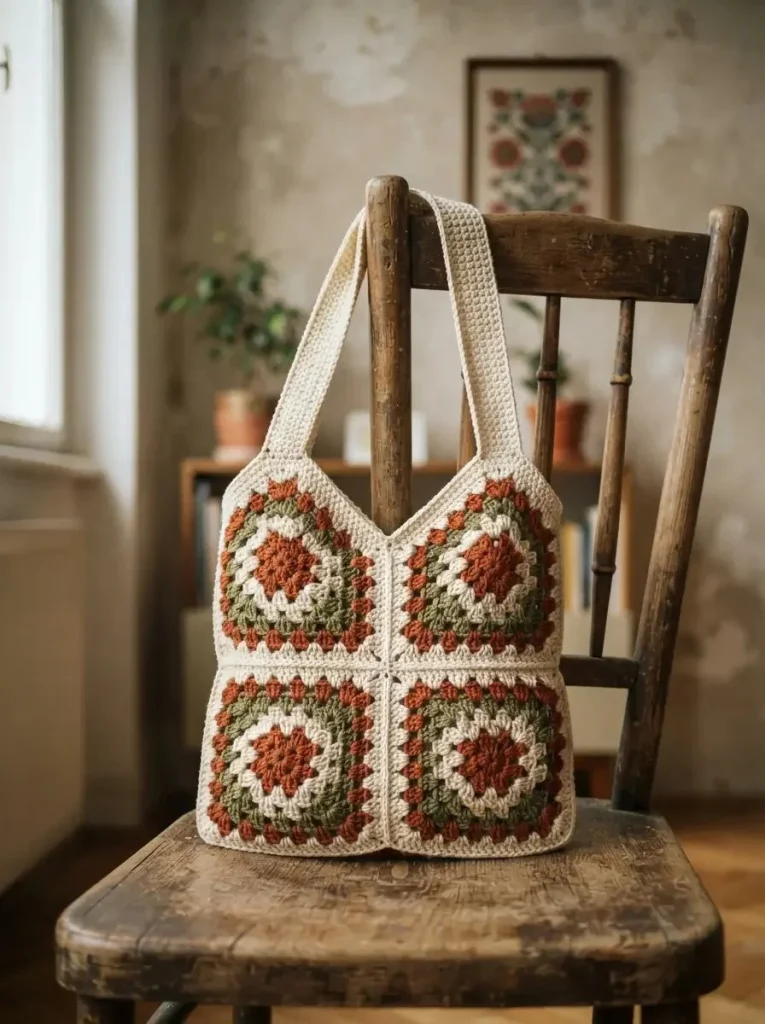
This stylish Autumn granny square shoulder bag is an engaging project that is both functional and visually appealing. Featuring a delightful combination of cream, rust, and olive green cotton yarn, this bag is perfect for carrying everyday essentials, transitioning seamlessly from casual outings to festive celebrations. The construction relies on classic granny square techniques, ensuring that the finished product is not only trendy but also sturdy and reliable.
By using a medium thickness cotton yarn, the bag maintains a comfortable structure while the granny squares provide a charming geometric element. This project is ideal for confident beginners looking to enhance their crochet skills while creating a unique accessory that embodies the autumn season’s warm colours and textures.
Pattern at a Glance
Skill level: Confident beginner
Terminology: UK terminology
Construction: Made from granny squares
Finished size: Approximately 28 × 28 cm, excluding strap
Yarn weight: Medium thickness (DK)
Hook: 4 mm crochet hook
Main stitch: Double crochet (erp)
Gauge: Not specified but ensure consistent tension
Motifs: 2 granny squares
Layout: Two squares sewn together
Joining: Whip stitch or slip stitch for seams
Border: Simple finishing with short stitches (rp)
Materials
For this project, gather the following materials:
- 250–300 g medium thickness cotton yarn:
- Cream
- Rust
- Olive green
- A crochet hook of about 4 mm: Ensure the hook matches the yarn thickness for optimal tension.
- Scissors: For cutting yarn as needed.
- Blunt-ended sewing needle: Useful for weaving in ends and for sewing components together.
- Stitch markers: To keep track of rounds and important stitch placements.
- Cotton fabric for the lining (as required): This will provide a neat finish and prevent small items from falling out of the bag.
Yarn and Colour Notes
Choosing the right yarn is vital for both the aesthetics and functionality of your bag. The medium thickness cotton yarn offers a balance of softness and sturdiness, making it perfect for a bag that needs to withstand daily use. Cotton yarn also provides a defined structure, allowing the granny squares to hold their shape beautifully.
For the colours, the combination of cream, rust, and olive green reflects the rich hues of autumn. You can opt for solid colours or explore variegated options for a charming twist. If you choose to play with colours, consider the visual impact—complementary colours can enhance the overall design, while a more monochromatic palette might offer a sophisticated touch.
Finished Measurements
The bag measures approximately 28 × 28 cm when completed, excluding the strap. This dimension makes it a perfect size for carrying essentials like keys, a wallet, and small personal items without being overly bulky. Keep in mind that the exact finished size may vary depending on your crochet tension; maintaining a consistent gauge is crucial for achieving the desired measurements.
Gauge
While a specific gauge isn’t provided, it’s important to ensure that your crochet tension matches the constructed pieces. You can test your gauge by creating a small swatch of granny square to see if you achieve the same size. If your stitches are tighter, your squares may end up smaller; if they are looser, you could risk oversizing.
Utilising the correct gauge affects not only the overall size of your project but also the durability of the finished bag. As a general rule, aim for a firm but flexible fabric to ensure the bag can support its contents without sagging.
Abbreviations
For this pattern, the following abbreviations will be used:
- lsz = chain stitch
- ksz = slip stitch
- rp = short stitch
- erp = double crochet
It is important to note that the initial 3 lsz at the start of the round counts as an erp.
Important Pattern Notes
- Turning chains: Remember that the initial chain can count as a stitch in rounds, specifically the first 3 lsz.
- Right side / wrong side: Ensure that your squares are assembled with the right sides facing out for a neat appearance.
- Colour changes: When changing colours, carry the unused yarn along the edges to maintain a clean finish.
- Stitch markers: Make use of stitch markers to keep your place, especially when working in rounds.
- Seaming orientation: Always check that your pieces align correctly when joining them.
Special Stitches and Techniques
This pattern mainly employs the double crochet (erp) stitch. Here’s a brief overview of the key techniques used:
- Magic circle: This initial method creates a tight centre for your granny square, preventing gaps.
- Slip stitch (ksz): Used to connect rounds or seams, providing a nearly invisible join.
Understanding the Construction
The bag is constructed using two identical granny squares featuring vibrant autumn colours. The squares are crocheted in rounds and then assembled to form the body of the bag. A sturdy strap, worked separately, will be attached to the upper corners of the bag, and an optional lining can be added for extra durability and a polished look.
Full Pattern Instructions
Foundation
To begin, gather your materials and set up your crochet workspace.
Round 1
- Create a magic circle.
- Chain 3 (counts as the first erp), then work 2 erp, followed by 2 lsz.
- Repeat the following steps three times: Work 3 erp, 2 lsz.
- Close with a ksz into the top of the starting 3 lsz. At this point, four groups of stitches and four corner arches should be formed.
Round 2
- With a slip stitch, move to the next corner arch.
- In the first corner, work 3 lsz, 2 erp, 2 lsz, and 3 erp.
- Chain 1 lsz.
- For every subsequent corner, work 3 erp, 2 lsz, 3 erp, with 1 lsz between the corner stitches.
- Close the round.
Rounds 3 and beyond
- From round 3 onwards and for all following rounds, in each corner arch work 3 erp, 2 lsz, 3 erp.
- For each side with a 1 lsz space, continue with 3 erp, ensuring 1 lsz between groups.
- Begin each round with 3 lsz and close it with ksz.
Continue in this manner until the side of the square measures approximately 28 cm.
Note: Change colours every two rounds, following this sequence: rust, cream, olive green. The final two rounds should be in cream.
Assembly of the Squares
- Create a second identical square, weave in any thread ends, and ensure both pieces are the same size.
- Place the squares right sides facing each other. With cream yarn, connect three sides using rp, ensuring you work into the stitches of both squares. For added strength, place 2 rp in each corner arch. Leave the top side open.
Strap
- Make 9 lsz. In the first row, from the second lsz counted from the hook, work 8 rp.
- For each subsequent row, chain 1 lsz, turn, and work 8 rp. Note that the turning lsz does not count as a stitch.
- Continue this for approximately 60 cm in length. It’s important to try it on your shoulder, as the strap may stretch with use.
Finally
- Sew the two ends of the strap to the two upper side corners of the bag with a 3–4 cm overlap. Reinforce with several rows of stitching.
- Finish off by crocheting around the top opening with a row of rp. For a neat finish and to prevent items from falling out, it’s advisable to sew a fabric lining into the bag.
Checkpoints
- After completing the first round, ensure you have four groups of stitches and arches.
- At the end of each round, confirm that your piece measures approximately 28 cm per side.
- When shaping the strap, check that it comfortably fits on your shoulder before attaching.
Finishing Touches
To enhance the durability of your bag:
- Weave in all loose ends carefully to prevent unraveling.
- Consider blocking your squares gently to maintain a neat appearance before assembly.
How to Resize
To adjust the size of your bag:
- Modify the number of rounds in the granny squares based on personal preference, ensuring to maintain the same colour change intervals.
- Alter the strap length according to your comfort preference.
Useful Variations
Explore the following variations of the design:
- Create a smaller or larger version as per your needs.
- Experiment with a monochromatic palette for a sophisticated look.
- Add embellishments or embroidery onto the squares before assembly for an extra personal touch.
Troubleshooting
Why Is My Project Getting Wider?
Increasing stitch count on the edges may be caused by adding extra stitches or not maintaining consistent tension. Consider using stitch markers to help track your transitions.
Why Is My Edge Wavy?
Wavy edges could be the result of inconsistent stitch tension or missing stitches. Check your stitch count and aim for uniformity in your rows.
Why Is My Fabric Curling?
Curling often occurs when using stitches that don’t have enough support from adjacent rows. Ensure that you’re following the stitch counts and maintaining your tension consistently.
Frequently Asked Questions
Can I use a different yarn weight?
You can use different yarn weights, but be aware this will affect the size of your finished bag; adjust your hook size and stitch counts accordingly.
Is the pattern reversible?
The design of granny squares typically allows both sides to be used, providing visual interest; however, the lining will make one side more beneficial for practical use.
Do I need a special hook?
A standard 4 mm crochet hook is suitable for this project, and no special hooks are required.
Can a beginner make this?
Yes, this project is ideal for confident beginners looking to hone their skills, as it involves basic crochet techniques.
Final Thoughts
The Autumn granny square shoulder bag comes down to the delightful blend of creating two granny squares and assembling them strategically to form a unique accessory. With its mix of textures and colours, this bag not only captures the essence of autumn but also offers a wonderful opportunity to practice crochet techniques. Enjoy the process, and most importantly, have fun crafting your bag!



