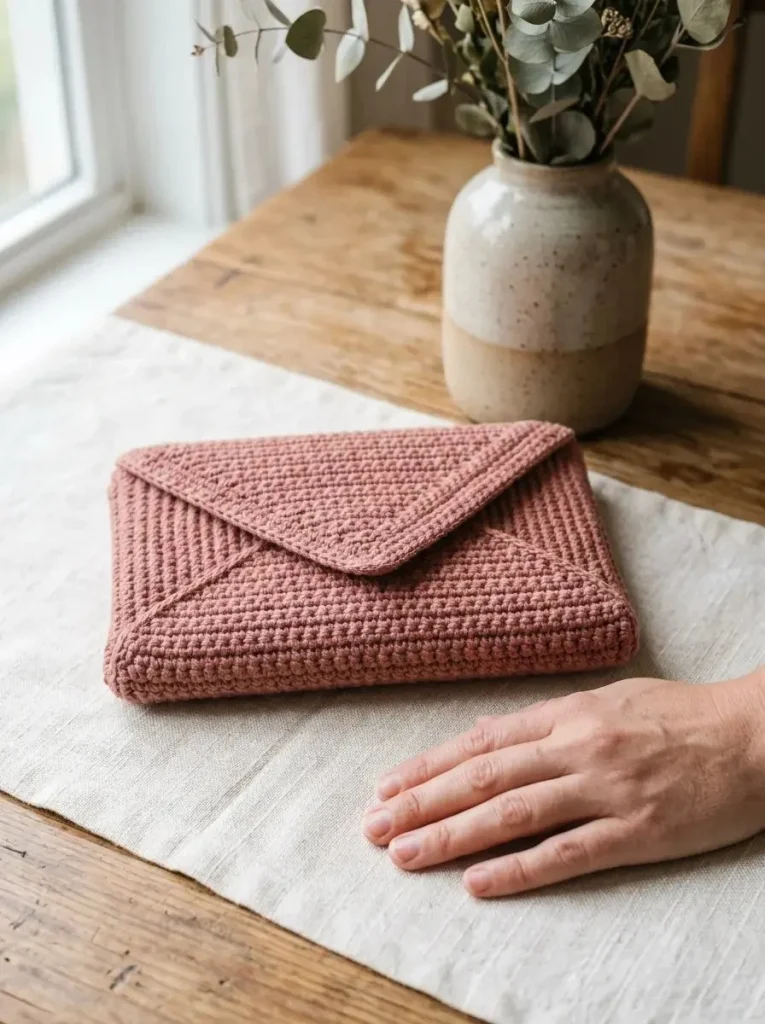
This elegant and simple Envelope Crochet Clutch is the perfect blend of functionality and style, making it a must-have accessory for any casual outing or event. With a chic tapered fold-over flap, this clutch not only looks great but is also easy to carry. Suitable for confident beginners, this project utilizes straightforward single crochet stitches, allowing you to create a beautiful piece in no time.
The clutch, designed to be compact yet functional, measures approximately 22 cm wide and 14 cm high when finished. It’s a straightforward design without any clasps, buttons, or straps, which means you can style it in various ways, whether you want a minimalist look or something a bit more decorative. This makes it a great project for those looking to explore their personal crochet style while enhancing their skills.
Pattern at a Glance
Skill level: Confident beginner
Terminology: US terms
Construction: Flat rectangular body with tapered flap
Finished size: Approx. 22 cm wide x 14 cm high
Yarn weight: Medium-weight cotton yarn
Hook: 3.5–4 mm crochet hook, adjusted for a firm fabric
Main stitch: Single crochet
Gauge: Not specified but should result in a firm fabric for bag construction
Motifs: None
Layout: Worked in rows
Joining: Sew sides together
Border: None required
Materials
To create your Simple Envelope Crochet Clutch, you will need the following materials:
- Yarn: Approximately 150–200 g of medium-weight cotton yarn in a color of your choice (dusty rose is recommended for a soft, sophisticated look).
- Hook: An approximately 3.5–4 mm crochet hook. Choose the size that will provide a firm fabric, which helps retain the shape of the clutch.
- Notions:
- Scissors: For cutting your yarn.
- Blunt yarn needle: For weaving in ends.
- Measuring tape: To track your project’s size accurately.
- Stitch markers: Helpful for marking corners or where to fold the clutch.
Yarn and Color Notes
Cotton yarn is an excellent choice for this clutch because it provides a sturdy yet soft structure. Medium-weight cotton offers the right balance between durability and comfort, ensuring that the clutch holds its shape while remaining lightweight. Dusty rose not only adds a sophisticated vibe but also complements various outfits, making it versatile.
If you prefer to use other fibers, consider blends that maintain a similar thickness and drape, such as cotton-acrylic blends or mercerized cotton, which can also add subtle lustre to your finished item.
Finished Measurements
Your finished clutch should measure approximately 22 cm in width and 14 cm in height. These measurements refer to the clutch’s body when it is flat and prepared for use. The dimensions may vary slightly depending on your crochet tension, so ensure to check as you work.
Gauge
While the pattern does not specify an exact gauge, it’s essential to crochet with a tension that provides a firm fabric for better structure and overall durability.
If your gauge is larger (wider stitches), your clutch may end up being larger than intended, whereas a tighter gauge could result in a smaller finished piece. If this is your first attempt with this yarn or hook size, making a small swatch (about 10 cm square) before starting is a good practice to ensure your final measurements match.
Abbreviations
The following abbreviations are used throughout the pattern:
- ch: chain
- sc: single crochet
- sc2tog: single crochet two together (decrease)
Important Pattern Notes
Before diving into the pattern instructions, it’s crucial to understand a few vital aspects:
- Turning chains: The turning chain (ch 1) at the start of each row does not count as a stitch. It’s primarily for height adjustment.
- Stitch counting: Keep track of your total stitches at the end of each row to avoid any unintentional increases or decreases.
- Folding: Make sure the folding edge of your clutch meets the line where the tapered flap begins to ensure a neat finish.
Special Stitches and Techniques
The primary stitch used in this pattern is single crochet (sc), which forms the foundation for the clutch’s body and flap. Additionally, the pattern introduces the decrease stitch (sc2tog) to create a tapered effect for the flap, allowing it to taper gracefully to a point.
Understanding the Construction
This clutch is constructed primarily as a flat rectangle that serves as both the body and the flap. You’ll begin by creating the long rectangle that folds into the shape of the clutch. After reaching the desired height, the flap tapers down with a series of decreases to achieve the elegant finish.
Full Pattern Instructions
Foundation
- Start with ch 41.
Row 1
- In the second chain from the hook, work sc in each remaining chain. You should have a total of 40 sc at the end of this row.
Row 2
- Ch 1, turn your work; sc in every stitch through both top loops. You will have 40 sc at the end of this row.
Continuing Rows
- Repeat Row 2 for several rows. Measure the width as you work and aim for approximately 22 cm. If you do not reach this dimension with the current foundation chain, restart with a different even stitch count. Remember that the foundation chain should be one greater than your desired sc count.
Measuring Height
- Continue working in single crochet until the rectangle measures approximately 28 cm in height, which will accommodate the folded section of the clutch.
Beginning the Tapered Flap
-
To create the tapered flap, begin decreasing as follows:
- Decrease row: Ch 1, turn; sc2tog over the first 2 stitches, sc in every middle stitch, sc2tog over the final 2 stitches.
- This decreases your stitch count to 38 sc.
-
Repeat the decrease row until you have 2 stitches remaining. From an initial 40-stitch width, you will complete 19 decrease rows in total.
Final Row of the Flap
- For the final row, work ch 1, turn; sc2tog once, leaving 1 stitch. Fasten off.
Folding and Assembling
- Fold the starting edge upward by 14 cm so that the foundation edge aligns with the line where the tapered flap begins. Ensure that the flap remains above the body.
- Keep the folded bottom straight and pin the side edges together with stitch markers.
Sewing the Sides
- Using matching yarn, sew the left and right body sides through corresponding row ends on both layers. Be sure not to sew the flap edges or open body. Maintain even side seams without pulling them tight.
Final Touches
- Weave in any remaining ends. Fold the tapered flap down over the front of the clutch and gently shape it according to the yarn care instructions. Allow it to dry flat.
Carry light, non-fragile items that cannot slip through the fabric or open flap.
Note: This original pattern has not been physically test-crocheted. Sizes and yarn quantities are estimates; always double-check dimensions as you work.
Checkpoints
- Your piece should now measure approximately 28 cm in height.
- You should still have 40 stitches after Row 2 before starting the decreases.
- Ensure that the flap remains even when folded over.
Assembly
- Once the body and flap are complete, focus on achieving a neat join of the side seams. The right sides should be facing each other during assembly.
- Start by aligning the top edges and pinning before sewing to avoid any puckering.
- Remember to apply gentle tension; too much pulling could distort the fabric.
Finishing
To complete your clutch, sew the sides snugly using a whip stitch or slip stitch to create a nearly invisible seam. Be diligent in weaving in ends when necessary to maintain a clean finish.
Resizing
If you wish to resize the clutch:
- For a wider clutch, add an even number of stitches to your foundation chain, making sure it still totals one greater than your desired width for single crochet.
- For a taller clutch, continue working additional rows before beginning the tapered flap, measuring each section to guarantee a proportional look.
Variations
Feel free to explore different colorways or textures! A striped version could utilize contrasting colors, or a luxurious variegated yarn could add depth and interest. You might also consider adding embellishments like tassels, or a contrasting edging around the flap for an entirely different aesthetic.
Troubleshooting
Why Is My Clutch Curling?
A common issue may be curling edges, which can occur if your gauge is too tight. Switching to a larger hook can help alleviate this.
Why Do I Have Gaps in My Seams?
Gaps can indicate that the stitches were not joined tightly enough. Aim for a balanced pull while sewing the body seams.
Frequently Asked Questions
Can I Use a Different Yarn Weight?
Yes, you can, but adjustments may be necessary, especially in the foundation chain and overall stitch count.
Can A Beginner Make This?
Absolutely! The pattern is designed to be beginner-friendly, focusing on basic stitches and construction.
Do I Need a Special Hook?
A standard crochet hook size of 3.5–4 mm works well. Ensure it suits your yarn for optimal tension.
Is This Clutch Reversible?
While the design is not reversible due to the flap and seams, the interior will be neat and presentable.
Final Thoughts
This Simple Envelope Crochet Clutch is not only a delightful project to enhance your skills but also a stunning accessory for everyday use. It combines a straightforward design with elegance and practicality. Once completed, you’ll have a beautifully crafted clutch perfect for any occasion, showcasing your hard work and creativity. Happy crocheting!



