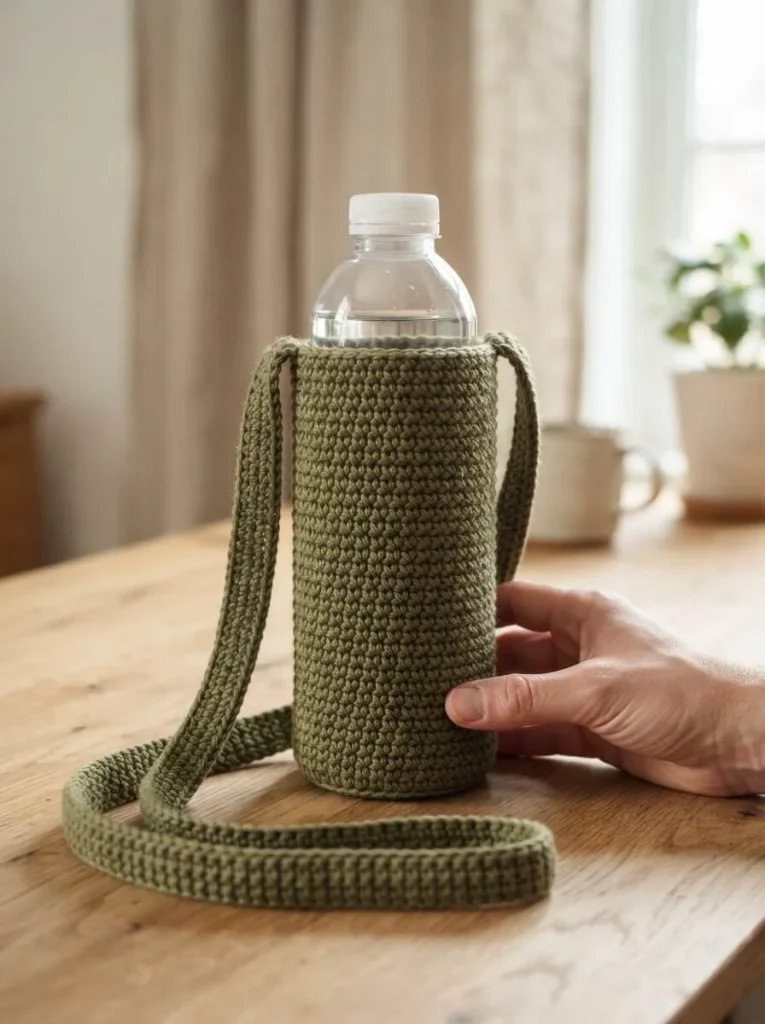
Creating a crochet water-bottle carrier is a practical and stylish way to ensure you stay hydrated while on the go. This crochet project not only keeps your reusable bottle easily accessible but also allows you to express your creativity. The Everyday Crochet Water-Bottle Carrier is perfect for confident beginners looking to enhance their crochet skills without too much complexity. By using a simple spiral construction, the pattern keeps things straightforward while ensuring the bottle fits snugly.
The carrier is functional and visually appealing, with options to customize the length of the strap to suit your needs. Additionally, the use of worsted-weight cotton yarn in a rich olive green offers a sturdy yet soft texture that complements various styles—making it a versatile accessory for daily use.
Pattern at a Glance
Skill level: Confident Beginner
Terminology: US
Construction: Spiral
Finished size: Fits bottles 17-24 fl oz (500-700 ml)
Yarn weight: Worsted-weight cotton
Hook: US G/6 (4 mm) or size giving a dense fabric
Main stitch: Single crochet (sc)
Gauge: To be determined based on hook and yarn used
Motifs: Not applicable
Layout: Tubular body with shoulder strap
Joining: Sew ends securely
Border: None
Materials
To create your Everyday Crochet Water-Bottle Carrier, you will need the following materials:
- Yarn: Approximately 150–220 g worsted-weight cotton yarn in olive green
- Hook: US G/6 (4 mm) crochet hook, or size giving a dense fabric
- Notions:
- Stitch marker
- Scissors
- Blunt yarn needle
- Measuring tape
- Bottle for Fitting: Start with a small reusable bottle around 17–24 fl oz (500–700 ml)
Yarn and Color Notes
Worsted-weight cotton yarn is ideal for this project due to its durability and ability to hold its shape. Cotton yarn is also great for projects that require a bit of stretch and recovery, which is essential for ensuring the carrier can accommodate your bottle. The olive green color not only looks stylish but also gives a natural, earthy tone that blends seamlessly with outdoor settings.
You might consider using variegated yarn for a fun swirly effect; however, be mindful that this might alter the overall aesthetic. If you’re looking for a more subtle look, stick with solid colors to maintain classic elegance.
Finished Measurements
The final size of your bottle carrier will depend on the dimensions of the bottle used and your personal preferences for strap length. However, typically the body will fit securely around bottles of 17–24 fl oz (500–700 ml), while the strap can be adjusted to around 26–30 inches (66–76 cm).
Gauge
While an exact gauge measurement isn’t specified, you should aim for a firm fabric that does not stretch too easily. A tighter stitch tension will ensure the carrier securely holds the bottle without sagging. If you notice your finished piece is too loose or too tight, you can adjust the hook size and yarn tension accordingly.
Abbreviations
- ch: Chain
- sc: Single crochet
- inc: Increase (2 sc in one stitch)
- sl st: Slip stitch
- BLO: Back loop only
- FLO: Front loop only
Important Pattern Notes
- Make sure to mark the first stitch of each round to keep track of rounds.
- The carrier is worked in a continuous spiral, which means you do not need to join at the end of each round.
- When using the stitch marker, remember to move it up as you progress through the rounds.
- The top of the carrier remains fully open with no drawstring or closure.
- Be sure to check the fit of the bottle frequently as you work on the body.
Special Techniques and Techniques
- Magic Ring: This technique creates a tight center for the base of the carrier. If you’re not familiar with this method, there are numerous tutorials online.
- Back Loop Only (BLO): This stitch creates a subtle texture and sturdy edge when transitioning from the base to the body.
Understanding the Construction
The Everyday Crochet Water-Bottle Carrier is constructed from the bottom up. You’ll begin with the base, working in a magic ring to create a round foundation that fits snugly against the bottle’s base. As you add rounds for the body, you must pay attention to fit continuously against the bottle to ensure easy insertion while preventing sagging. The strap is attached after the body is complete, allowing for an adjustable fit.
Full Pattern Instructions
Base
- Round 1: Work 6 sc into a magic ring.
- Round 2: Increase in every stitch: 12 sc.
- Round 3: (1 sc, inc) six times: 18 sc.
- Round 4: (2 sc, inc) six times: 24 sc.
- Round 5: (3 sc, inc) six times: 30 sc.
- Round 6: (4 sc, inc) six times: 36 sc.
- Round 7: (5 sc, inc) six times: 42 sc.
Checking Base Fit
- After completing the base, check the circle against the bottle bottom without stretching it. The base should be slightly wider than the bottle.
- If needed, you can adjust the rounds: add an extra sc before every increase for additional rounds (increasing the stitch count by 6 each time).
- Aim for a mostly flat base. Record the final even stitch count.
Turning Round
- After the final round, work 1 sc in the back loop only of every stitch (42 sc if you used 42 stitches).
Body
- Work 1 sc in each stitch around until the body reaches approximately 1 inch (2.5 cm) below the bottle’s shoulder or narrowing section.
- Try inserting the bottle as you work. It should slide in effortlessly.
Finish Body
- When the desired height is reached, finish with a sl st in the next stitch, fasten off, and weave in any ends securely.
Strap
- Ch 9.
- Row 1: Sc in the second chain from the hook and every remaining chain for a total of 8 sc.
- Each following row: ch 1, turn, and sc in each stitch (8 sc). The turning chain does not count.
- Continue to the desired length, checking around 26–30 inches (66–76 cm), including attachment overlaps as cotton can stretch with use.
Attaching the Strap
- Mark two opposite points on the rim, half the body stitch count apart (21 stitches apart for a 42-stitch body).
- Place one strap end against each marked side, overlapping the inside wall by approximately 1.5 inches (4 cm).
- Ensure the strap is not twisted.
- Sew each overlapping end around its perimeter and across its middle through actual crochet stitches. Reinforce with several passes.
Final Touches
- Weave in all ends securely.
- Test the strap attachments by placing the carrier on a table with an empty bottle, gradually adding water. If you notice any strain in the stitches or yarn, discontinue use and reinforce as necessary.
- Support a heavy bottle by its base for optimal stability.
Note: This original pattern draft has not been physically test-crocheted or load-tested. Fit, strength, and yarn quantities must be checked in the finished item. This is an adult accessory; not intended for children.
Resizing Your Carrier
Adjustments can be made based on your desired fit or bottle size. To modify the pattern:
- For a wider base: Add additional rounds before starting the body, ensuring to keep the proportions consistent.
- For a longer strap: Simply chain more before starting the rows, and keep in mind that cotton may stretch with use.
Useful Variations
Here are some variations you might consider for making the water-bottle carrier more personal:
- Try a two-color pattern for the strap and body to create a unique look.
- Experiment with different worsted-weight colors for seasonal versions – think bright colors for summer or muted tones for fall.
- Create a miniature version for travel-sized bottles, adjusting both the base and strap length accordingly.
Troubleshooting
Why Is My Project Getting Wider?
If the project is getting wider, check to ensure that you are not inadvertently adding extra stitches during your rows. Always count your stitches at the end of each round to be sure.
Why Is My Edge Wavy?
Wavy edges can result from too much tension. Make sure your stitches are consistent.
Why Is My Fabric Curling?
This may happen if you’re crocheting too tightly. Ensure that your tension remains even throughout the project.
FAQs
Can I use a different yarn weight?
Certainly! Just ensure that the yarn you choose is a worsted weight to maintain the structure.
Can I make it larger?
Yes, simply adjust the number of rounds in the base and the length of the strap.
Is the pattern suitable for beginners?
This project is geared towards confident beginners, provided you are familiar with basic crochet stitches.
How should I clean my carrier?
Machine wash in cold water on a gentle cycle and lay flat to dry to maintain its shape.
Final Thoughts
In summary, this Everyday Crochet Water-Bottle Carrier project is all about combining functionality with creative flair. You can easily customize its size and length to fit your needs while enjoying the meditative quality of crochet. This project not only provides a practical solution for carrying bottles but also allows you to express your artistic side with yarn. Enjoy your crocheting!



