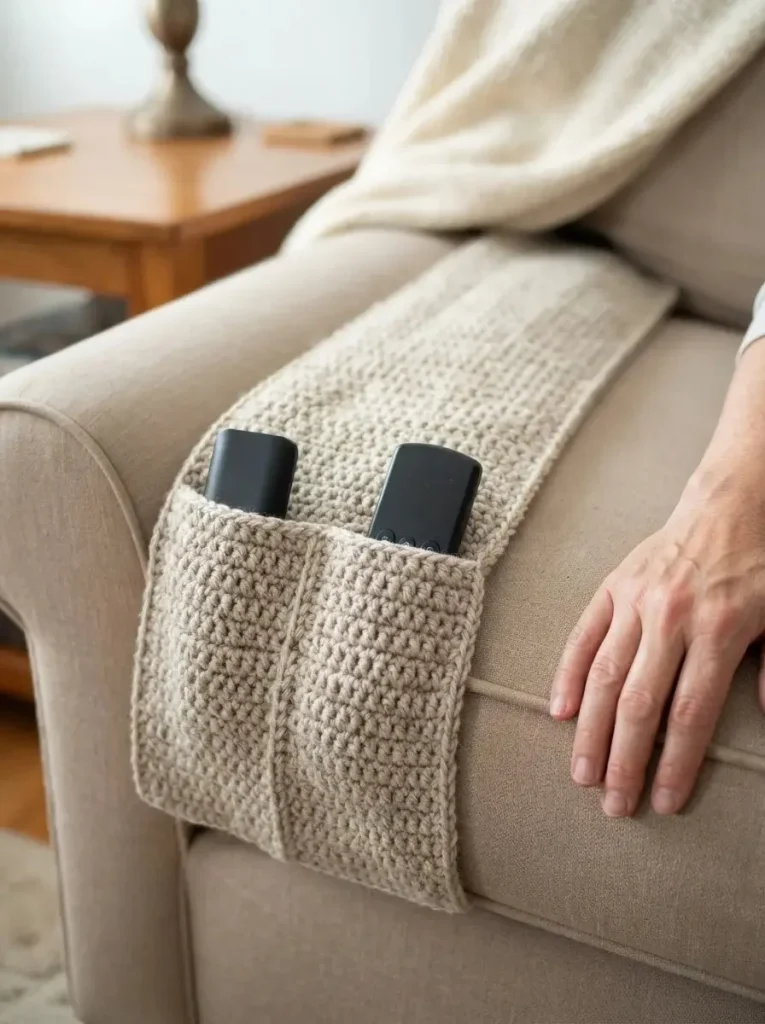
This unique and functional crochet project combines creativity with practicality, resulting in a chunky crochet remote holder that keeps your TV remotes within easy reach and adds a touch of handmade charm to your living space. Not only does this remote holder serve a functional purpose, but its textured design, achieved with bulky cotton-blend yarn, offers a modern aesthetic that is visually appealing. This project is particularly designed for beginner crocheters who possess confidence in basic crochet techniques.
The construction features a single rectangular strip that folds up at one end to form two pockets for your remotes. The longer section drapes over the arm of your sofa and tucks securely under a removable seat cushion, ensuring it stays in place while providing easy access to your remotes. Before starting, it’s important to measure your sofa to make certain the holder fits perfectly and remains stable.
Pattern at a Glance
Skill level: Confident beginner
Terminology: US crochet terms
Construction: One rectangular strip folded into pockets
Finished size: Adjustable based on remote measurements and personal preferences
Yarn weight: Bulky
Hook: US J/10 (6 mm)
Main stitch: Single crochet
Gauge: Not specified, but check your work when making to ensure pocket depth and overall fit are correct
Layout: One-piece construction
Joining: Minimal, only sewing the pockets into place
Finishing: Weaving in ends and blocking as needed
Materials
To create this chunky crochet remote holder, gather the following materials:
- Approximately 250–400 g of bulky cotton-blend yarn in a color like oatmeal. This type of yarn typically has good stitch definition, perfect for showcasing the crochet texture.
- US J/10 (6 mm) crochet hook, ideal for creating a dense fabric that holds its shape.
- Scissors for cutting yarn.
- A blunt yarn needle for weaving in ends.
- Measuring tape for accurate measurements.
- Stitch markers to keep track of your stitch count and row progress.
- Your sofa and two remote controls, essential for checking the fit as you work.
Yarn and Color Notes
Choosing the right yarn is essential for this project. A bulky cotton-blend yarn not only provides warmth and durability but also delivers a pleasant texture. Look for yarn that has a smooth finish for better stitch definition, which will enhance the overall look of your finished piece. Solid colors can result in a clean and classic appearance, while variegated or speckled yarns can add unique visual interest.
Finished Measurements
The finished measurements of the remote holder can vary depending on your specific sofa and remote sizes. As a general guideline, aim for a starting width of approximately 10 inches (25 cm) for the remote pockets. The total length of the strip will be calculated based on the depth of the pockets and the dimensions of your sofa arm. Example calculations could lead to a total length of about 31 inches as you incorporate various measurements (e.g., pocket depth + drop to sofa arm + distance across the arm + tuck length under the cushion). Measure carefully to ensure a good fit!
Gauge
Gauge is not expressly provided for this project, but it’s always wise to check your gauge when working on any crochet project. A tighter gauge will yield a sturdier structure that holds its shape better. If your stitches are larger than expected, consider switching to a smaller hook size or adjusting your tension. Conversely, if your stitches are smaller, you might need to experiment with a larger hook.
Abbreviations
Here are the abbreviations used in this pattern:
- ch: Chain
- sc: Single crochet
Important Pattern Notes
Before diving into the pattern, keep these important details in mind:
- The turning chain of 1 does not count as a stitch.
- Pay attention to the right side and wrong side of your fabric; the right side is the finished side that will be visible.
- Always use stitch markers if necessary to track your progress.
- Make sure the pockets are sized well enough to hold the remote controls but allow for easy access.
Special Stitches and Techniques
This pattern primarily uses the single crochet stitch throughout. It is a great stitch for beginners and serves as the foundation for creating a solid and durable fabric.
Understanding the Construction
This project involves creating a long rectangular strip that will serve as the body of the remote holder. The unique aspect of this design is how it folds to create two pockets for the remotes. The additional length helps in tucking the holder securely under the cushion, ensuring it remains stable during use.
Complete Pattern Instructions
Foundation
- Plan your Width: Lay the two remote controls side by side to determine the required width. Allow for seams and easy access; a starting width of approximately 10 inches (25 cm) is suitable for most remotes. Begin with a starting chain of 29.
Row 1
- Row 1: In the second chain from the hook (the first chain is your starting chain), work 1 single crochet in each chain across. You should have a total of 28 single crochets at the end of this row.
Row 2
- Row 2: Chain 1 and turn your work. Work 1 single crochet in every stitch through both top loops. Repeat Row 2 until your strip reaches the desired width, ensuring the same stitch count each time.
Strip Length
-
To determine the length of the strip, add the desired pocket depth, the drop from the pocket bottom to the top of the sofa arm, the width of the arm, and the section needed to tuck securely under the seat cushion. Example: 6 inches (pocket depth) + 8 inches (drop) + 7 inches (width of the arm) + 10 inches (tuck length) = 31 inches total length.
-
Continue crocheting until you reach this calculated length. Fasten off and weave in the yarn ends. Allow it to shape according to the yarn care label while drying.
Creating Pockets
-
Once dry, lay the strip flat with the intended pocket side facing upward. Fold the starting end upward by your planned pocket depth (for example, 6 inches (15 cm)). This creates a double-layer pocket with a fold at the bottom.
-
Sew the left and right edges of the folded section to the backing using corresponding row ends. Keep the upper pocket edge open.
Adding Divider
- Place the remotes inside temporarily to mark the position for the vertical divider, then remove them before sewing. Sew one vertical divider from the bottom fold to the pocket opening, going through both layers, to create two channels. Make sure to reinforce both ends of the divider. Each remote should have enough width to slide in and out easily, so the two pockets do not need to be identical in size.
Finishing Touches
-
With your pockets now positioned on the outside of the sofa arm, drape the remaining length of the strip over the arm and securely tuck the tail beneath the seat cushion. First, check the stability with just the empty holder, adding the two remotes afterward. If it slips out of place, you may need to increase the tucked length or adjust its positioning.
-
There are no buttons, hooks, straps, fringe, or trim included. For cleaning, simply remove the remotes and follow the care instructions on the yarn label.
Disclaimer
Note: This original pattern draft has not been physically test-crocheted. Dimensions, yarn amounts, and holding performance are not guaranteed; fit and test it on your own sofa.
Checkpoints
- Your piece should measure approximately 10 inches (25 cm) in width.
- You should maintain 28 single crochet stitches per row.
- The finished strip should be 31 inches long, based on your calculations.
Assembly
The simplicity of this project requires minimal assembly. The key steps include ensuring the pockets are securely sewn in place while keeping the tops open for easy access.
Resizing
To resize, you can:
- Adjust the chain length at the beginning for different pocket widths.
- Modify the total length to suit different arm lengths of various sofas.
Variations
Consider these variations for a unique touch:
- Use different colors for the yarn.
- Create a shorter or longer version to fit various remotes or for aesthetic appeal.
- Experiment with adding decorative stitching or additional pockets.
Troubleshooting
Why Is My Project Getting Wider?
A common cause is adding stitches accidentally at row ends. Always double-check your stitch count after each row.
Why Is My Edge Wavy?
Wavy edges are usually due to tension issues. Try to maintain an even tension on each stitch.
Why Is My Fabric Curling?
If your work curls, consider going up a hook size or using a different tension.
Frequently Asked Questions
Can I use a different yarn weight?
Yes, but be mindful that it might affect the overall size and stability of the remote holder.
Can I use cotton?
Absolutely! Cotton is a great choice for this project due to its durability and washability.
How should I block it?
Lightly blocking this design can help it maintain its shape without compromising the integrity of the soft fabric.
Final Thoughts
This chunky crochet remote holder project merges practicality with creative flair. Following the outlined steps and instructions, you’ll create a lovely addition to your living space that brings ease to your relaxation time. Embrace the satisfaction of crafting something useful while learning and honing your crochet skills along the way!



