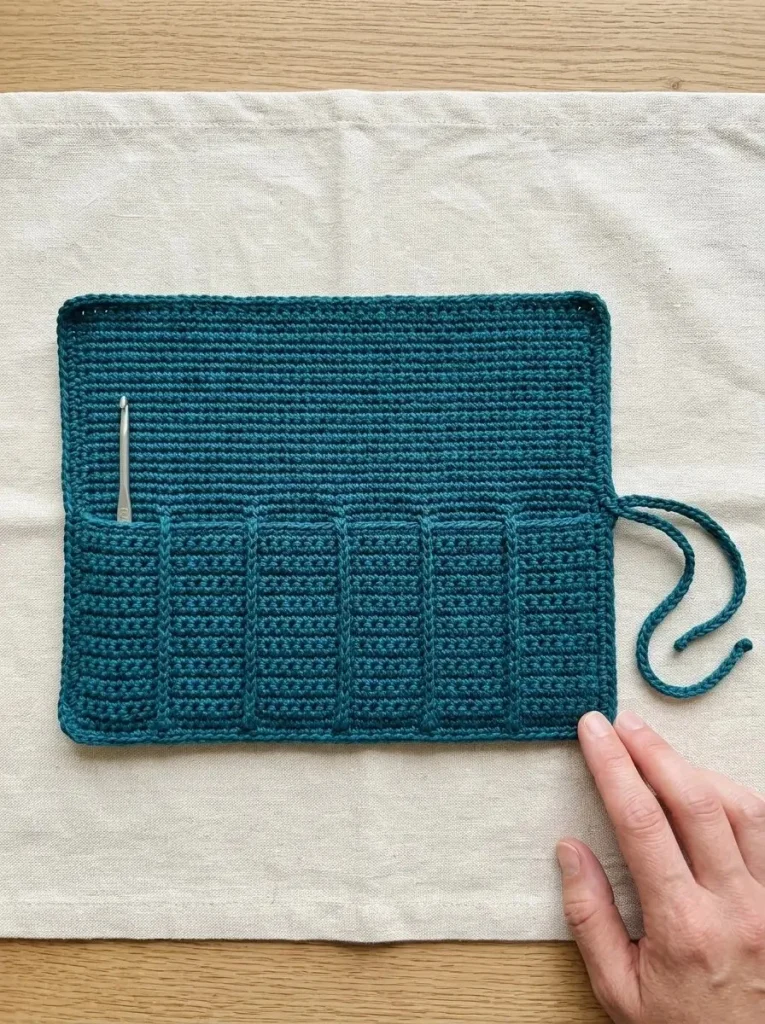
Creating a Roll-Up Crochet-Hook Organizer is not only a practical solution for keeping your crochet tools tidy, but it also offers a chance to showcase your crochet skills. This easy-to-make storage solution combines functionality with creativity, allowing you to personalize it with your choice of colors and yarn. The organizer’s design features a folded pocket with individual channels for your hooks, providing quick access while keeping everything secure. Ideal for both beginner and seasoned crocheters, this project is a beautiful way to stay organized as you explore new patterns or simply enjoy crafting.
Pattern at a Glance
- Skill level: Easy
- Terminology: US terms, including ch (chain), sc (single crochet), BLO (back loop only), and st (stitch)
- Construction: Rectangular base with folded pocket; backstitched channels for hooks
- Finished size: Approximately 9 in wide by 7 in high (23 by 18 cm)
- Yarn weight: Worsted cotton
- Hook: 4 mm crochet hook
- Main stitch: Single crochet
- Gauge: 16 sc and 20 rows per 4 in (10 cm)
- Motifs: None
- Layout: Single piece with pocket and channels
- Joining: Whipstitch for edges
- Border: None
- Seaming: Backstitching between channels
Materials
To create your Roll-Up Crochet-Hook Organizer, you will need:
- Yarn: 100–140 g of worsted cotton (suggested color: deep teal)
- Hook: 4 mm crochet hook
- Notions:
- Yarn needle for weaving in ends
- Scissors for trimming yarn
- Tape measure for accurate measurements
- Stitch markers to denote channel divisions
- Crochet Hooks: Six slim crochet hooks up to about 6 in (15 cm) long for fitting and creating channels
Yarn and Color Notes
For this organizer, using worsted weight cotton yarn not only provides durability but also ensures that your finished product retains its shape over time. Cotton yarns are ideal for soft storage solutions since they are sturdy yet flexible.
When selecting a color, deep teal is not only visually striking but offers a calming presence. You could also consider variegated yarn for a more unique look. Just remember that the color and texture can affect the overall presentation of your project, so pick a shade that inspires you!
Finished Measurements
The finished organizer will measure approximately 9 in wide by 7 in high (23 by 18 cm). The front pocket has a depth of 3 in (7.5 cm), making it spacious enough to accommodate various sizes of crochet hooks. As you work, your measurements may be influenced by your gauge, so be mindful of consistency.
Gauge
To achieve the correct gauge, strive for 16 single crochets and 20 rows per 4 in (10 cm).
- Where to measure: Take your measurements across several rows to establish an average.
- Why gauge matters: Achieving the correct gauge is important for functionality and aesthetic integrity. If your gauge is larger than this, the finished pocket may be too loose, compromising the security of your hooks. Conversely, if your gauge is smaller, the pockets might become too tight, making it difficult to insert or remove crochet hooks.
Abbreviations
- ch: chain
- sc: single crochet
- BLO: back loop only
- st: stitch
Important Pattern Notes
- Turning chains: The turning chain does not count as a stitch.
- Right side vs. wrong side: Ensure you identify which side will be the right side, as this will affect how the pocket appears.
- Channel measurement: The spacing for channels can be adjusted depending on the size of the hooks used.
- Soft storage method: Remember, this organizer is intended for soft storage rather than as a rigid case, so avoid flipping it upside down.
Special Stitches and Techniques
- Single Crochet (sc): The main stitch used in this project, worked across all rows to form a sturdy fabric.
- Backstitch (for channels): Used to create the dividers within the pocket; backstitching provides a secure finish to the seams.
Understanding the Construction
This Roll-Up Organizer is constructed from a single piece of crocheted fabric. It starts with a foundation chain followed by rows of single crochet, which form a rectangle. After reaching the desired length, the fabric is folded to create a pocket, enhancing its usability. The folded edges are then whipstitched to form an open-top pocket, and backstitching creates the individual channels for your crochet hooks. Finally, a cord is created and attached for rolling and securing the organizer closed.
Full Pattern Instructions
Foundation
- Ch 37.
Row 1
- In the second ch from the hook, sc in each remaining ch (total of 36 sc).
Row 2
- Ch 1, turn your work, and sc in each st across (total of 36 sc).
Rows 3-50
- Repeat Row 2 until your rectangle measures 10 in (25.5 cm) long, which will be approximately 50 total rows. Fasten off the yarn when finished.
Folding the Rectangle
- Lay the rectangle so that the 9 in (23 cm) edges are horizontal. Fold the lower 3 in (7.5 cm) upward. The back height of the organizer should measure 7 in (18 cm), leaving a 3 in high pocket at the front.
Assembling the Pocket
- Use a whipstitch to sew both short side edges of the folded pocket together through both layers, leaving the top open.
Creating the Channels
-
Divide the pocket into six equal channels by marking five vertical seam lines at 1.5 in (3.8 cm) intervals. Before sewing, test the spacing with actual hooks to ensure they fit comfortably.
-
Backstitch through both layers along each marked line, from the bottom fold to only the top of the pocket. Reinforce the top of each seam to ensure durability.
Constructing the Tie
-
For the tie, ch a cord about 26 in (66 cm) long.
-
Slip stitch into the second chain from the hook and continue slip stitching back along the entire chain. Make sure to fasten off and weave in the ends.
-
Secure the midpoint of the finished cord to the outside of one side edge of the organizer at about half the height, leaving two free tails for tying.
Storing Crochet Hooks
- Place one hook in each channel with the handles facing down. When storing, roll the organizer from the opposite side toward the tie attachment and use the tails to secure it. Tail length can be adjusted for a snug fit.
Final Steps
- Weave all remaining ends securely and wash and dry flat according to your yarn label instructions. Remember: this organizer is meant for soft storage, so treat it gently—carry it upright in your bag and avoid turning it upside down.
Checkpoints
- Your rectangle should now measure approximately 10 in in length.
- There should be six open channels created by the marked lines after sewing.
- Ensure that the pocket remains 3 in in height after folding.
Assembly
During assembly, you will only need to secure the sides of the folded pocket and reinforce the channel dividers. This is a straightforward process, so follow your lines carefully and check the pockets for evenness as you sew.
Finishing
As you finish, take care to weave in all ends to maintain a clean look. Consider blocking your piece if the edges are curling or if you want sharper lines. This can help your organizer maintain its intended shape.
How to Resize
If you need to resize this project, the main element to adjust is the starting chain. Maintain the stitch pattern by adjusting the chain in multiples of 2, as the single crochet stitches and channel dividers depend on this format. Be sure to test with your actual hooks for spacing before securing any stitches.
Useful Variations
- Color Variations: Create a multi-colored version by alternating yarns in different sections.
- Longer Organizer: Extend the rectangle to fit more hooks for avid crocheters.
- Personalized Touch: Add embellishments or appliques that represent your crochet journey.
Troubleshooting
Why Is My Organizer Too Tight?
If your organizer is too tight, it likely means your gauge was smaller than recommended. Consider using a larger hook size or adding chains to start with a wider base.
Why Is My Fabric Curling?
Curling can occur if your tension is too tight. Make sure to check your stitch tension, and consider blocking your finished piece to help shape it better.
Why Don’t My Channels Fit the Hooks?
If the channels are too small, you might need to adjust the spacing based on your crochet hook handle sizes. Always test your hooks in the channels before final attachment.
Frequently Asked Questions
Can I use a different yarn weight?
Yes, but be aware that different weights will alter the dimensions and gauge. Adjust your stitches accordingly to maintain the fit.
How should I block it?
Once your piece is complete, you can wash it gently and lay it flat to dry, ensuring the edges are shaped properly.
Is this project suitable for beginners?
Absolutely! The techniques used are perfect for those new to crochet, providing a fantastic project to hone your skills.
Final Thoughts
The Roll-Up Crochet-Hook Organizer comes down to a few main steps: setting your foundation with a sturdy rectangle, creating a practical pocket, and adding individual channels for organization. This project not only holds your tools but also offers a creative outlet, inviting you to express your personal style. Enjoy the process and your tidy workspace!



