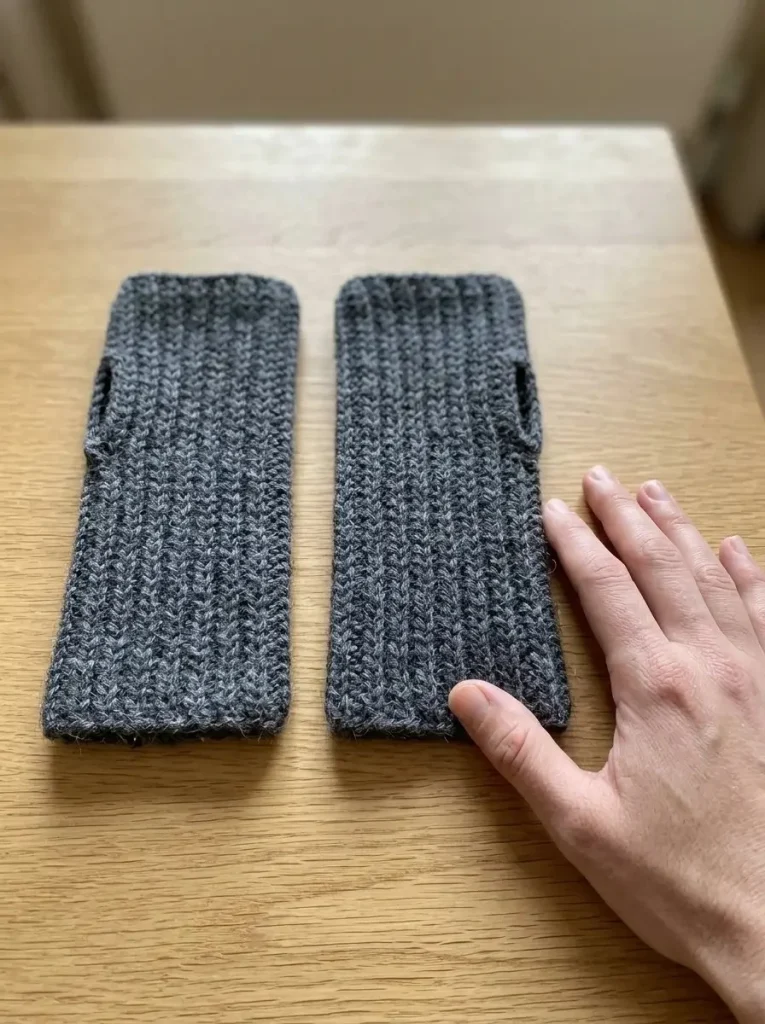
Creating your own fingerless wrist warmers is a delightful way to combine function and style while exercising your crochet skills. The Easy Ribbed Fingerless Wrist Warmers project presents a charming opportunity to create cozy accessories that work well for cooler days or simply to enhance your outfit. These warmers are designed as seamless tubes with openings for the thumbs, making them extremely easy to wear and practical. The simple construction employs a back loop only (BLO) stitch, resulting in a lovely ribbed texture that is not only aesthetically pleasing but also functional in providing warmth.
Pattern at a Glance
- Skill level: Easy
- Terminology: US terms
- Construction: Made to measure; each warmer is a rectangle sewn into a tube with a thumb opening.
- Finished size: Approximate length of 7 in / 18 cm
- Yarn weight: Worsted wool/acrylic blend
- Hook: 5 mm
- Main stitch: Single crochet (sc) in back loop only (BLO)
- Gauge: 16 sc per 4 in / 10 cm
- Motifs: None
- Layout: Rectangular
- Joining: Whipstitch for seam
- Seaming: Using a yarn needle
Materials
To complete the Easy Ribbed Fingerless Wrist Warmers, you will need the following materials:
- Yarn: 70–100 g of soft worsted wool/acrylic blend in charcoal gray for a pair
- Hook: 5 mm crochet hook
- Notions:
- Yarn needle
- Scissors
- Measuring tape
- Stitch markers
Each material plays a crucial role: the yarn provides warmth and comfort, while the hook size impacts the overall gauge of your project. A yarn needle is essential for weaving in ends, and scissors will assist you in properly finishing your work. Lastly, a measuring tape will be helpful for ensuring the perfect fit.
Yarn and Color Notes
For these wrist warmers, a worsted wool/acrylic blend is an ideal choice. It strikes a balance between warmth and breathability, making it suitable for various temperatures. Such blends usually have a pleasing drape and are easy to care for, lending themselves well to everyday wear. Choosing a charcoal gray color not only keeps the design neutral but also allows you to pair the wrist warmers with multiple outfits.
If you want to add a pop of color or create a more personalized touch, consider using variegated yarn or changing up the colors at different rows to produce a unique design. Solid colors will give a classic look, while a splash of color can enhance the visual appeal.
Finished Measurements
The finished size of each warmer should be approximately 7 in / 18 cm in length. It’s important to remember that these measurements are based on the specified yarn and gauge. If you wish to resize them, adjustments to the length can be achieved by altering the starting chain or row count.
Gauge
To ensure your wrist warmers fit beautifully, check your gauge. The suggested gauge is 16 sc per 4 in / 10 cm. This is essential for fit, particularly for garments.
- Where to measure: Gauge is usually checked with a square of fabric before starting. Measure across a predefined area of your swatch.
- If your gauge is larger: Your warmers may end up too loose and not provide the fit you desire.
- If your gauge is smaller: The warmers may become tight, potentially leading to discomfort.
If your gauge doesn’t match, adjust your hook size accordingly—use a larger hook for a looser gauge or a smaller one for a tighter fit.
Abbreviations
- ch: chain
- sc: single crochet
- BLO: back loop only
- st: stitch
Important Pattern Notes
- Turning chains: Don’t count turning chains as stitches unless specified.
- Right side / wrong side: Ensure you know which side will be the public side once finished, especially when starting the second piece.
- Stitch markers: Use to identify important points in your work, especially for marking the thumb gap.
Special Stitches and Techniques
The primary stitch used in this project is the single crochet worked in back loop only (BLO). This stitch creates the ribbed texture that gives the warmers their appealing look.
Understanding the Construction
These fingerless warmers are constructed in a very straightforward manner. You will create a rectangular piece using only single crochet stitches in the back loop. After reaching the desired width to fit around your hand, you will seam the rectangle together to form a tube with a gap for the thumb. This streamlined approach makes the pattern accessible even for beginners.
Complete Pattern Instructions
Foundation
Begin by measuring around the widest part of your hand (excluding the thumb). This measurement will guide you in determining the rectangle’s width. Adjust as needed to ensure it fits comfortably; aim for 0–0.5 in / 0–1.3 cm less than your measurement if your swatch has good elasticity.
Starting Chain
Ch 29. This provides the foundation length of your warmer.
Row 1
In the second chain from the hook, work sc in each remaining chain (a total of 28 sc). This row should run to approximately 7 in / 18 cm, making it the correct length to go from wrist edge to finger edge. If you want a different length, feel free to change your starting chain count.
Row 2
- Ch 1, turn.
- Work sc in the BLO of each stitch across (maintaining 28 sc). Repeat this row until the rectangle fits comfortably around your hand.
For an 8 in / 20 cm hand, start checking the rectangle width when it reaches 7.5–8 in / 19–20 cm. Ensure it can be slipped on without forcing.
Assembling the Tube
- Fasten off with a long sewing tail.
- Bring the foundation edge and last row together to form a tube, ensuring it is not twisted.
- Mark your thumb gap by starting about 1.5 in / 4 cm below the finger opening and leaving about 1.5 in / 4 cm unsewn. Try on the tube to confirm you can adjust the gap’s position to suit your thumb.
Closing the Tube
Whipstitch from the finger edge to the top thumb marker, securing the yarn and fastening it off. Rejoin at the lower thumb marker and sew down to the wrist edge, leaving the marked gap open. Make sure to reinforce both ends of the gap, but don’t stitch across it. The top and bottom tube openings must remain open.
Making the Second Warmer
Follow the same dimensions and row count for the second warmer as described above. Weave in any ends and turn the seams inward. Once both warmers are complete, check that your fingers and thumbs move freely within each piece.
Finishing Touches
Be sure to wash according to the yarn label’s instructions and allow them to dry flat. After finishing, you should have two identical charcoal ribbed tubes, each featuring a side thumb opening and no separate cuffs or embellishments.
Checkpoints
- Your rectangle should now measure approximately 7 in / 18 cm in length and comfortably wrap around your hand.
- Ensure you still have 28 stitches in each completed row after reaching the desired dimensions.
Variations
Once you get the hang of the basics, consider experimenting with variations, such as:
- Different yarn colors: Brighten up your wrist warmers by incorporating colorful palettes.
- Length alterations: Make longer versions that extend up the forearm for added warmth or adjust the width for a looser fit.
- Textured patterns: Explore alternate stitches like half double crochet or even a variation of ribbing for a different look.
Troubleshooting
Why Is My Project Getting Wider?
This could happen if you are inadvertently adding extra stitches at the beginning or end of your rows. Ensure you’re maintaining the correct stitch count per established row.
Why Is My Edge Wavy?
Wavy edges typically indicate a tension issue. Make sure your tension is even throughout your work. If it persists, consider using a larger hook size to relax the fabric.
Why Are My Stitch Patterns Not Matching?
If you are losing count of rows, use stitch markers to help maintain your place or jot down notes on what row you are on. Always double-check your stitch count after each row.
Frequently Asked Questions
Can I use a different yarn weight?
You can, but be aware that this may affect the finished size and fit, along with the gauge. It’s advisable to adjust your hook size accordingly and swatch first.
Is this pattern suitable for beginners?
Absolutely! The simplicity of the stitch and construction makes it an excellent choice for new crocheters.
How should I block my finished warmers?
You can steam block them lightly or allow them to dry flat to help set the stitches neatly.
Can I make it larger?
Yes! By adjusting the starting chain length and checking the measurement, you can easily resize these warmers for larger hands.
What should I do if my warmers are too tight?
You might need to go up a hook size or use a yarn that has more stretch or drape.
Are there any specific care instructions after completing my warmers?
Always refer to the yarn label for specific washing and drying instructions. Generally, most acrylic blends can be machine washed and dried.
Final Thoughts
This project comes down to simple calculations and easy crochet techniques. By recognizing how to measure, construct, and adapt the design, you can create personalized fingerless wrist warmers that are not only cozy but also uniquely yours. With the straightforward application of single crochet stitches, you’re sure to enjoy this practical and stylish addition to your winter wardrobe! Happy crocheting!



