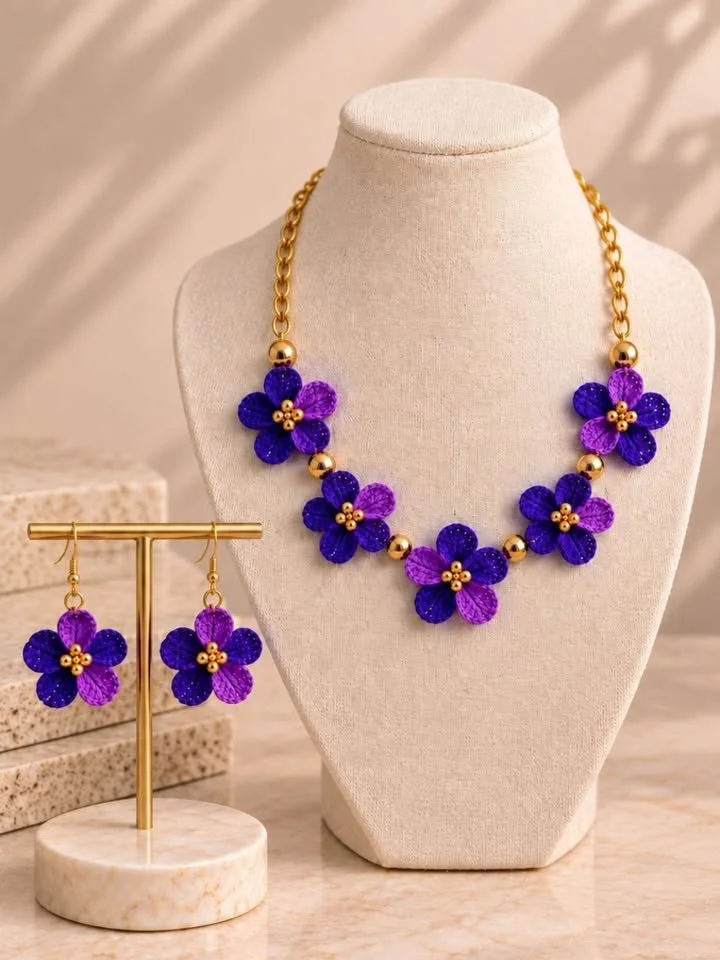
Creating eye-catching crochet jewelry can turn into a lovely afternoon project, especially with a design as charming as this five-petal bloom. This intricate flower not only adds flair to jewelry, but also inspires creativity in creating unique gifts or accessories. With tiny stitches working together to form delicate petals, this project invites crocheters of various skill levels to explore and appreciate the beauty of handmade items.
The main technique used in this pattern is traditional crochet, focusing on a blend of tight stitches to achieve the desired texture and definition in each petal. The appeal of this design lies not only in its aesthetic qualities but also in its versatility—this bloom can be used as a brooch, hair accessory, or even sewn onto a piece of clothing, giving it endless possibilities for customization and personal expression.
Pattern at a Glance
- Skill level: Intermediate
- Terminology: US Crochet Terms
- Construction: Worked in a series of rounds to form petals
- Finished size: Approximately 2-3 inches in diameter (depending on gauge)
- Yarn weight: Light weight (similar to sport weight)
- Hook: 3.5 mm (E/4)
- Main stitch: Single crochet (sc), slip stitch (sl st), and chain (ch)
- Gauge: 22 sc = 4 inches
- Motifs: 5 petal motifs per piece
- Layout: Circular flower shape
- Joining: Not required as petals are created in one piece
- Border: Optional picot edge for added detail
- Seaming: None necessary
Materials
To create this delightful bloom, you’ll need the following materials:
-
Yarn:
- Light weight yarn, approximately 50 yards in your chosen color (or colors). You could use cotton for a sturdier feel or acrylic for softness.
-
Hook:
- 3.5 mm crochet hook (E/4).
-
Notions:
- Scissors for cutting yarn.
- Yarn needle for weaving in ends.
- Optional: Small bead or button to embellish the center of the flower.
-
Stitch markers:
- Useful for keeping track of rounds if you’re working in the spirals.
Yarn and Color Notes
Choosing the right yarn can significantly affect the overall appearance of your floral jewelry. For this project, a light weight yarn is recommended to maintain delicate proportions while ensuring the petals aren’t too bulky. Cotton yarn can provide a firm structure, while acrylic may allow for softer folds and drape. Consider patterns or colors that complement each other, especially if you plan to create more flowers or wearable items that showcase multiple colors.
Finished Measurements
The finished flower will measure approximately 2 to 3 inches in diameter, depending on your tightness of tension and how much you stretch the finished petals. Understanding how to manipulate your yarn tension is important for achieving your desired dimensions.
Gauge
Achieving the correct gauge is essential for ensuring your flower turns out as intended. The provided gauge of 22 single crochets (sc) = 4 inches applies to the main body of the pattern. To measure your gauge, work a small swatch with your chosen yarn and hook. If your gauge is larger than indicated, consider using a smaller hook to tighten your stitches. Conversely, if your gauge is smaller, a larger hook may be necessary to achieve the right size.
Abbreviations
In this pattern, you’ll encounter the following abbreviations:
- ch: chain
- sc: single crochet
- sl st: slip stitch
Important Pattern Notes
-
Turning chains: When instructed to create a chain, it does not count as a stitch unless stated.
-
Right side / wrong side: This pattern is primarily created in a continuous round, eliminating concerns about right or wrong sides.
-
Stitch markers: For clarity, use stitch markers at the beginning of each round to help keep your place.
Special Stitches and Techniques
-
Single crochet (sc): The foundation stitch in this pattern.
-
Slip stitch (sl st): Used for finishing rounds.
-
Picot stitch (optional): A decorative stitch that can be added to create a lace-like edge for finishing.
Understanding the Construction
The flower is constructed by creating five petals in rounds that are built upon each other. The combination of sturdy stitches maintains structure while allowing for a beautiful shape that resembles a blooming flower. There is no need for separate assembly since everything culminates into one cohesive piece.
Full Pattern Instructions
Foundation
Begin by making a magic ring (or chain 4 and join into a ring).
Round 1
- Ch 2 to start the round, which will count as your first sc.
- Work 11 sc into the ring.
- Pull the ring tight and join with a sl st to the first sc to close the round.
Round 2
- Start with a ch 2.
- Work 2 sc in each stitch around (total 24 sc).
- Join with sl st to the first sc.
Round 3
- Chain 1 and work 1 sc into the first stitch.
- *Work 1 sc in the next stitch, then 2 sc in the following stitch. Repeat from * around (36 sc total).
- Join with sl st to the first sc.
Round 4
- Chain 1, then work 1 sc in each stitch around (36 sc).
- Join with sl st to the first sc.
Creating Petals
- Begin the first petal by chaining 3 from the last round’s join.
- Work back into the same stitch with 3 dc, then work 1 sc into the next stitch.
- Repeat from the first step (ch 3, 3 dc, 1 sc) in each of the next 11 stitches to form petals.
- After making 5 petals, finish with a sl st to the base of the petal sequence.
The flower will now have five lovely petals raised around its center. If desired, you can add a picot trim by chaining 3 from each peak of the petal for added texture.
Checkpoints
-
After completing Round 1, you should have 12 stitches in the circle.
-
After Round 2, you should have 24 stitches.
-
By the end of Round 3, your total should be 36 stitches confirming the expansion of your design.
Finishing
Once your flower is complete, weave in any loose yarn ends to maintain a clean finish. If desired, you may attach a small bead or button in the center of the flower as an embellishment. This can do wonders for the overall appearance, giving your project a charming focal point.
How to Resize
Resizing may be achieved by adjusting the number of rounds or stitches in each round. For a larger flower, you may simply repeat the petal creation steps or add additional rounds. Reworking the foundation by varying your chain counts can also yield different sizes.
Useful Variations
Consider experimenting with various colors or yarn types to create unique flower variations:
-
Two-tone petals: Gradually shift colors across each petal for a gradient effect.
-
Bold contrast: Use contrasting shades for the center and petals to make the flower pop.
Troubleshooting
Why Is My Petal Shape Irregular?
Ensure you are consistently working the same number of stitches in each petal. Tension affects the final shape, so try to keep tension uniform throughout.
Why Don’t My Petals Stand Up?
If petals are floppy, consider using a firmer yarn or reducing the number of stitches to create tighter petals that hold their shape better.
Why Are My Stitches Uneven?
Check your tension as you work. If you’re pulling your yarn too tightly, or too loosely, it will affect the stitch appearance. Aim for a consistent pressure across each round.
Frequently Asked Questions
Can I use a different yarn weight?
Yes, you can opt for heavier yarn, but ensure that your hook size accommodates this change to maintain the project’s integrity.
Can I use cotton?
Absolutely! Cotton yarn is excellent for sturdy floral patterns as it holds shape well.
Can I make it larger?
To increase size, consider adding extra rows in the petal section or using a bulkier yarn with a proportional hook.
Is the pattern reversible?
This flower design isn’t particularly reversible due to the way petals are constructed, but you can have a similar finishing on both sides if desired.
Do I need a special hook?
A standard crochet hook in the recommended size is sufficient, but ensure it’s smooth for best results.
Final Thoughts
Creating this stunning flower is not only a gratifying crochet project, but it also incorporates creativity, a pinch of patience, and the joy of crafting. By understanding the construction and adhering to the pattern, you can cultivate a beautiful range of floral accessories, each representing your unique style and flair. The foundation built upon simple stitches can open a myriad of pathways for future designs, encouraging continued exploration in the world of crochet!



