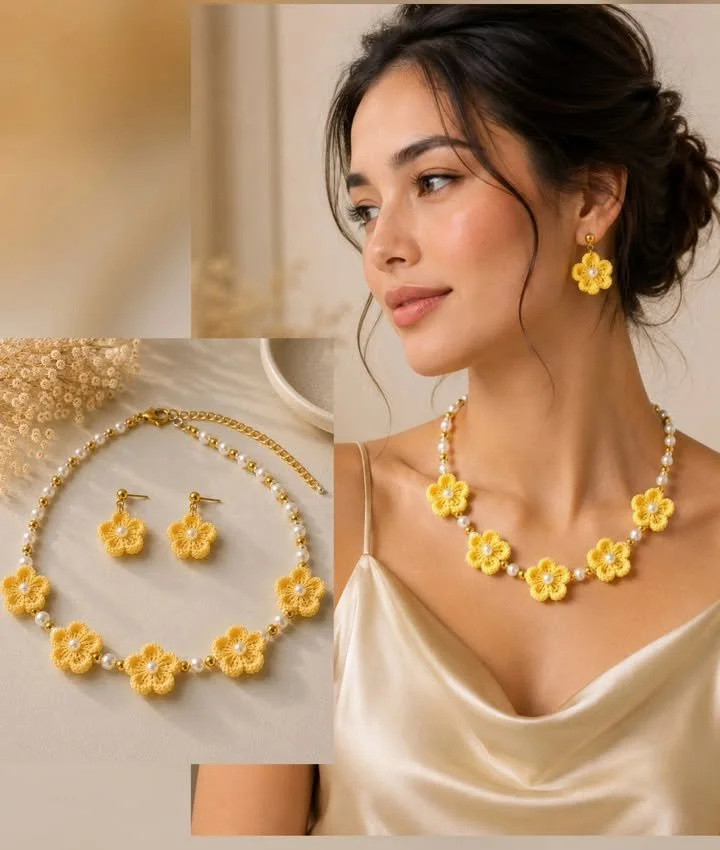
Crocheting your own jewelry can add a lovely, personal touch to your outfits, and the “Golden Blooms for Sunny Days” project showcases this beautifully. With its sunny floral motifs, this crochet jewelry piece is not only visually appealing but also a fun and rewarding project to create. Perfect for brightening any look, the lightweight and delicate nature of this crochet jewelry makes it ideal for wearing in the warmer seasons.
The process of making these golden blooms involves simple crochet techniques, perfect for both beginners and seasoned crocheters alike. The pleasing patterns and vibrant hues enable you to express your creativity while developing your crochet skills.
Pattern at a Glance
- Skill level: Easy
- Terminology: US Terms
- Construction: Worked in rounds and joined together
- Finished size: Varies depending on motif assembly
- Yarn weight: Worsted weight (Category 4)
- Hook: Size H/8 (5.00 mm)
- Main stitch: Double crochet
- Gauge: 4 inches = 16 dc
- Motifs: Several floral motifs are made and assembled
- Layout: Floral motifs are combined to create a necklace or embellishment
- Joining: Motifs are sewn together
- Border: Optional edging can be added if desired
- Seaming: Join with needle and thread
Materials
To get started on your "Golden Blooms for Sunny Days" crochet project, you’ll need the following materials:
- Yarn: Worsted weight yarn in yellow, green, and other desired colors for the blooms. Approximately 100 yards will suffice for the blooms.
- Hook: Size H/8 (5.00 mm) crochet hook, ideal for creating a nice drape with worsted weight yarn.
- Needle: Tapestry needle for weaving in ends and joining pieces.
- Scissors for trimming excess yarn.
- Stitch markers can be helpful for keeping track of stitch counts if desired.
- Optional: Beads or other embellishments to enhance the flower design.
Yarn and Color Notes
When selecting your yarn, consider the fiber content and texture. For flower motifs, smooth cotton blends can provide a cleaner finish and easier stitch definition, while a blend with wool can add warmth and softness. Solid colors will produce a classic look, while variegated yarns can create interesting depth and dimension.
Feel free to experiment with different colors to achieve the vibrant or soft palette that suits your style. Spring or summer tones, like bright yellows and greens, will complement the theme of sunny blooms perfectly.
Finished Measurements
The final size of the project will depend on how many motifs you choose to create and how they are arranged. Each individual bloom will approximately measure 3 inches in diameter. Create as many as you wish, and remember that arranging them in a necklace or bracelet will depend on your personal taste and style.
Gauge
Achieving the correct gauge is crucial for ensuring your crochet motifs turn out as expected. To check your gauge, work a swatch of your pattern in double crochet:
- Gauge: 4 inches = 16 dc
- If your gauge is larger than this, your motifs will be larger than intended. To remedy this, switch to a smaller hook.
- Conversely, if your gauge is smaller, switch to a larger hook.
Abbreviations
- ch: Chain
- dc: Double crochet
- sl st: Slip stitch
Important Pattern Notes
- Turning chains: Always count your turning chain as the first stitch of the row when applicable.
- Right side / wrong side: Ensure you are consistent with the right and wrong sides of your work to maintain uniformity in your motifs.
- Removed stitches or added stitches: Carefully count stitches in each round to maintain the flower shape.
Special Stitches and Techniques
The main stitching technique utilized in this project is the double crochet. This creates an open and airy feel, perfect for lightweight floral motifs.
Understanding the Construction
These floral motifs are created separately before being joined to form your desired jewelry piece. The process consists of creating individual blooms using rounds of double crochet, resulting in a delightful, textured appearance. After crafting a collection of flowers, they will be sewn together to form a necklace or any other style of jewelry you desire.
Full Pattern Instructions
Foundation
Begin with a magic ring or chain 4 and join with a slip stitch to form a ring.
Round 1
Ch 3 (counts as first dc now and throughout), work 11 dc into the ring. Join with a slip stitch to the top of the ch 3. (12 dc total)
Round 2
Ch 3, 2 dc in the first stitch, 3 dc in the next stitch, repeat from * to * around. Join with a slip stitch. (36 dc total)
Round 3
Ch 1, sc in the first stitch, ch 3, skip 2 dc, sc in the next dc, repeat from * to * around. Join with a slip stitch.
At this point, you have completed your bloom. Fasten off, and leave a long tail for sewing.
Creating Additional Blooms
Repeat the above instructions to create as many additional blooms as desired for your jewelry piece.
Checkpoints
- After Round 1, check that you have 12 stitches.
- After Round 2, double-check you have a total of 36 stitches.
- Each bloom should measure approximately 3 inches in diameter.
Assembly
Once all your blooms are created, assemble them in your desired flower arrangement:
- Lay out the blooms to find the perfect arrangement.
- Using the long tail from each bloom, sew the flowers together, ensuring that they align correctly.
- Continue until all pieces are joined, creating a cohesive look.
Finishing
After joining your motifs, weave in any loose ends with your tapestry needle for a neat finish. You can also add beads or other embellishments to the centers of your blooms for extra flair, and consider applying a light blocking step to help shape the florals, especially if they appear uneven.
How to Resize
If you wish to create a longer or shorter piece, consider how many blooms you make. You can easily add or remove the number of floral motifs to cater to your desired length. Each flower adds approximately 3 inches to the overall length of your project.
Useful Variations
- Single Large Bloom Necklace: Instead of multiple flowers, consider crafting a single oversized bloom for a statement piece.
- Color Variations: Try using a gradient color scheme where the flowers gradually change shades from light to dark, or vice versa.
- Bracelet Version: Create smaller flowers for a cute bracelet instead of a necklace.
Troubleshooting
Why Is My Bloom Curling?
It may be due to tight stitches. Ensure to relax your tension while working on your motifs.
Why Are My Flowers Not Laying Flat?
If your blooms are puckering, you might need to adjust your stitch count or check your tension throughout the work.
Why Do My Flowers Look Uneven?
Check that you are maintaining the same stitch counts in all rounds and that you are using consistent tension for each piece.
Frequently Asked Questions
Can I use a different yarn weight?
Yes, but adjust the hook size accordingly to maintain the same gauge and overall appearance.
Can I use cotton yarn?
Absolutely! Cotton yarn is an excellent choice for floral motifs, providing durability and a beautiful finish.
Can a beginner make this?
Definitely! This project is designed to cater to beginners while also allowing for creativity and growth in skills.
How should I block it?
Gently steam or spray with water and lay flat to dry to maintain the flower shapes.
Do I need a special hook?
No special hooks are necessary, just a standard size H/8 (5.00 mm) or your preferred size that meets the gauge.
Is this project reversible?
The completed floral motifs are not reversible due to the nature of the stitching and joining, but they look beautiful from all angles.
Final Thoughts
This charming project revolves around crafting delightful floral motifs that are then brought together to create stunning jewelry. With a few simple crochet techniques, you can immerse yourself in creativity, making unique pieces to brighten your jewelry box and showcase your handmade expertise. Remember, the joy of crochet lies not only in the final products but in the process of creation itself. Enjoy making your Golden Blooms for Sunny Days!



