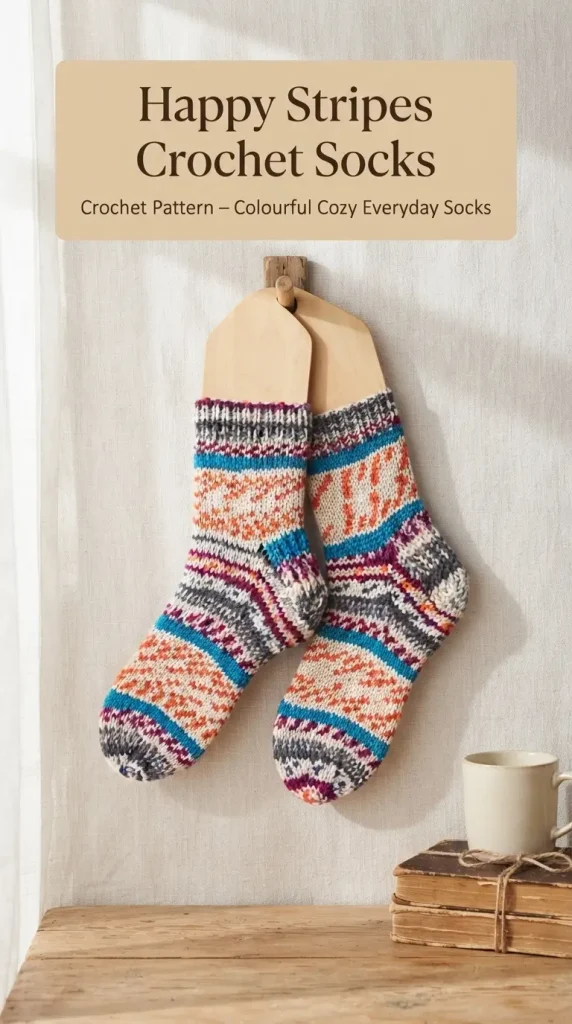
These Happy Stripes Crochet Socks are a cheerful way to turn multicolored yarn into a cozy handmade pair you can wear around the house or tuck into boots. The design keeps the simple, playful striped look of self-patterning sock yarn while using crochet construction throughout.
This original crochet version is inspired by the colorful sock silhouette in the reference image. The socks feature a neat ribbed cuff, a comfortable leg, shaped heel, fitted foot, and rounded toe. A self-striping yarn creates lively bands of coral orange, turquoise blue, charcoal gray, cream, burgundy, and soft lavender without requiring complicated color changes.
DESCRIPTION
The finished Happy Stripes Crochet Socks have a classic mid-calf length with a stretchy ribbed cuff, straight leg, shaped heel, comfortable foot, and smooth rounded toe. The fabric is dense enough to feel warm while remaining flexible for everyday wear. The multicolored yarn creates irregular horizontal stripes and small speckled sections in coral, turquoise, cream, gray, burgundy, purple, and white. The overall look is cozy, casual, colorful, and perfect for a handmade crochet gift.
MATERIALS
- 175–220 yd / 160–200 m of DK or light worsted weight sock yarn
- 3.5 mm to 3.75 mm crochet hook
- Stitch markers
- Yarn needle
- Scissors
- Measuring tape
- Optional sock blockers
For a similar color effect, choose a self-striping yarn containing:
- Coral orange
- Turquoise blue
- Charcoal gray
- Cream
- Burgundy
- Plum
- Soft lavender
- White
Choose yarn with some wool content for warmth and a little nylon or other strengthening fiber for better durability.
ABBREVIATIONS
- ch – chain
- sc – single crochet
- hdc – half double crochet
- sl st – slip stitch
- st(s) – stitch(es)
- BLO – back loop only
- hdc2tog – half double crochet 2 together
- rep – repeat
PATTERN NOTES
US crochet terminology is used throughout.
The socks are worked from the cuff downward.
Construction includes:
- Stretchy ribbed cuff
- Leg
- Heel flap
- Heel turn
- Gusset
- Foot
- Toe shaping
Difficulty: Intermediate.
Make two identical socks.
The pattern can be adjusted easily by changing the leg and foot length.
For the best fit, crochet socks should have slight negative ease. Aim for a finished circumference approximately 0.5–1 in / 1.5–2.5 cm smaller than the foot circumference.
SIZING
Approximate foot circumference:
- Small: 7.5 in / 19 cm
- Medium: 8.5 in / 21.5 cm
- Large: 9.5 in / 24 cm
Approximate finished foot length is adjustable.
Measure from the back of the heel to the tip of the longest toe.
Stop the foot section approximately 1.5–2 in / 4–5 cm before the full foot length to allow for toe shaping.
GAUGE
Approximately:
18 hdc x 15 rounds = 4 x 4 in / 10 x 10 cm
Gauge should create a firm but flexible fabric.
If your fabric is too loose, use a smaller hook.
If it feels stiff, move up one hook size.
STEP-BY-STEP INSTRUCTIONS
RIBBED CUFF
The cuff is worked sideways in rows and joined into a ring.
Ch:
- Small: 9
- Medium: 10
- Large: 11
Row 1
Sc in second ch from hook and each ch across.
Turn.
Row 2
Ch 1.
Sc BLO in each st across.
Turn.
Repeat Row 2 until the strip fits comfortably around the ankle with gentle stretch.
Approximate number of rows:
- Small: 34
- Medium: 38
- Large: 42
Do not stretch excessively when measuring.
Bring the first and last rows together.
Sl st through both layers to form a ring.
Turn the cuff so the seam is inside.
LEG
Rotate the cuff so you can work around one long edge.
Round 1
Ch 1.
Work hdc evenly around the cuff edge.
Aim for:
- Small: 36 sts
- Medium: 40 sts
- Large: 44 sts
Join with sl st.
Place a marker at the beginning of the round.
Round 2
Ch 1.
Hdc in each st around.
Join.
Repeat Round 2 until the leg measures approximately 5–7 in / 13–18 cm from the top of the cuff.
Allow self-striping yarn to change color naturally.
HEEL DIVISION
The heel is worked across approximately half of the total stitches.
Heel stitch counts:
- Small: 18 sts
- Medium: 20 sts
- Large: 22 sts
Work across the heel stitches only.
Leave the remaining stitches unworked for the instep.
HEEL FLAP
Row 1
Ch 1.
Sc across the heel stitches.
Turn.
Row 2
Ch 1.
Sc BLO across.
Turn.
Repeat Rows 1–2 until the heel flap measures approximately:
- Small: 2 in / 5 cm
- Medium: 2.25 in / 5.7 cm
- Large: 2.5 in / 6.5 cm
The flap should reach approximately from the ankle bone to the bottom of the heel.
HEEL TURN
The heel is shaped using short rows.
For Medium, begin with 20 heel stitches.
Row 1
Sc 13.
Sc2tog.
Sc 1.
Turn.
Row 2
Ch 1.
Sc 7.
Sc2tog.
Sc 1.
Turn.
Row 3
Ch 1.
Sc across until 1 st before the visible gap.
Sc2tog across the gap.
Sc 1.
Turn.
Repeat Row 3 until all heel stitches have been incorporated.
For Small and Large, use the same technique and center the shaping over the heel.
The finished heel should form a small curved cup.
GUSSET
With the RS facing, begin at one side of the heel.
Pick up and work approximately 1 hdc into each heel-flap row.
Work hdc across the held instep stitches.
Pick up the same number of stitches along the opposite side of the heel flap.
Work across the heel stitches.
Place your round marker at the center back heel.
GUSSET DECREASE ROUND
Ch 1.
Hdc across the heel and first side until 2 sts before the instep.
Hdc2tog.
Hdc across the instep.
Hdc2tog after the instep.
Hdc around to the marker.
Join.
PLAIN GUSSET ROUND
Ch 1.
Hdc in each st around.
Join.
Repeat:
- 1 decrease round
- 1 plain round
until you return to the original leg stitch count:
- Small: 36 sts
- Medium: 40 sts
- Large: 44 sts
FOOT
Continue working even rounds.
Foot Round
Ch 1.
Hdc in every st around.
Join.
Repeat until the sock measures approximately 1.5–2 in / 4–5 cm shorter than the wearer’s total foot length.
Try the sock on as you work whenever possible.
The heel should sit comfortably against the back of the foot without excess fabric.
TOE SHAPING
Divide the stitches visually into four equal sections.
Place markers if helpful.
Decrease Round
Ch 1.
Work hdc until 2 sts before first quarter marker.
Hdc2tog.
Work to 2 sts before next marker.
Hdc2tog.
Continue around so you make 4 decreases total.
Join.
Plain Round
Hdc in each st around.
Join.
Repeat one decrease round followed by one plain round until approximately half the original stitches remain.
Then work decrease rounds every round until approximately 8–10 stitches remain.
CLOSING THE TOE
Fasten off, leaving a long tail.
Thread the tail through the remaining stitches using a yarn needle.
Pull gently to close the opening.
Pass the yarn through the center and secure it inside the sock.
Weave in securely.
SECOND SOCK
Make the second sock using the same instructions.
If using self-striping yarn, you can either:
- Begin at the next point in the skein for intentionally mismatched stripes
- Wind through the yarn until you find the same starting color for matching socks
Both styles work beautifully.
FINISHING
Weave in all loose ends.
Gently wash the socks according to the yarn manufacturer’s care instructions.
Shape them while damp.
If using sock blockers, place the socks onto the blockers without overstretching.
Allow them to dry completely.
TIPS & VARIATIONS
Let Self-Striping Yarn Do the Work
Color-changing sock yarn is ideal for this project because even simple crochet stitches create an interesting surface.
You do not need to manually change colors unless you want specific stripe placement.
Make Matching Socks
Locate the same point in the color repeat before beginning Sock 2.
This may require removing or rewinding a small amount of yarn.
Make Mismatched Socks
Start the second sock exactly where the first skein left off.
The resulting pair will coordinate without being identical.
Make Shorter Socks
Work only 2–3 in / 5–7.5 cm of the leg before beginning the heel.
This creates ankle socks.
Make Taller Socks
Continue the leg rounds until the socks reach your preferred height.
Check that the circumference remains comfortable around the calf.
Reinforce the Heel and Toe
For socks that will receive frequent wear, hold a thin reinforcing thread together with your yarn while working:
- Heel flap
- Heel turn
- Toe
Choose Durable Yarn
Sock yarn containing wool and nylon usually lasts longer than very soft yarn without reinforcing fibers.
Avoid highly delicate fibers if the socks will be worn inside shoes.
FAQ
Can beginners crochet these socks?
These socks are best for confident beginners or intermediate crocheters. The basic stitches are simple, but heel turning and gusset shaping require careful stitch placement.
Can I use regular DK yarn?
Yes, but choose yarn that can tolerate friction. A wool blend with nylon is preferable for socks intended for frequent wear.
How do I adjust the foot length?
Simply continue the foot rounds until the sock measures approximately 1.5–2 in / 4–5 cm shorter than the wearer’s foot, then begin the toe decreases.
CONCLUSION
The Happy Stripes Crochet Socks are a fun way to make the most of colorful self-striping yarn. Their ribbed cuffs, shaped heels, comfortable fitted feet, and cheerful bands of coral, turquoise, gray, cream, and burgundy create a cozy pair that feels wonderfully handmade. Crochet a matching pair, embrace intentionally mismatched stripes, or choose your favorite multicolored yarn for a unique handmade gift.



