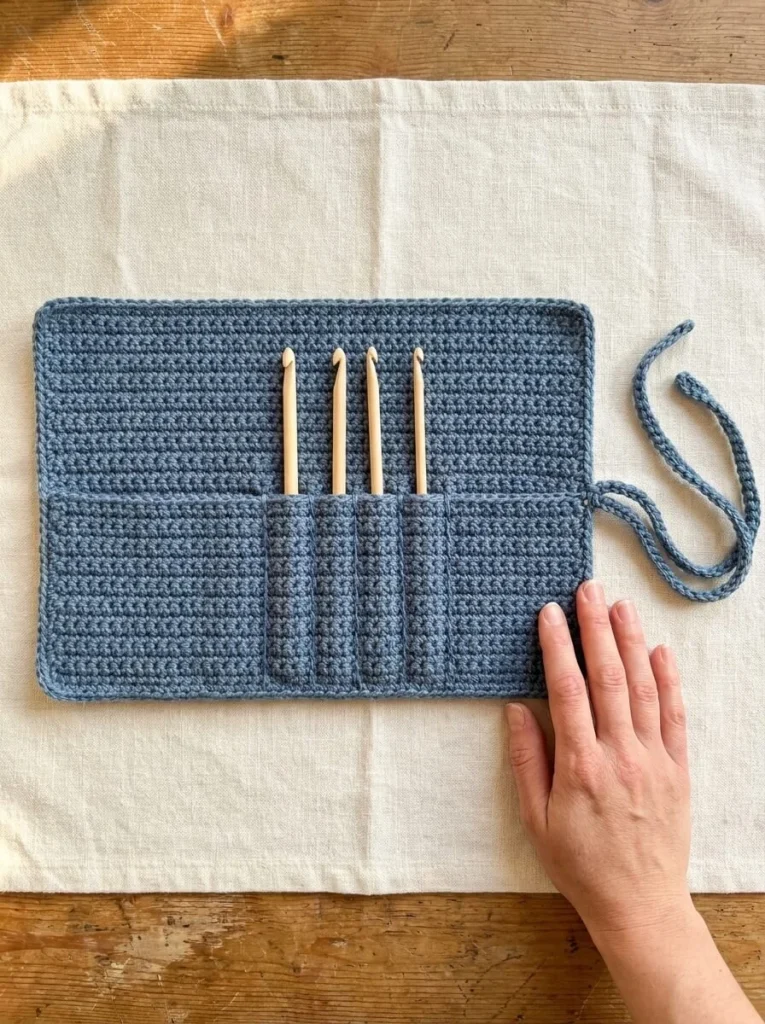
Crafting a roll-up crochet hook organizer is an incredibly rewarding project that brings practicality and style to your crochet supplies. This beautiful fabric roll allows you to neatly store your crochet hooks while preventing them from tangling or getting lost. With its cozy muted denim blue color and simple construction, this organizer is perfect for crochet enthusiasts of all levels, especially confident beginners. The design includes a folded lower pocket divided into individual channels, accommodating various hook sizes while still being compact enough to fit in your crafting bag.
In this article, we will walk you through the entire process of creating your very own roll-up crochet hook organizer. From gathering your materials to following the pattern instructions, we will ensure that you have the guidance you need to successfully complete this project. Let’s dive into the details!
Pattern at a Glance
Here’s a quick overview of what you’ll be making:
Skill level: Confident beginner
Terminology: US crochet terms
Construction: Fabric roll with a folded pocket
Finished size: Approximately 28 cm wide and 17 cm high, with a 7 cm-high pocket
Yarn weight: Medium-weight cotton
Hook: Approximately 3.5–4 mm for dense fabric
Main stitch: Single crochet (sc)
Gauge: Not specified; check row counts and width to ensure fit
Motifs: None
Layout: Rectangle with a fold for pockets
Joining: Sewing the pocket edges
Border: None required
Seaming: Hand sewing of pocket edges
Materials
Before beginning this project, gather the following materials:
- Approximately 120–180 g medium-weight cotton yarn in a muted denim blue shade: This will be your primary fabric for the organizer.
- Approximately 3.5–4 mm crochet hook for creating a dense fabric; this size will help achieve tight, secure stitches for durability.
- Scissors for cutting yarn and trimming loose ends.
- Blunt yarn needle to weave in the ends neatly and for sewing the pocket edges.
- Measuring tape to ensure your dimensions are accurate throughout the project.
- Stitch markers to mark specific points, especially for dividing into pocket channels.
- Your crochet hooks for measuring the pocket widths and heights as you plan the design.
Yarn and Color Notes
Choosing the right yarn is crucial for the structural integrity and aesthetic of your crochet hook organizer. A medium-weight cotton yarn is recommended due to its durability and ability to hold shape while being soft enough to handle. The muted denim blue color gives a neutral, calming palette that will fit well with various crafting spaces.
When using color combinations, consider accenting this base color with brighter or contrasting hues for decoration or personal flair in future projects.
Finished Measurements
Once completed, this roll-up crochet hook organizer will measure approximately 28 cm wide and 17 cm high when opened. The height of the pocket will be approximately 7 cm. These dimensions make it practical for transporting the organizer anywhere while still providing ample space for your crochet hooks.
Gauge
Although specific gauge measurements are not provided, it is essential to check your tension throughout the project to ensure the final dimensions are accurate. To test gauge, crochet a small swatch using the same methods described in the pattern, ensuring your rectangles remain consistent in width and height.
- If your fabric stretches wider than the specified 28 cm during row repetitions, you may need to adjust your chain count to maintain the desired width.
- Conversely, if your piece is too narrow, try using a larger hook or adjusting your tension.
Abbreviations
Here are the abbreviations used in this pattern for reference:
- ch: chain
- sc: single crochet
Important Pattern Notes
Several important notes can help guide your crochet journey:
- Turning Chains: The chain-1 at the beginning of each new row does not count as a stitch.
- Right Side/Wrong Side: Always remember which side is facing out as you complete the project. The right side is the one that will show when the project is finished.
- Seam Orientation: When sewing pocket edges, ensure that the stitches are not overly tightened; this will help maintain a flexible pocket.
- Channel Widths: The pockets within the organizer do not need to be identical in size as ergonomic hooks can vary slightly in width.
Special Stitches and Techniques
The primary stitch for this project is the single crochet (sc). This basic stitch will provide a solid fabric and will be repeated throughout the main body of the organizer.
Understanding the Construction
The roll-up crochet hook organizer is constructed from a simple rectangle folded to create a pocket. The folded lower edge forms the pocket front, allowing individual compartments for your hooks. As you crochet, you will create a sturdy foundation that will support the tools within, ensuring optimal organization.
Complete Pattern Instructions
Now, let’s dive into the complete pattern instructions that you can follow to create your roll-up organizer.
Foundation
- Ch 51: Start by chaining 51 stitches, leaving one extra chain for the single crochet count.
Row 1
- Row 1: Work sc in the second chain from the hook and in each remaining chain. You should have a total of 50 sc at the end of this row.
Row 2
- Row 2: Ch 1, turn your work. Work sc in each stitch across, maintaining the count of 50 sc.
Continuing the Rows
- Repeat Row 2 until your rectangle measures approximately 24 cm tall. As you work, check to ensure the width of the piece remains close to 28 cm. Depending on your tension, you may need to restart with a different chain count to get the correct open width.
Finishing the Rectangle
- Once you reach the desired height, fasten off and weave in any loose ends. Following the yarn label, dampen the piece and shape it into a flat rectangle. Allow it to dry fully to hold its shape.
Creating the Pocket
- With the rectangle right side up, fold the lower edge upward by 7 cm to form the pocket front. The remaining height above this fold should be 17 cm, which accommodates your hooks. Adjust this height if you will be storing larger tools.
Sewing the Pocket Edges
- Sew the two short side edges of the folded pocket to the backing of the fabric, ensuring to leave the top open. Be careful to match actual fabric stitches and to avoid tightening the seam excessively.
Planning the Channels
- Gather your crochet hooks and place them inside the pocket to determine where the channels should go. Mark the channel lines using removable markers. After marking, remove the hooks before proceeding with sewing.
Sewing Vertical Dividers
- Sew vertical divider seams from the bottom of the fold to the top edge of the pocket through both layers of fabric. Reinforce the start and end of each divider, leaving enough space to accommodate thicker handles.
Adding the Tie
- Create a matching chain of approximately 65–75 cm long for the tie. After fastening off, sew the midpoint securely to the outside of one side edge, approximately half the finished roll’s height. This will provide you with two free tie ends. Feel free to adjust this length after doing a trial roll to find a comfortable fit.
Final Assembly
- Insert the hooks into their designated channel slots. Gently roll the fabric from the opposite edge towards the attached tie. Wrap both ends around the roll and tie a simple bow. Ensure you do not roll it tightly, as squeezing the tools through may cause them to protrude.
Remember to store only your blunt crochet hooks in this pouch; the open top of the design is not suitable for sharp needles.
Note: This original draft has not been physically test-crocheted. Sizes and yarn quantities are estimates; always check pocket sizes against your hooks to ensure a good fit.
Checkpoints
- Your rectangle should measure approximately 28 cm wide and 24 cm tall after completing the body.
- Make sure the pocket height allows your tools to fit comfortably inside.
- The channel widths can vary based on the hook sizes used, so test fit as needed before securing the dividers.
Assembly
The only assembly step necessary involves sewing the short edges of the pocket to the backing. Ensure that the folded pocket remains open at the top and is aligned properly before securing it with stitches.
Finishing Touches
Once you have completed the assembly, take a moment to weave in any remaining ends. You may wish to block your work gently to ensure it lays flat and to give it a polished finish.
Resizing
The original size of the pattern should suit most standard crochet hook sizes, but if you find you have longer or thicker hooks:
- Adjust the initial chain count to increase the width of the rectangle. For a wider organizer, try increasing the chain count by increments of 2.
- For taller tools, increase the height of the rectangle as needed by adding rows before folding to create the pocket.
Variations
Once you’ve mastered this pattern, consider these variations:
- Use contrasting colors for different sections or even a rainbow of shades to make your organizer more vibrant.
- Create a larger version to store additional hooks or tools.
- Consider adding decorative elements like embroidered designs or fabric appliques on the outside.
Troubleshooting
Why Is My Project Getting Wider?
If your organizer is expanding, it could be due to too many stitches being added during your rows. Double-check that you’re not skipping stitches.
Why Is My Edge Wavy?
Wavy edges typically indicate either too much tension in your stitching or inconsistent row height. Try keeping your tension steady throughout.
Why Is My Fabric Curling?
Curling usually happens when the fabric is under-tensioned or if the stitch count is incorrect. Blocking your piece can help manage curling.
Frequently Asked Questions
Can I use a different yarn weight?
Yes, but keep in mind a different weight may change the overall dimensions and resulting structure.
Can I make it larger?
Absolutely. Follow the resizing section to adjust your starting chains and rows as needed.
Do I need a special hook?
A standard 3.5–4 mm crochet hook is recommended for this pattern, but feel free to experiment within that range based on your yarn choice.
Is the pattern reversible?
The design is not reversible as the right side has a finished look, while the inside is plain.
How should I block it?
Lightly dampen and shape while flat, then allow it to dry to help set the shape.
Final Thoughts
Creating your own roll-up crochet hook organizer is a straightforward and rewarding project. This organizer not only keeps your tools easily accessible but adds a personalized touch to your crafting routine. With just a few materials, simple crochet stitches, and guided instructions, you will be ready to roll your hooks in style!



