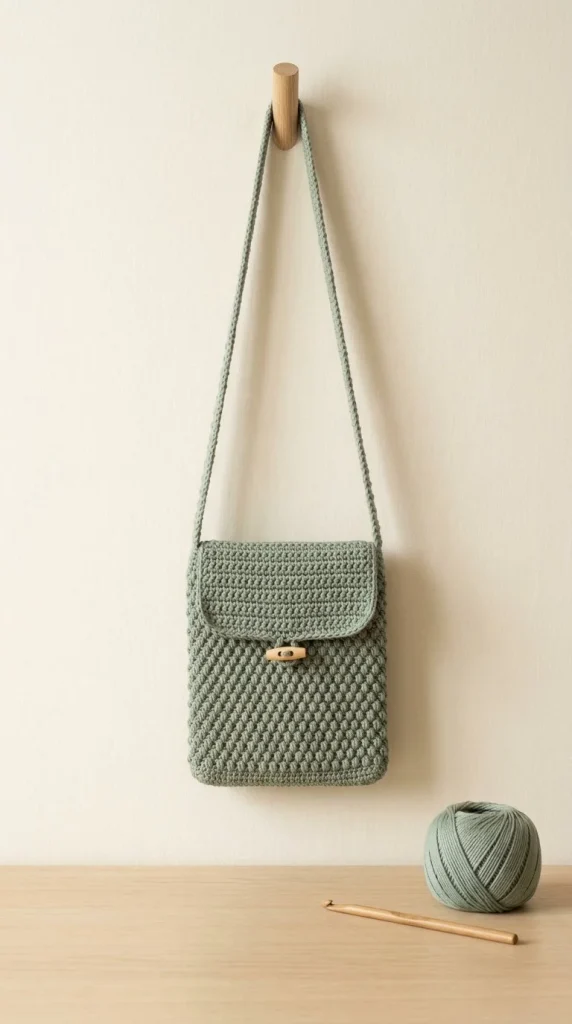
This crochet pattern will guide you through the creation of a stylish crossbody bag featuring a charming pebble stitch design. Perfect for everyday use, this Sage Pebble-Stitch Crossbody Bag combines functionality with aesthetic appeal, making it a delightful project for crocheters looking to enhance their skills.
Skill Level
Confident Beginner
This project is ideal for crocheters who have basic skills and are comfortable with single and double crochet stitches. The pebble stitch adds a touch of challenge but is manageable with attention to detail.
Materials
- Yarn: 380 m worsted-weight mercerized cotton in muted sage green
- Crochet hook: 4.0 mm
- Closure: 25 mm wooden toggle
- Yarn needle
- Stitch markers
- Scissors
Abbreviations — US Terms
- ch – chain
- sl st – slip stitch
- sc – single crochet
- dc – double crochet
- st(s) – stitch(es)
- BLO – back loop only
Special Stitches
Pebble Stitch
- Begin with a single crochet (sc) in the indicated stitch.
- Next, work a double crochet (dc) into the same stitch.
- The pebble stitch will create a textured effect, alternating between sc and dc in the specified rows.
Gauge
Gauge is not critical for this project; however, maintaining consistent tension is important to ensure uniformity in the bag’s size and structure.
Finished Size
The finished product will approximate a height of 20 cm, depending on your tension and adjustments made during construction.
Pattern Notes
- The bag is constructed in one piece, first forming the base and then working up to the body.
- Ensure to mark the center back stitches for the flap to maintain symmetry.
- The project involves working in rounds and rows, with the use of stitch markers to track rounds when needed.
- The pebble stitch creates a dense and textured fabric that adds durability to the bag.
Crochet Instructions
Part 1 – Base
Foundation Chain
- Ch 38: This forms the foundation of your bag.
Row 1
- Start by making a sc in the 2nd ch from the hook and continue working 1 sc in each of the following chains across. You should have 37 sc in total.
- Ch 1, turn.
Rows 2-9
- For each row, work 1 sc in each stitch across. You will repeat this for a total of 8 more rows. At the end of Row 9, you should have completed a rectangle measuring approximately 20 cm in width.
Part 2 – Body Setup
- Work around the base:
- On each long side, work 37 sc and on each short side, work 9 sc.
- This should result in a total of 92 sts. Join with a sl st to the first sc to complete the round.
Part 3 – Body Rounds
Round 1
- Ch 1 to begin.
- Work 1 sc in each of the 92 stitches around. Join with sl st to the beginning.
Round 2
- Ch 1 to start.
- Work 1 sc in each st around. Join with sl st to the beginning.
Round 3
- Ch 1 to begin.
- Work the following sequence: 1 sc in the next st, 1 dc in the next st. Repeat this sequence around and join with sl st. You will have a total of 92 sts.
Round 4
- Ch 1 to start.
- Work the sequence: 1 dc in the next sc, 1 sc in the next dc around. Join with sl st. You will still maintain a total of 92 sts.
Repeating Rounds
- Repeat Rounds 3–4 until the body measures 20 cm from the base. Use a ruler or measuring tape to ensure accuracy.
Part 4 – Flap
- Mark the 37 centered back stitches on the last round to prepare for the flap.
Row 1
- Continue by working in pebble stitch across the 37 marked sts. Ch 1, turn.
Rows 2-9
- Work 7 more rows in the same pattern, ensuring to maintain the pebble stitch throughout.
Part 5 – Flap Shaping
- For the next 5 rows, skip the first st and sl st into the second. Work in pattern to the last 2 sts and leave them unworked.
- Fasten off after completing the 5 rows of shaping.
Part 6 – Toggle Loop
- Join at the flap center and ch 12.
- Sl st back into the same point to create a loop.
- Sew the wooden toggle securely to the front panel of the flap.
Part 7 – Strap
Foundation Chain
- Ch 186: This will be the length of your strap.
Row 1
- Work a sc in the 2nd ch from the hook and across the chain.
Rows 2-3
- Sc in BLO across for 2 rows to create a firm strap.
Adjusting Strap Length
- Before fastening off, adjust the strap to your desired crossbody length.
Finishing the Strap
- Fasten off your work. Sew strap ends to the side walls of the bag with several passes of yarn for strength.
Finishing Touches
- Consider adding a cotton lining to enhance structure and durability.
- Weave in all ends and steam-block lightly to give your bag a polished finish.
Care
For maintaining the quality of your mercerized cotton yarn, check the label for washing instructions. Typically, hand washing in cold water and laying it flat to dry is best to preserve shape and texture.
Conclusion
Now you have a beautiful Sage Pebble-Stitch Crossbody Bag that merges utility with handmade charm! Enjoy showcasing your work and the skills you’ve developed throughout this project. Happy crocheting!



