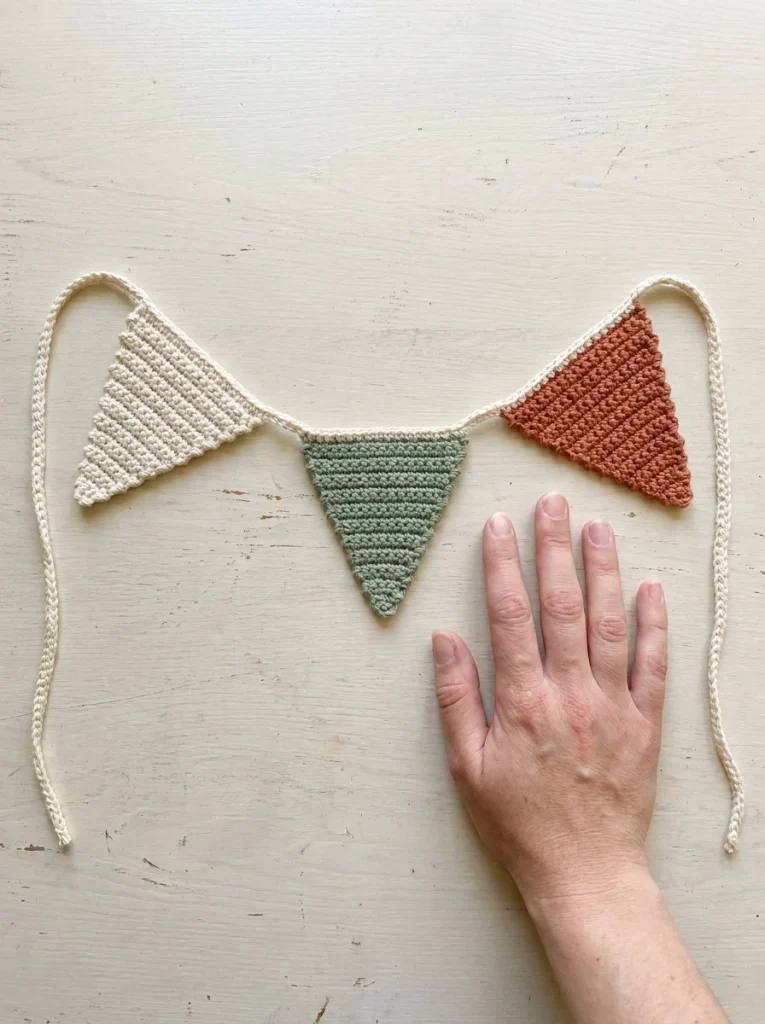
This charming crochet project is perfect for anyone looking to add a pop of color and personality to their home décor or event decorations. The Three-Flag Crochet Bunting features three solid triangular flags, each crafted in a vibrant color palette of cream, sage green, and terracotta. The flags are worked from the lower point upward, creating a unique and playful design. Ideal for beginners, this pattern not only provides an opportunity to practice basic crochet stitches but also yields a decorative piece that can be used for various occasions, from birthdays to seasonal celebrations.
The construction of this bunting is straightforward and consists of simple stitches, making it accessible for those new to crochet. The triangle flags come together to form a beautiful garland that can be hung on walls, across tables, or even outdoors for festive gatherings. This project is not just about crafting; it’s also about creating an atmosphere, be it for a party or simply as a cheerful addition to your living space.
Pattern at a Glance
Skill level: Beginner
Terminology: US crochet terms
Construction: Worked in rows, individual flags joined with a cord
Finished size: Approximate dimensions depend on yarn and tension
Yarn weight: Light to medium weight cotton yarn
Hook: Approximately 3.5 mm
Main stitch: Single crochet
Gauge: Not specified, but consistent tension is essential
Motifs: Three triangular flags
Layout: Flags arranged in a row
Joining: Using a single crochet cord
Materials
To complete this bunting, you will need the following materials:
- Approximately 40–60 g of light-to-medium-weight cotton yarn distributed among:
- Cream for the first flag
- Sage green for the second flag
- Terracotta for the third flag
- One approximately 3.5 mm crochet hook for working the flags
- A pair of scissors for cutting yarn
- A blunt yarn needle for weaving in ends
- A measuring tape for checking dimensions
Each of these materials has a specific role to play in ensuring your bunting is both beautiful and durable. The cotton yarn is ideal for its sturdiness and ease of care, while the crochet hook size is suitable for achieving the right tension.
Yarn and Color Notes
Choosing the right yarn is crucial for the look and feel of your project. Light-to-medium-weight cotton yarn is recommended for a few reasons:
- Softness: Cotton is gentle against the skin, making it perfect for decorative items that might come into contact with people.
- Durability: Cotton holds its shape well and maintains vibrant colors after washing.
- Breathability: This yarn type allows for air circulation, making it suitable for both indoor and outdoor use.
You can experiment with color combinations as well. While this pattern specifically calls for cream, sage green, and terracotta, you could choose your favorite colors or seasonal hues to create a unique look.
Finished Measurements
The finished size of each flag will vary depending on your yarn tension and hook choice. However, since they are constructed similarly, maintaining consistent stitch count and technique across all flags is essential for a harmonious appearance.
Gauge
While a precise gauge is not specified for this project, achieving consistent tension is key. If you’re new to crochet, it’s wise to practice matching your tension before starting the flags. Don’t worry if your gauge is slightly off; just be prepared for your flags to differ minimally in size.
To check your gauge, crochet a small swatch with your chosen yarn and hook. If you find your stitches are too loose, switch to a smaller hook; if they’re too tight, try a larger one.
Abbreviations
- ch = chain
- sc = single crochet
- CO = cast on (not used in this pattern)
Important Pattern Notes
- Always remember that the turning chain (ch 1) does not count as a stitch in the row.
- Pay attention to your stitch placement to avoid adding or missing stitches as the flags increase in width.
- Make sure to fasten off your yarn after completing each flag and weave in all ends to maintain a tidy appearance.
Special Stitches and Techniques
This pattern primarily uses the single crochet (sc) stitch and includes increases within rows to form the triangle shape. Here’s a brief overview of the increase technique:
- For each subsequent row, you will be placing two single crochets in the first and last stitches, with one single crochet in each middle stitch.
This consistent pattern allows for the triangular shape of the flags to emerge beautifully.
Understanding the Construction
The bunting consists of three triangular flags, each crafted separately. The flags’ design incorporates straightforward increases, which contribute to the distinctive shape. Once all flags are created, they are joined together by a decorative cord made of the cream yarn.
Full Pattern Instructions
Foundation
To begin, let’s start with the first flag.
Row 1
- Ch 2. Work 1 sc in the second chain from the hook.
Total: 1 sc
Row 2
- Ch 1, turn. Work 3 sc into the single stitch from Row 1.
Total: 3 sc
Row 3
- Ch 1, turn. Work 2 sc in the first stitch, 1 sc in the middle stitch, and 2 sc in the last stitch.
Total: 5 sc
Following Rows
- For each following row:
- Ch 1, turn.
- Work 2 sc in the first stitch, 1 sc in each middle stitch, and 2 sc in the final stitch.
This pattern continues as follows: - Row 4: 7 sc
- Row 5: 9 sc
- Row 6: 11 sc
- Row 7: 13 sc
- Row 8: 15 sc
- Row 9: 17 sc
- Row 10: 19 sc
- Row 11: 21 sc
- Row 12: 23 sc
Note: You can stop after Row 12 for smaller flags, but you are welcome to continue adding more rows until reaching your desired size. The stitch count for Row n will be calculated as 2n – 1.
Flag Completion
- Fasten off and weave in the ends. Repeat the process for the following two flags, using the remaining colors.
Blocking
- Once all flags are complete, dampen and block all three flags to ensure they are flat triangles. Follow the yarn label instructions on blocking for best results.
Joining Cord
- With cream yarn, create a 20 cm chain tail. Hold the first flag with the upper edge accessible and point facing down. Work 1 sc through each stitch across the upper edge. Chain 10 to form a gap, then sc across the second flag’s upper edge. Chain 10 again, then sc across the third flag. Finally, finish with another 20 cm chain tail and fasten off.
Finishing Touches
- Weave in the joining yarn ends without shortening the hanging tails. Arrange the flags with cream, sage green, and terracotta from left to right. Ensure every flag is hung with the same side facing forward, and enjoy your festive bunting!
Important Notes: This pattern has not been physically test-crocheted. Yarn amounts and dimensions are estimates. This bunting is meant for decoration and not as a toy. Keep the cord away from cots and young children.
Checkpoints
- Your flags should now be distinctly triangular and flat after blocking.
- Ensure each flag is evenly sized if the same number of rows was used.
- The cord should feel secure and not overly tight to allow for the flags to hang straight.
Assembly
Since the flags are joined by a cord, alignment is crucial. When assembling, make sure:
- The flags are oriented in the correct direction.
- The gaps between flags are even.
- The cord is not stretched too tightly to avoid bunching.
Finishing
- After finishing, consider adding extra embellishments as desired. However, the pattern does not include tassels, beads, or other trim.
- Weaving in ends is vital for a neat appearance. Make sure all yarn ends are secured and trimmed to prevent unraveling.
Resizing
If you’d like larger flags, simply continue adding rows to each flag following the established pattern. Just remember to maintain the same number of rows for all three flags to keep a uniform look.
Variations
- Color Variations: Experiment with different color schemes such as pastels for spring events or bright colors for summer gatherings.
- Size Adjustments: To make larger or smaller versions, adjust the number of rows accordingly.
- Material Substitutions: Consider using different fiber types such as acrylic if cotton isn’t accessible, but be aware of changes in drape and final look.
Troubleshooting
Why Is My Project Getting Wider?
Ensure that you are not inadvertently adding extra stitches. Each row is meant to have an increasing number of stitches but check your counts against the pattern.
Why Are My Flags Curving?
If your flags are curving, you might be working your stitches too tightly. Using a larger hook can help alleviate this issue.
How Do I Ensure My Flags Are Even?
Carefully count your stitches in each row and make sure the same number of rows are completed for each flag.
FAQs
Can I use a different yarn weight?
Yes, but keep in mind that the size and tension may vary if significantly different yarns are used.
Can I make it larger?
Absolutely! Just add additional rows following the same stitch increase pattern.
Is this a beginner-friendly project?
Yes, this project is designed for beginners, allowing you to practice basic stitches and construction techniques.
How should I block it?
Dampen each flag lightly and pin to a flat surface in a triangular shape until dry to help hold their shape.
What if my triangles are not perfectly straight?
Blocking can help shape the flags. If issues persist, check for consistent tension as you crochet.
Final Thoughts
Creating the Three-Flag Crochet Bunting comes down to mastering simple stitches while enjoying the creative process. This delightful project includes straightforward steps that result in a vibrant piece perfect for any decorative occasion. Assemble and hang your flags with pride, knowing that each stitch was made with care and attention. Happy crocheting!



