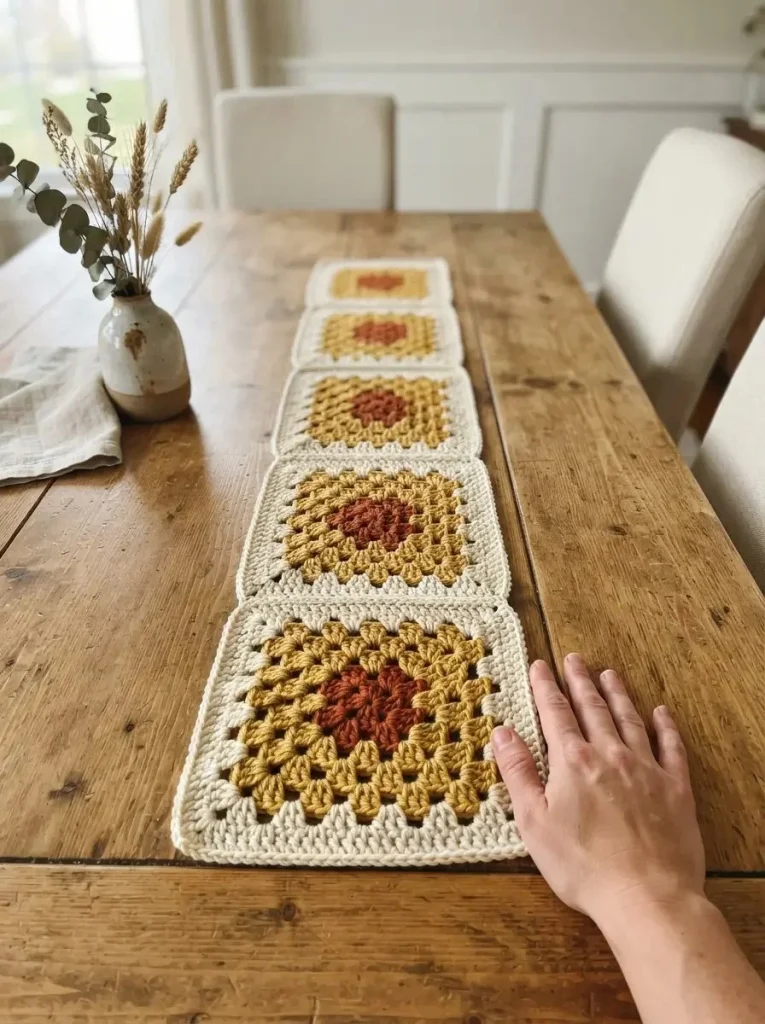
Creating a Granny-Square Fall Table Runner is a delightful way to embrace the changing seasons while showcasing your crochet skills. This charming project combines a traditional granny square motif in autumnal colors, making it a perfect accent piece for your home decor during fall gatherings. With a simple construction and appealing color palette of rust, mustard, and cream, this table runner will add warmth and texture to your dining experience.
Pattern at a Glance
- Skill level: Confident beginner
- Terminology: US terms
- Construction: Motifs joined in a row with a border
- Finished size: Approximately 30 x 6 inches (76 x 15 cm), plus a narrow border
- Yarn weight: Worsted-weight cotton
- Hook: US G/6 (4 mm) crochet hook, or size suitable for the yarn
- Main stitch: Double crochet (dc)
- Gauge: Approximately 6 inches (15 cm) across for each square, specific gauge not provided
- Motifs: Five matching squares
- Layout: Linear arrangement of squares
- Joining: Whip stitch or slip stitch to join squares
- Border: Single crochet (sc) around the entire runner
Materials
To make your Granny-Square Fall Table Runner, you will need the following materials:
- Yarn: Approximately 150–220 g worsted-weight cotton yarn in three colors: rust, mustard, and cream. This amount should be enough to create five squares and a border, depending on your tension and yarn choice.
- Hook: US G/6 (4 mm) crochet hook or a size that works best for your yarn.
- Notions:
- Scissors
- Blunt yarn needle for weaving in ends and joining squares
- Measuring tape to ensure accurate sizing
- Stitch markers to help keep track of rounds and seams
Yarn and Color Notes
When selecting yarn for your table runner, consider using cotton fiber for its durability and washability. Cotton yarn has a nice drape, making it suitable for table linens that may see some spills or stains. Here are a few tips regarding yarn selection:
- Color: The combination of rust, mustard, and cream creates a warm, inviting palette that is perfect for autumn. If you wish to alter the palette, consider jewel tones or earthy shades that capture the essence of the season.
- Texture: A smooth cotton is preferable to highlight the stitch definition in the granny squares and achieve a clean finish. Avoid fuzzy yarns that might obscure the pattern.
Finished Measurements
The finished dimensions for the Granny-Square Fall Table Runner are approximately 30 x 6 inches (76 x 15 cm) before including the border. Each individual square measures about 6 inches (15 cm) across, allowing for a total of five squares lined up in a single row.
Gauge
While no specific gauge swatch is provided, it’s essential to take gauge into account, especially for larger projects. Here’s why gauge matters:
- If gauge is larger: Your finished runner may end up larger than intended, requiring adjustments to the number of rounds per square.
- If gauge is smaller: Your runner may not match the desired dimensions and may require additional squares or rounds to achieve the appropriate size.
For best results, make a small test square using the rust yarn and adjust your hook size if necessary before starting the full project.
Abbreviations
Here are the abbreviations used in this pattern, following US crochet terminology:
- ch: Chain
- sl st: Slip stitch
- sc: Single crochet
- dc: Double crochet
Important Pattern Notes
- Chains count: The beginning ch 3 at the start of rounds counts as a dc.
- Rounds: Squares are constructed in rounds; press markers into the first stitches of the rounds to keep track of your progress.
- Join method: Use a flat and relaxed seam when joining squares to avoid tension issues or puckering.
- Color changes: Each square contains colors in a specific sequence (rust, mustard, and cream), which should be maintained across all squares for a consistent look.
Special Stitches and Techniques
Throughout this pattern, several specific crochet techniques are used. Here’s a brief description:
- Magic Ring: This technique is used to create a tight center for the granny square. It’s particularly useful for working in the round without a hole in the middle.
- Cluster Stitches: The pattern predominantly uses double crochet clusters within corners to create the characteristic granny square look.
Understanding the Construction
This Granny-Square Fall Table Runner consists of five granny squares joined together in a row. Each square is crafted using a combination of rust, mustard, and cream yarn, following a series of rounds. Once all squares are made, they are assembled in a straight line, and a single crochet border is added around the entire piece for a polished finish.
Full Pattern Instructions
Foundation
To start, gather your materials and ensure you have a comfortable workspace.
Square 1 – Round 1 (Rust Yarn)
- Create a magic ring.
- Work ch 3, then 2 dc into the ring followed by ch 2.
- Next, work (3 dc, ch 2) three times into the ring to create four clusters and four corner spaces.
- Tighten the ring closed and join with a sl st to the top of the initial ch 3.
Round 2 (Rust)
- Slip stitch into the next corner space.
- In the first corner space, work ch 3, 2 dc, ch 2, 3 dc.
- In each of the remaining corner spaces, work the same: (3 dc, ch 2, 3 dc).
- Work ch 1 between corner spaces before joining the round.
Round 3 (Mustard)
- Begin in a corner space.
- Work (3 dc, ch 2, 3 dc) in each corner space.
- In each side ch-1 space, work 3 dc.
- Work ch 1 between neighboring clusters.
- Replace the first dc with ch 3 and join with a sl st.
Rounds 4-6 (Mustard & Cream)
- Continue repeating round 3 for round 4 using mustard.
- Make rounds 5–6 in cream. Regularly check the size to aim for approximately 6 inches across. If necessary, add more rounds with cream until you achieve the target size.
Additional Squares
- Repeat the above rounds to create a total of five identical squares. Use the same color sequence for uniformity.
- Once finished, weave in ends, dampen squares according to the yarn label, and block them to ensure they all measure the same. Allow to dry completely.
Assembly
- Arrange the squares in a single row, ensuring they are all facing the same direction.
- Using cream yarn and a blunt needle, join each adjacent pair along one full edge, carefully matching dc stitches and spaces. Make sure this seam is flat and not too tight.
Border
- Attach cream yarn at any outer corner to begin the border.
- Ch 1, then work sc around the entire runner.
- Make 1 sc in every dc and ch-1 space along the sides.
- For the four outer corners, work 3 sc into each ch-2 space.
- At the top and bottom of each internal join, work 1 sc into each of the neighboring corner spaces.
Completing the Project
- Check that edges are smooth. Join with a sl st to the first sc, fasten off, and weave in all ends.
- Finally, gently block the complete runner into a straight rectangle shape.
Note: This original pattern has not been physically test-crocheted. The finished size and yarn quantities may vary based on individual gauge and the number of rows.
Checkpoints
- After completing the first square, it should measure approximately 6 inches across.
- Ensure all squares are the same size before joining to avoid discrepancies in assembly.
- The finished runner should lie flat without any noticeable waves or bumps.
Variations
Feel free to explore various colorways and textural combinations to fit your personal style:
- One-color version: Create all squares in a single color for a more uniform appearance.
- Scrap-yarn version: Use leftover yarn from past projects to create a fun, eclectic look.
- Seasonal variations: Tailor the color palette to match different seasons or holidays.
Troubleshooting
Why Is My Project Getting Wider?
If your squares are consistently wider than expected, ensure you’re not inadvertently adding stitches between clusters or corners. Count your stitches after each round to maintain the correct count.
Why Is My Edge Wavy?
Wavy edges can occur from tight seams or inconsistent tension. When joining squares, ensure the seams are relaxed, and consider adjusting your hook size if it’s too tight.
Why Don’t My Motifs Match?
If your squares vary in size, double-check that each square has the same number of rounds and that gauge is consistent. Blocking each square can also help them align better when assembled.
Why Is My Border Ruffling?
Ruffling can occur if the border is too tight. Make sure to maintain a loose tension when working the border stitches, especially in the corners.
Frequently Asked Questions
Can I use a different yarn weight?
Yes, but keep in mind that changing the yarn weight will affect the overall size and drape of your table runner. Make adjustments to the number of rounds as needed to achieve similar dimensions.
Can I use cotton?
Absolutely! Cotton is a wonderful choice for home decor projects due to its durability and washability, making it suitable for a table runner.
Can I make it larger?
Yes, you can increase the size by adding more squares or additional rounds to each square, following the established color sequence.
Is the pattern reversible?
The nature of granny squares makes this table runner aesthetically pleasing from both sides, although the joining seams might be more visible on one side.
Final Thoughts
Creating the Granny-Square Fall Table Runner is not only a rewarding crochet project but also a beautiful addition to your home decor that celebrates the essence of autumn. By mastering the granny square technique and following the straightforward construction steps, you’ll have a stunning piece that elevates your dining experience—all while enhancing your crochet skills! Enjoy making this lovely project, and don’t hesitate to add your unique twist on colors and finishes.



