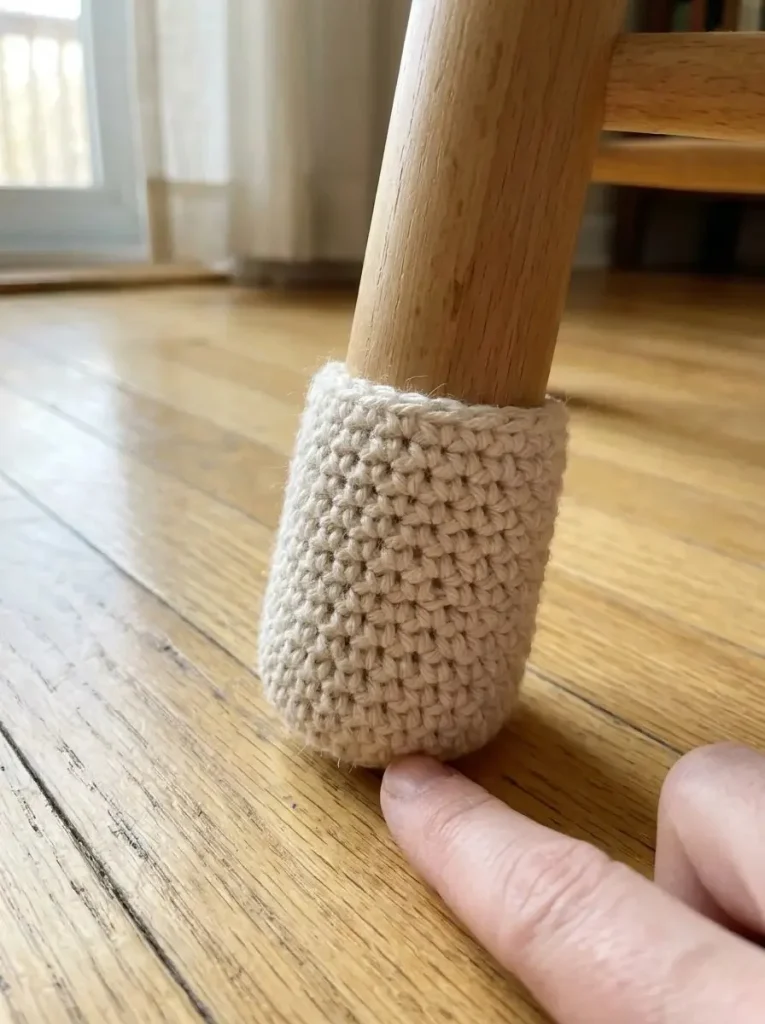
Creating crochet chair-leg socks is an excellent way to not only protect your floors but also add a touch of creativity to your furniture. This project involves crafting small, washable covers for round chair feet that can help soften contact with the floor while providing grip. Made with the simple technique of single crochet, these chair-leg socks are both functional and visually appealing. The beauty of this project lies in its straightforward construction which utilizes a continuous spiral method, making it ideal for crocheters of all skill levels.
As you begin this project, think about the potential for customization. You can choose any color of worsted cotton yarn that matches your décor, allowing each sock to complement your home’s aesthetic. They will not only serve a practical purpose but also add a unique charm to your chairs.
Pattern at a Glance
- Skill level: Beginner to Intermediate
- Terminology: US terms
- Construction: Continuous spiral
- Finished size: Custom to chair foot
- Yarn weight: Worsted cotton
- Hook: 3.5 mm crochet hook
- Main stitch: Single crochet (sc)
- Gauge: Specific gauge not necessary for this project
- Motifs: None
- Layout: Round covers for chair legs
- Joining: Not applicable
- Border: Not applicable
- Seaming: Not applicable
Materials
To create the chair-leg socks, you will need the following materials:
- Yarn: Approximately 30–50 g of worsted cotton (sufficient for four small covers)
- Crochet hook: 3.5 mm
- Stitch marker: To keep track of your rounds
- Yarn needle: For weaving in ends
- Scissors: To cut your yarn
- Chair: A chair with round, straight feet to ensure proper fitting
The choice of a smooth, durable cotton yarn is crucial for a sleek finish and reliable performance, preventing slipping on various flooring types.
Yarn and Color Notes
When choosing your yarn, look for:
- Durability: Cotton is ideal because it withstands regular washing and wear.
- Color Options: Bold colors can brighten a room, while neutral tones provide a polished look.
- Yarn Texture: A smooth yarn will glide easily over your hook and create a clean finish without snagging.
Feel free to experiment with different shades or variegated yarns to produce unique patterns, but be aware that variegated yarn may create a less uniform look.
Finished Measurements
The final size of your chair-leg socks will be determined by the diameter of the chair legs. To ensure a perfect fit, it’s recommended to measure the width of your chair feet before beginning. A successful cover should fit snugly without any bunching at the bottom.
Gauge
Given the simplicity of this project, measuring gauge isn’t critical. However, if you want to ensure fit, test your tension with a sample swatch. If you find your stitches are too tight, consider using a larger hook. Conversely, if they are too loose, try a smaller hook.
Abbreviations
In the pattern, you will encounter the following abbreviations:
- sc: single crochet
- inc: increase (2 sc in the same stitch)
- sl st: slip stitch
- BLO: back loop only
Important Pattern Notes
- Work must be done in a continuous spiral; do not join or turn unless instructed.
- Utilize a stitch marker to keep track of the first stitch of each round.
- Take care to check the fit against the chair leg throughout the process to ensure a snug fit.
Special Stitches and Techniques
The primary stitch used in this project is the single crochet, which is fundamental in crochet. This stitch creates a dense fabric, suitable for this application. The use of back loop only (BLO) in the side round gives the socks a distinct texture and allows the fabric to stretch while remaining snug against the chair foot.
Understanding the Construction
This project involves making one test cover first to ensure the fit before completing a set. The covers are constructed as a spiral, beginning with a magic ring and increasing in rounds until the desired diameter is reached. After shaping the base, you work in BLO to create the sides, rounding off the top before finishing.
Full Pattern Instructions
Foundation
Before beginning, gather all your materials. Measure your chair feet to determine the appropriate size for your chair-leg covers.
Round 1
Start with a magic ring.
- Work 6 sc into the magic ring.
- Pull the ring closed.
Round 2
- Inc in every stitch: This will give you a total of 12 sc.
Round 3
- Repeat the following sequence six times: [sc in next stitch, inc in next stitch].
- End with a total of 18 sc.
Size Check
- Check the base against the bottom of the chair foot at this point. The base should be approximately the same diameter as the chair foot, with little to no overhang.
Additional Increase (if necessary)
If your chair foot is larger, you might need to add one more increase round:
- Repeat [sc in next 2 stitches, inc in next stitch] six times to reach 24 sc. If you are working with a smaller chair foot, you may only need the first two rounds.
First Side Round
- Switch to working sc BLO in every stitch to maintain the stitch count you have.
Following Rounds
- Continue working sc through both loops in every stitch until the sides measure approximately 1.5–2 inches (4–5 cm) in height.
Finishing
- Work a sl st in the next stitch to close the last round.
- Fasten off and weave in both ends securely.
- For added security, reinforce the magic-ring tail by weaving it through several stitches in two directions.
Final Fit Check
- Fit the cover onto the chair foot. It should stay securely in place without bunching underneath. If it feels loose, consider reworking it with a smaller hook or adjusting the base size.
Record Your Work
- Record the successful stitch and round counts, then repeat the above steps to create three identical covers.
Use and Care
Before using the covers, check the stability of the chair on your actual floor. Ensure that they do not slip or catch during movement, and keep the undersides free of grit. Regularly inspect for wear and wash them to maintain cleanliness. They should only be used once fully dry.
Troubleshooting
Why Is My Cover Too Loose?
If your cover does not fit snugly around the chair foot, consider using a smaller hook or adjusting the base increase stitches.
Why Is My Fabric Curling?
This can happen if your tension is too tight or loose. Ensure to follow the instructions carefully and maintain consistent tension throughout your work.
How Can I Maintain the Shape of My Covers?
Regular washing will help the cotton retain its shape. Ensure they dry flat to prevent any deformation.
Frequently Asked Questions
Can I use a different yarn weight?
While worsted cotton is recommended for optimal fit and function, you can try different weights if you adjust your hook size accordingly.
Can I use acrylic yarn?
Yes, but please remember that acrylic may not have the same protective qualities on various floor surfaces compared to cotton.
How should I wash them?
Machine wash on a gentle cycle, but avoid fabric softeners as they can reduce grip.
Final Thoughts
This project combines practicality with creativity by providing an excellent solution for protecting floors while adding an aesthetic touch to your home. It involves straightforward crochet techniques, making it accessible for crocheters of all skill levels. Remember, starting with a test cover will ensure the best fit before you commit to making all the socks. Enjoy your crafting!



