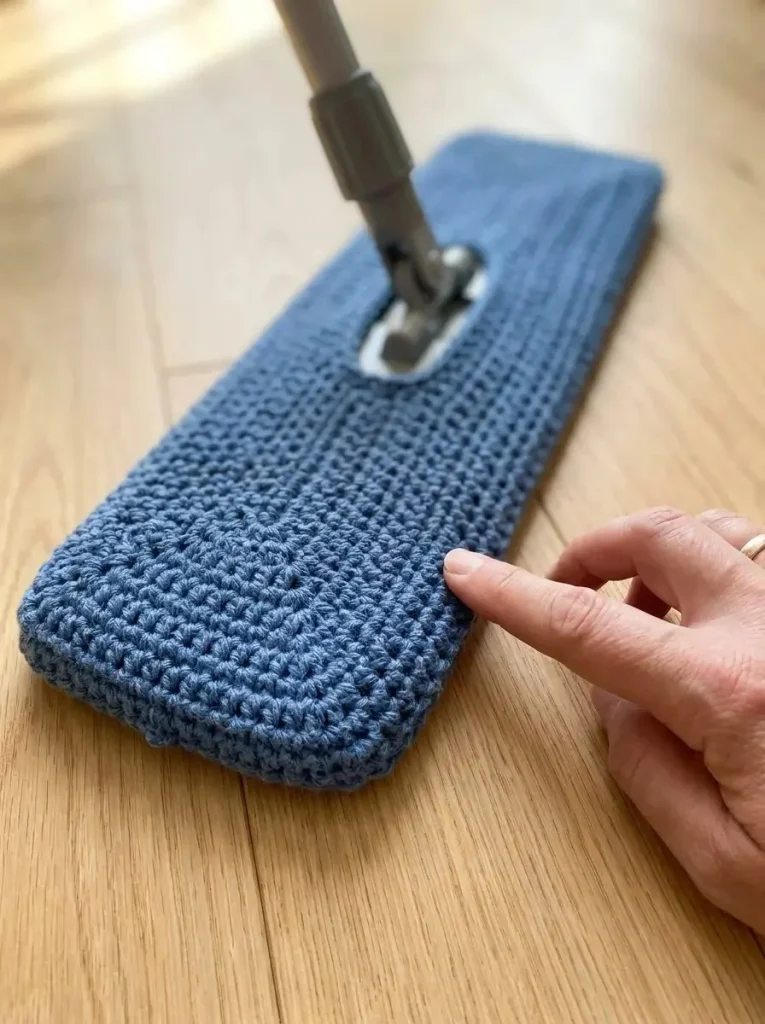
This practical crochet project allows you to create a washable cover for your manual flat mop, making household cleaning a bit easier and more eco-friendly. The Reusable Flat-Mop Cover is not just functional; it’s a charming addition to your cleaning supplies with its denim blue yarn and simple design. Moreover, this cover is designed to fit snugly over your mop head, ensuring that it remains in place while you clean.
It’s an engaging way to combine crochet skills with an everyday necessity, creating a unique and sustainable alternative to disposable mop covers. This pattern is accessible even for beginners familiar with basic crochet stitches and is a great way to practice your tension while producing a practical item you can use in your home.
Pattern at a Glance
Skill level: Intermediate
Terminology: US Terms
Construction: Flat rectangle with folded edges
Finished size: Approximately 10 × 4.5 inches (25.5 × 11.5 cm)
Yarn weight: Worsted cotton
Hook: 4 mm crochet hook
Main stitch: Single crochet (sc)
Gauge: 16 sc per 4 inches (10 cm)
Motifs: None
Layout: Rectangle
Joining: None required
Border: None
Seaming: Basic hand sewing
Materials
For this project, you will need the following materials:
- Approximately 100–150 g worsted cotton yarn in denim blue: This weight provides a balance of sturdiness and flexibility for the cover.
- 4 mm crochet hook: A standard size for worsted weight yarn, comfortable for working single crochet stitches.
- Yarn needle: Essential for weaving in ends securely after finishing your project.
- Scissors: For cutting your yarn cleanly.
- Measuring tape: Useful for ensuring that your final piece measures correctly and fits your mop head snugly.
- Manual flat-mop head for fitting: It’s important to measure this before starting to achieve the best fit.
Yarn and Color Notes
When selecting your yarn, consider using a worsted cotton yarn, as it is durable and machine washable, ideal for this household item. The denim blue color adds a nice aesthetic touch while remaining practical. You might choose a solid color for a classic look or opt for a variegated yarn to add some visual interest. Remember, how you work with colors can impact the final look of your project, so think ahead about the vibe you want to create!
Finished Measurements
The finished cover will measure approximately 10 × 4.5 inches (25.5 × 11.5 cm) when completed. Before folding the rectangle to create the pockets, ensure that it measures about 15 × 5 inches (38 × 12.5 cm) to allow for the necessary seams and folds.
Gauge
Achieving the correct gauge is essential, especially for fitting this cover to your mop head. The starting gauge is 16 single crochets per 4 inches (10 cm). If your gauge is larger, your cover will end up larger, which may result in it being too loose for the mop. Conversely, if your gauge is smaller, your cover may be too tight and may not fit at all. Adjust your tension accordingly: crocheting tighter will give you a smaller gauge, while a looser tension will increase your gauge.
Abbreviations
- ch: chain
- sc: single crochet
Important Pattern Notes
- Remember that the turning ch 1 at the beginning of a row does not count as a stitch.
- Always check that you are keeping the right side facing out while you work.
- It’s crucial to wash and dry the rectangle according to the yarn label before final fitting, as cotton may shrink.
- Make sure to adjust the fold depth of the two pockets for a snug fit that doesn’t obstruct the mop’s swivel joint.
Special Stitches and Techniques
This pattern mainly utilizes the single crochet (sc) stitch. It’s an essential stitch for most crochet projects, providing a tight and dense fabric that is ideal for durable items such as this mop cover. Since the pattern is straightforward and repetitive, it’s a great way to enhance your single crochet technique.
Understanding the Construction
The Reusable Flat-Mop Cover is made from a single flat rectangle that is folded at both ends to create pockets. The long central section will lie beneath the mop head, while the folded edges will hold the mop in place. This construction allows for easy fitting and ensures that the mop head is securely covered without slipping.
Full Pattern Instructions
Foundation
- Ch 21. This forms the foundation chain.
Row 1
- Row 1: Sc in the second ch from the hook and in each remaining ch, resulting in 20 sc.
Row 2
- Row 2: Ch 1, turn your work, and sc in every stitch, maintaining the count of 20 sc.
Continuation
-
Repeat Row 2 until your rectangle measures approximately 15 inches (38 cm) in length.
-
Fasten off your yarn. Remember to wash and dry the rectangle as per the yarn instructions prior to the final fitting.
Assembly
-
Lay the rectangle flat with the long side facing left to right. Fold each short end inward by approximately 2 inches (5 cm).
-
At each folded end, sew both short side edges of the flap to the main fabric, ensuring to leave the flap’s inner edge open. This creates the two opposing end pockets.
Fitting
-
Fit the mop head into the created pockets; the broad part of the rectangle will sit beneath the mop head, while the folded pockets will sit over the ends of the head.
-
Adjust the fold depth and seam positions, ensuring that the cover fits snugly without impeding the swivel joint movement.
-
Weave all yarn ends in securely to finish the project.
Custom Sizing
If you need to adjust the sizing, start with a width equal to the mop-head width plus about 0.5 inch (1.3 cm) accounted for thickness. The length should match the mop-head length plus twice your desired pocket depth, with additional room for adjustments if necessary. Always check the fit against the actual mop head after washing to confirm your adjustments.
Care Instructions
- This cover is designed for use with manual mops only; refrain from using it with steam or powered mops.
- Follow the cleaning and maintenance advice for your floor type.
- Wash the cover after each use and ensure it dries fully to maintain shape and hygiene.
- No claims of disinfecting or antibacterial performance are made with this cover.
Useful Variations
You can experiment with various color combinations or weights of cotton yarn if you’re looking for a different style. Consider creating a multi-colored version or contrasting colors for the pockets versus the main body. This project can easily adapt to different sizes as well: simply adjust the starting chain and row counts as outlined above to create a cover for larger or smaller mops.
Troubleshooting
Why Is My Project Getting Wider?
If your piece starts to widen, check for missed stitches or accidental increases in your rows. Make sure to keep consistent tension throughout your work.
Why Does My Edge Look Wavy?
Wavy edges often result from inconsistent tension or incorrect stitch counts. Double-check that you are working the proper number of stitches per row.
Frequently Asked Questions
Can I use a different yarn weight?
If you do, the dimensions may change, and you’ll need to adjust your starting chain and gauge.
Is the pattern reversible?
No, this pattern is designed with a defined right side that will face outward.
Can I make it larger?
Yes! Use the custom sizing instructions provided to adjust the rectangle to your preferred dimensions.
Is there any special panelling needed for assembly?
No additional assembly techniques are needed beyond the simple sewing of edges as described.
Final Thoughts
The Reusable Flat-Mop Cover is a functional and environmentally friendly project that adds a personal touch to your cleaning supplies. With just a few stitches, you can create a useful item that not only enhances cleaning efficiency but also reduces the need for disposable alternatives. Enjoy the crafting process and the satisfaction of creating something that will be used around the house!



